Frank,
sounds like you have some quality parts so you should be OK.
Placement wise, try to keep the speakers about 3 feet from the back wall and 4 feet in from the side walls. Main thing is DON'T stuff them in the corners where you'll get sound reflections, try to keep the distances from the back wall and side walls different.........same reason.
Voicing the speakers is changing the resistor / inductor / capacitor values to your individule needs for your room and your tastes.
It takes a while to get it right but it's worth it. Great reason to keep the XOs external.
There has been a different XO design for the Thors made, I too had VERY nice XO components in the original design. .......I updated to the new design and like it better......not as shoutty and harsh.
We'll help you with any questions you may have.
Good luck, and we LIKE pictures!
Ron
fc911c said:
Hi Troy
thanks for the help, looking forward to seeing them.
I guess I could put the Xovers in an external box, good idea?
Frank
For Reputes boxes I put the port tube half in and half out the enclosure. I put a sub compartment on the bottom and slid the port tube through it into the top of the stands.
The cross overs are internal to the speaker enclosure, but not in the air space of the drivers. I almost potted them in the sub enclosures but decided against it.
Thanks for the help guys. I am going to pickup some of the material tomorrow. First I am going to make a cross cut jig for the table saw. I am also waiting for the circle jig and my router to come.
I am undecided on the finish it will get, maybe Black laquer or a venere. We shall see
I would really like to see the pedestal if you get a chance.
Thanks
Frank
I am undecided on the finish it will get, maybe Black laquer or a venere. We shall see
I would really like to see the pedestal if you get a chance.
Thanks
Frank
fc911c said:
I am undecided on the finish it will get, maybe Black laquer or a venere. We shall see
Thanks
Frank
Yeah, we all THINK about black laquer...............until we do a test sample and see how much work it is....


Keep us updated please. We like pictures
Ron
fc911c said:.........
I would really like to see the pedestal if you get a chance.
Thanks
Frank ..............
Harass him relentlessly.. He is innately lazy <like me> but will act if tormented enough.
http://www.diyaudio.com/forums/member.php?s=&action=getinfo&userid=1296
troystg said:
Harass him relentlessly.. He is innately lazy <like me> but will act if tormented enough.
http://www.diyaudio.com/forums/member.php?s=&action=getinfo&userid=1296
LOL ok I will.
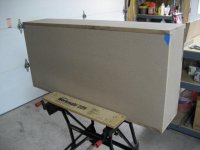
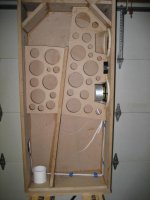
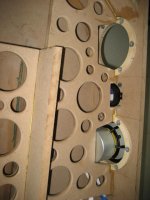
well I got quite a bit done I think, keep in mind this is my first attempt at making speaker cabinets. I cut all the boards to size for the Seas Thor and SL's Sub Bass thor.
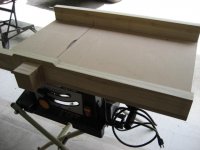
The first thing I did was to make a cross cut jig for the table saw, I'm glad I did as it really helped to keep the cuts square and for repetability. It was well worth it.
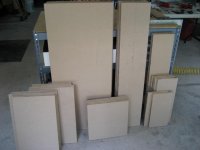
here are the parts test fitted, I am very happy how the cuts turned out.
Thanks
Frank
Attachments
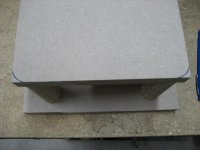
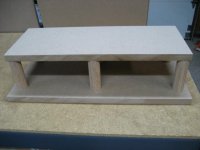
as for the pedistal I have an idea. I think I am going to use some 1 -1/4 round oak on all four corners and maybe 2 more in the middle down to a 1" or so base maybe a couple of inches wider on either side than the cabinets. also maybe rounding the front corners of the cabinets to match the radius the round oak. What do you guys think?
Is there a special glue for MDF or is wood glue ok?
also I would like to use the threaded inserts for the speakers mounting screws. Where can I get these and what size will I need?
I still have to to make the bracing with the holes. Does the one that is right behind the speakers touch the magnets on the woofers. I have the sheided ones.
How is the port attached to the cabinet?
Frank
Attachments
Frank,
Sorry, can't quite picture how your pedistals will look. Could you mock one up for us??? and yourself of course.
TiteBond wood glue, either #3 or 4, I like to use 1 coat on the endgrain of MDF and let it soak in, then glue both of the pieces in place and shoot a couple of pin nails into it while it drys. Never ever ever had a glue joint fail when done this way.
As far as the brace touching the backside of the driver.....I suppose it should, but mine don't and haven't had any problems with 'em yet. I have the ones with the rubber boot. I have several horizontal cross braces in addition to the one vertical brace though. Make sure you don't center the vertical brace, off set is better for sound wave cancellation.
You can get the threaded inserts from OSH (Orchard Supply Hardware) they have several styles to choose from. I like the ones that look like corkscrew picture holders for sheetrock. It is a VERY good idea to use 2 layers of MDF at the driver locations. Back bevel around the drivers to make them fit. 2 layers is plenty of support and you may not even need the threaded inserts, depends on what type of screws you mount drivers with. I used #8 Allen head.
I attached my front loaded port to the back side of the front Baffle with sub-floor adheasive. On a test chunk of wood route out a hole 1/4" deep that is the same as the outside diameter as the port tube. Snug fit is what you are after, glue it in place and let it dry. When it's dry, drill a large hole from the otherside into the center of the port tube. Use a flush cut router bit inside the port and Voila. instant perfect fit. I then used a 3/8" roundover as a flare to give it a finished look. However, as you are going to downfire your Thors, it doesn't have to be beautiful.
Thanks for the pictures.
Ron
Renron said:Frank,
Sorry, can't quite picture how your pedistals will look. Could you mock one up for us??? and yourself of course.
TiteBond wood glue, either #3 or 4, I like to use 1 coat on the endgrain of MDF and let it soak in, then glue both of the pieces in place and shoot a couple of pin nails into it while it drys. Never ever ever had a glue joint fail when done this way.
As far as the brace touching the backside of the driver.....I suppose it should, but mine don't and haven't had any problems with 'em yet. I have the ones with the rubber boot. I have several horizontal cross braces in addition to the one vertical brace though. Make sure you don't center the vertical brace, off set is better for sound wave cancellation.
You can get the threaded inserts from OSH (Orchard Supply Hardware) they have several styles to choose from. I like the ones that look like corkscrew picture holders for sheetrock. It is a VERY good idea to use 2 layers of MDF at the driver locations. Back bevel around the drivers to make them fit. 2 layers is plenty of support and you may not even need the threaded inserts, depends on what type of screws you mount drivers with. I used #8 Allen head.
I attached my front loaded port to the back side of the front Baffle with sub-floor adheasive. On a test chunk of wood route out a hole 1/4" deep that is the same as the outside diameter as the port tube. Snug fit is what you are after, glue it in place and let it dry. When it's dry, drill a large hole from the otherside into the center of the port tube. Use a flush cut router bit inside the port and Voila. instant perfect fit. I then used a 3/8" roundover as a flare to give it a finished look. However, as you are going to downfire your Thors, it doesn't have to be beautiful.
Thanks for the pictures.
Ron
Thanks Renron I will mock one up and take a pic. Thanks for the detailed answers to my questions, it will make my job a lot easyer.
Thanks
Frank
Frank,
Aaahhhh, now I get it! Thanks for the mock up. Looks good, and a cool idea. Be aware that the tweeter height will change accordingly and you may need to sit on a phonebook or two to get your ear to the "sweet spot" tweeter wise.
Looks like a good idea and I like the rounded front, are you planning on using a round over bit too?
Titebond is the original, the numbering system (original, 2, 2d, 3) came later in development. They are respectively; General purpose alaphatic glue, #2; a semi-waterproof approved for light outdoor duty a polyvinyl acetate, (2d) it's darker brother for dark woods, and the waterproof version #3, which is a polymer. Their suitability for cold weather applications is in reverses order, 3,2,original, 3 being the best for cold weather work but takes the longest to tack and dry completely. (I worked as a carpenter at Lake Tahoe (elevation ~6,200 ft.) and the glue often froze in the back of the truck overnight. The only one that worked in those temps was Titebond 3, after it was warmed up a bit. I used over 1/2 gallon on my build of the Thors. I also used it for the cherry wood veneer iron on lay-up. It worked flawlessly.
Ron
Hi Ron
yes I know I will have to adjust tweeter height, so I will just add layers to bottom of base. or get a lower chair LOL
I would like to match the Radius on both front corners all the way up the cabinets. I don't know if there is a router bit that big, 3/4 is the biggest I've seen.
Well back to work this week so I won't have a chance to work on them till the end of week.
Frank
Hi all
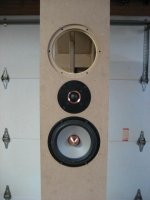
well I have one cabinet almost completed. I haven't much time to work on them and it took a lot longer than I thought it would.
I have a question on the batting amount used. I started with the recomended amount of 9 and 15 oz but it sounded muffled. I removed 9 oz from the rear compartment and it really sounded much better.
Can someone give me a idea of how much to use and where to put it? Does teasing the batting make a differance?
Thanks for the help
Attachments
Frank I might not be any help because mine have a different internal structure, no typical TL baffle like yours do. I have "tuned or voiced" mine to the way I like them, and how they sound where they are placed in the room. I have removed even more of the stuffing after each change. I LOVE the new crossover design and it being outside the "box". I have removed all the stuffing out of the bottom / last 1/3. I would recommend that you do NOT glue them up until you have an opportunity to live with them for at least a few weeks. Remember they WILL take about 80 hours to break in and sound their best. I'd be screwed if I could not have access to the internal chamber. I also replaced all the wireing to the drivers with different gauges for bass and tweets.
Only you can tell if you like the stuffing amount and how they sound in your listening room. If they sound muffled to you then take out some more stuffing until they sound boomy, then slowly replace stuffing and give'em a listen. If you pick one song that has great detail and use it as a guide, you'll soon hear the difference in stuffing amounts and locations inside the cabinets.
Your gonna love the Thors..............")
Ron
Only you can tell if you like the stuffing amount and how they sound in your listening room. If they sound muffled to you then take out some more stuffing until they sound boomy, then slowly replace stuffing and give'em a listen. If you pick one song that has great detail and use it as a guide, you'll soon hear the difference in stuffing amounts and locations inside the cabinets.
Your gonna love the Thors..............
Ron
Last edited:
Well folks, the weather is cooler and it's time for a good project. FWIW i will bring (yet another) Short Thor in solid cherry. Step by (oops) step.
So far thanks and kudos to all the contributors to the clarity thread. After going somwhat blind i found every last answer i had about this kit. Adam at madisoud even thought i knew what i was doing.
Here for all is a compliation for short thor projects. It is my offering and
is well intentioned as the widows mite. All i did was gather this info. I deserve no credit for any of this and wish none.
I do hope as has been the tradition in this thread that someone will add
to this. Maybe do the same for Small or Fat Thor.
This will not be a value oriented project. Don't look for injenuity. At 59 yrs old I learned if I throw enough money and time at job i will pull it off. That
should at least make this entertaining.
Anyhow that is it for today. The speakers are in the sllipery fingers of UPS
and I pick up lumber tomorrow.
So far thanks and kudos to
all the contributors to the clarity thread. After going somwhat blind i found every last answer i had about this kit. Adam at madisoud even thought i knew what i was doing. Here for all is a compliation for short thor projects. It is my offering and
is well intentioned as the widows mite. All i did was gather this info. I deserve no credit for any of this and wish none.
I do hope as has been the tradition in this thread that someone will add
to this. Maybe do the same for Small or Fat Thor.
This will not be a value oriented project. Don't look for injenuity. At 59 yrs old I learned if I throw enough money and time at job i will pull it off. That
should at least make this entertaining.
Anyhow that is it for today. The speakers are in the sllipery fingers of UPS
and I pick up lumber tomorrow.
Attachments
- Home
- Loudspeakers
- Multi-Way
- Clarity on Seas Thor Kit