I have been working on a pair of speakers off and on for a while now, but am unsure how to do this one aspect. What is the best or easiest way to make the front cloth grill for DIY speakers? While this has been touched on in earlier threads, there is not thread dedicated to this specialty task. Building a solid and beautiful wood box is discussed in many books, but try as I might, I have not found a reference to speaker grill construction.
Thank you,
Craig
Thank you,
Craig
I would make a cutout of the desired size of your grill out of 1/2" mdf, and staple or glue grill cloth to it, which you can get from Parts Express. They also sell things to easily hold the grills onto your speakers. I would put up some links, but I can't seem to access their site at this time.
--
Brian
--
Brian
I was planning on keeping the mdf part of the front grill as far away from the drivers as possible, and just using it as the outside frame for the grill and the inside part of the frame being empty.
As for routing, I was just going to leave square edges, since it is not too close to the drivers. My plan was to cut the mdf to size, and paint it black, and staple the grill material to it.
Now, I am thinking of just skipping the grills, since i love the look of the drivers, and the wood. The only real reason that I wanted to have the grills, was for the protection of woofers from those who like to poke at them, especially at parties.
--
Brian
Here's a little trick I found works well.
Once you have your baffle cut and finished (eg, with edges and corners rounded, or whatever you choos) apply the cloth as follows:
Stretch the grill cloth out on a large table and tape it down with duct tape such that it has some tension.
Spray the front side, edges, and part of the back, with some aggresive 3M spray-on adhesive (I can't remember the adhesive number right now, maybe 99 ?- Home Depot sells a couple different ones)
Wait a couple minutes for the adhesive to get tacky.
Press the grill onto the cloth and then undo the tape holding the cloth one piece at a thime while wrapping the cloth around the edges and pressing onto the back of the grill.
Once it dries you can cut away the excess cloth with a razor knife.
The key is using the right adhesive. Some will not stick to cloth well but the one I used works great. Sorry, I will have to post the adhesive number later....
hope this helps, -Brad-
Why don't you post a pic and see who can come up with the best grill?
Although I made grills traditional way I still find this one the easiest to do and in certain designs the best looking grill.
If you notice pieces of black foam on top and bottom cabinet, believe it or not but their presence is detectable by ear.")
Although I made grills traditional way I still find this one the easiest to do and in certain designs the best looking grill.
If you notice pieces of black foam on top and bottom cabinet, believe it or not but their presence is detectable by ear.
Attachments
I like the air filter idea, it brought a smile to my face. I must confess though I don't know how my wife, nor my todler for that matter, would take to it. On second thought, my todler son might like it a lot as it would be nice and soft...
Back to the question 3 posts up. I actually didn't go to the trouble of flush mounting the drivers. It is all part of the saga. I picked up some drivers and crossover components from madisound on clearance 4-5 years back on a wim. After leaving them sit for a year or so, I started working on the enclosure. No table saw, everything cut with a circular saw. This was before I learned the usefulness of clamps and a nice straight guide... Needless to say, I had a lot of sanding to do to get a tight fit. So, months later, I finally have a MDF box. With no router on hand while cutting the original panels, I of course did not counter sink the driver holes. Once the box was assembled, I realized that I could see the seams from my but joints a little too much. I tried wood filler but that did not sand as easily as the MDF edge and made things worse. Finally used plaster and that worked well. Now I had to decide on finish. At the time, I did not realize how easy it was to find veneer and though I would paint them flat black and then coat with way too many layers of urethane. It is amazing how little imperfections are highlighted by this selection of finishes. Needless to say, I have wanted to scrap this project many times. But, if I did that, how would I be able to get my wife to allow me to build a set of Adire 281 TL speakers now that I have done far more work on wood etc. and would have a more successful and enjoyable time. So, I have a 20" x 12" front baffle, with non-flush mounted tweeter and 8" driver, that needs to be covered with a grill that will make these speakers look presentable and salvage this project so that I can move on hopefully having learned some stuff in the process. At this point, I don't care if they even sound terrible, which they likely might. I can overcome that obstacle in negotiations. I just need to show that I can make them look nice in the end. So, how do I get a professional looking front grill that won't completely destroy the effort I tried to put into designing of the enclosure and crossover.
If the 1/2" MDF with beveled edge won't work what will? I had thought of using a accoustical ceiling tile in place of the MDF as it will not have the reflection problem, but the ceiling tile is difficult to get a nice edge on. Other ideas?
Craig
I must confess though I don't know how my wife, nor my todler for that matter, would take to it. On second thought, my todler son might like it a lot as it would be nice and soft...Back to the question 3 posts up. I actually didn't go to the trouble of flush mounting the drivers. It is all part of the saga. I picked up some drivers and crossover components from madisound on clearance 4-5 years back on a wim. After leaving them sit for a year or so, I started working on the enclosure. No table saw, everything cut with a circular saw. This was before I learned the usefulness of clamps and a nice straight guide... Needless to say, I had a lot of sanding to do to get a tight fit. So, months later, I finally have a MDF box. With no router on hand while cutting the original panels, I of course did not counter sink the driver holes. Once the box was assembled, I realized that I could see the seams from my but joints a little too much. I tried wood filler but that did not sand as easily as the MDF edge and made things worse. Finally used plaster and that worked well. Now I had to decide on finish. At the time, I did not realize how easy it was to find veneer and though I would paint them flat black and then coat with way too many layers of urethane. It is amazing how little imperfections are highlighted by this selection of finishes. Needless to say, I have wanted to scrap this project many times. But, if I did that, how would I be able to get my wife to allow me to build a set of Adire 281 TL speakers now that I have done far more work on wood etc. and would have a more successful and enjoyable time. So, I have a 20" x 12" front baffle, with non-flush mounted tweeter and 8" driver, that needs to be covered with a grill that will make these speakers look presentable and salvage this project so that I can move on hopefully having learned some stuff in the process. At this point, I don't care if they even sound terrible, which they likely might. I can overcome that obstacle in negotiations. I just need to show that I can make them look nice in the end. So, how do I get a professional looking front grill that won't completely destroy the effort I tried to put into designing of the enclosure and crossover.
If the 1/2" MDF with beveled edge won't work what will? I had thought of using a accoustical ceiling tile in place of the MDF as it will not have the reflection problem, but the ceiling tile is difficult to get a nice edge on. Other ideas?
Craig
Make a grill frame of 1/2" plywood with cutouts the exact size of the drivers, put a generous radius on the corners, round over the inside of the cutouts and paint the edges and front surface flat black. Stretch black double knit polyester cloth over the whole thing and staple to the back. Attach to cabinet with a dab of silicon sealer in each corner. Place speakers in shop for tunes when making a better pair.
I have a pair of Canton speakers that have a pressed metal grille with a million 2 mm holes ala Jap portable audio speaker grilles.
They dont do any serious sonic damage (better even), look really smart, and are totally little finger proof.
Eric.
You could even electrify them with a negative ion generator to dissuade little fingers and pets etc.
No idea of the sonic effects....... I'll dig one out of my archives and try it !.
They dont do any serious sonic damage (better even), look really smart, and are totally little finger proof.
Eric.
You could even electrify them with a negative ion generator to dissuade little fingers and pets etc.
No idea of the sonic effects....... I'll dig one out of my archives and try it !.
mrfeedback:
These grills do a great deal of sonic damage and anyway he's not going through the trouble of trying to form them even if he could find the perforated metal at the local hardware store.
But you be sure to let us know how the electrified version effects the sound.
What a lame post. Just another example of how threads deteriorate. The idea from Electro is just as bad.
BF - The Lame Misleading The Lame
The grilles on the Cantons are quite fine to my ear, and they are totally finger proof.
Do you have a problem with that 'Mr Sage Bill the Lame' ?.
Or is it your ego talking again ?.
Whilst I'm on the subject Bill far too many of your posts have been of the inflammatory kind, or just plain and rudely dismissive and not in the spirit of this forum - time for you to pull your socks up or pull your head in mate.
Eric.
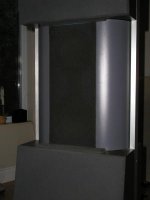
What about the new Krell's grills? D'Agostino liked Sonus Faber's Amati Homage grills so much that he asked them for permission to use same approach in his speakers.Those are rubber cords spread between two bars, bottom and top. The rubber strings supposedly decrease the reflective surface area.
Would they do sonic damage too?
Would they do sonic damage too?
Attachments

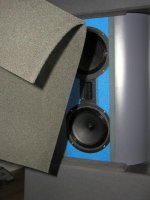
actually any grill that involves using 2 strips on the top and bottom of the box and a bunch of round string (SS wire, rubber cord etc..) is very good as round string does not seem to affect sound much. see (I use the term string looslely) ...
http://www.norh.com/products/norh9/index.html
http://www.norh.com/products/norh9/index.html
grill cloth experiment in progress
This is going to be a grill cover eventually. Once i settle on a tweeter i'll carve a hole in the wool-felt pad (salvaged from inside a dead Marsland) for the T, stiffen the pad with something (i'll try white wood glue to start), wrap some double-knit over it (salvaged from Ditton 25s) and velcro (salvage again) them to the box. The star helps kill some peakiness in the driver.
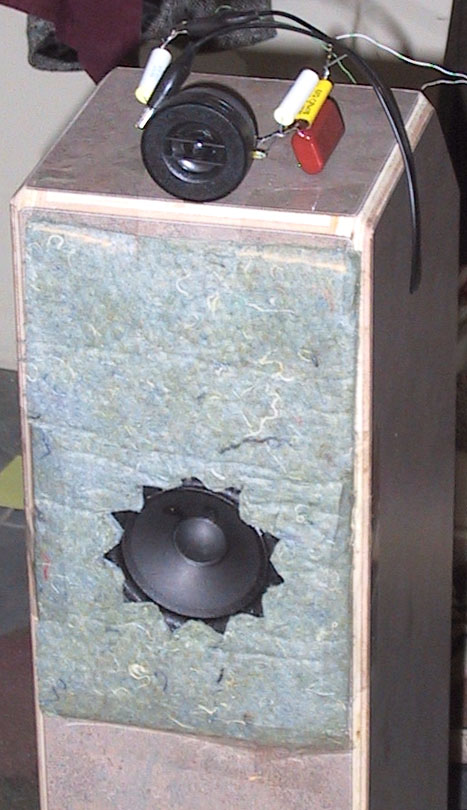
By the time i get these giant killer's tuned & finished they should still have cost less than $100 CAD (~$65 USD)out of pocket.
dave
This is going to be a grill cover eventually. Once i settle on a tweeter i'll carve a hole in the wool-felt pad (salvaged from inside a dead Marsland) for the T, stiffen the pad with something (i'll try white wood glue to start), wrap some double-knit over it (salvaged from Ditton 25s) and velcro (salvage again) them to the box. The star helps kill some peakiness in the driver.
By the time i get these giant killer's tuned & finished they should still have cost less than $100 CAD (~$65 USD)out of pocket.
dave
- Status
- This old topic is closed. If you want to reopen this topic, contact a moderator using the "Report Post" button.
- Home
- Loudspeakers
- Multi-Way
- How to construct grills?