Ok...
I have an 18 inch woofer that I picked up at a surplus store that didn't work. Right now I've dissasembled it into 3 pieces...some of it was already in different peices so not all the dissembling was my fault...
1) Voice Coil: Wound on a plastic former. The very top portion where it used to be attached to the suspension has some mild deformation, but other than that the majority of it looks fine. Electrical continuity is good so I suspect that on the whole it is ok.
2) Suspension and cone: Attached to eachother, I managed to detach both of these from the rest of the speaker without damaging them.
3) Magnet and frame: Still in good shape.
What I was wondering is how I would go about trying to repair this speaker, I know that I need to epoxy the VC back to the cone and reattach the tinsel leads, but is there an easy way to make sure that everything is all aligned? Also, is this even possible to save?
Any input would be appreciated.
Thanks,
Wes
Remove the dustcap and use very thin shims all the way around the pole piece between it and the voicecoil to center it. glue the spider and surround down without tension to any one direction. It is very hard to do right so dont be mad if you get a speaker that rubs. Remember to remove the shims when the glue is dry.
Time to play with cards
Not knowing the make or maodel of the driver I can give you some generic advice. To begin with be sure that the voice coil is still perpendicular to the motor structure ie: it slids in and out without touching the top plate or the pole piece. If this is still OK go to the next step. You have to remove the dust cap in the centre of the cone. With that off you should be able to see an even gap around the voicecoil former and the pole piece. You have to shim this space evenly with playing cards or business cards or what ever will fill the gap evenly. That should center the coil on the pole piece . It should do the trick. Use a good quality epoxy and make sure that if the cone is a polyprop type you clean the cone with some methyl alcohol. If it is a paper type than you will have no problems. You didn't say much about the spider. If it is still in good shape it can be glued back carefully with some epoxy to. Thing hard do a dry run and then glue it up.
Have fun!!
Mark
hi
only thing left out is - check the length of the winding on the coil
measure the top plate thickness - subtract this from the length of the coil and devide by 2
mark off this amont on the inside of the voice coil , (starting from the begining of the winding when looking from top) and when setting the coil with shims - insert upto this mark
this way u will be maintaining the x - max of the coi
suranjan das gupta
transducer design engineer l
These pdf's might help.
http://www.speakerbits.com/net/resources/pdf/gen_refm.pdf
http://www.speakerbits.com/net/resources/pdf/vc.pdf
http://www.speakerbits.com/net/resources/pdf/braid.pdf
For voice coil shims I prefer using clear polypropylene or acrylic covers they use in book binding. It's 0.3mm thick, quite stiff, slippery and doesn't tear. It's great as you can still see what you are doing as it's clear. I cut the corners at 6mm x 45º (helps when inserting), length 3 x VC dia (allows a gap at the join). Just cut as many as you need to fill the gap.
Attachments
I've been using 35mm films, Xrays or OHP sheets.
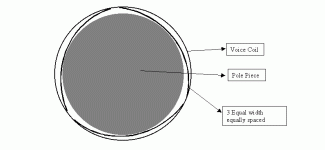
3 pieces of them cut into equal widths such that their width is less than 1/3 the perimeter of the voice coil.. Not much of a precision work...
Insert the shims such that they form the three sides of a virtual equilateral triangle between teh VC and the pole piece..
The voice coil will be held away from the pole piece as well as equally spaced, since the sheets will be bend at near equal angles and their edges support the voice coil (see fig).
The equal but small force excerted by all the 6 edges provides a uniform gap around the pole piece. This coupled with the voice coil vertical allignment gives extremely good results.
Sounds difficult...but is actually quite easy.
ajju
Attachments
- Status
- This old topic is closed. If you want to reopen this topic, contact a moderator using the "Report Post" button.
- Home
- Loudspeakers
- Multi-Way
- recentering a Voice Coil