A few months back I built some Synergy horns which were designed to be placed in a corner.
That worked pretty well. It's one of the few loudspeaker projects that's managed to last more than a few weeks before I was compelled to re-design it.
But the time has come to make some improvements, and I'll detail that in this thread.

This project was inspired by my Soundbar project* and my last Synergy project**, so check those out if you're curious how I got here.
* http://www.diyaudio.com/forums/multi-way/257787-soundbar-bateman-style.html
** http://www.diyaudio.com/forums/multi-way/266723-black-mirror.html
That worked pretty well. It's one of the few loudspeaker projects that's managed to last more than a few weeks before I was compelled to re-design it.
But the time has come to make some improvements, and I'll detail that in this thread.
This project was inspired by my Soundbar project* and my last Synergy project**, so check those out if you're curious how I got here.
* http://www.diyaudio.com/forums/multi-way/257787-soundbar-bateman-style.html
** http://www.diyaudio.com/forums/multi-way/266723-black-mirror.html
I'm sure you'll be including the mini-ambio on this project.
I'll be checking in on this thread.
You are correct! When I rented the SH50s I found that you can put the loudspeakers very very close together, and still get an excellent soundstage. This makes them ideal for ambio.
I think the reason is because the output of the midranges and tweeters is "contained" inside of the waveguide.
Synergy horns are rather unique in this respect; they're possible the only solution where everything from 350hz to 20khz is emanating from the same point *and* it's not radiating into the space where the other speaker is. A full range speaker can satisfy the first requirement, but not the second.
With some limitations can.. but not the second.
") . In CD horn.
. In CD horn. Just for fun had made 2way 15+3 today
.As Jason noted, this *will* be an ambiopole.

Here's what the ambiopole at Princeton University looks like.
I'm doing something similar, but with a couple of tweaks:
1) Princeton puts the speakers high above the ground, to minimize contamination from the floor bounce. I'm doing the opposite; I'm putting the speakers right *on* the floor, so there is no floor bounce; the floor extends the waveguide. This concept worked well in my 'Black Mirror' project, which I'm listening to right now
2) I'm trying to bury everything in a cabinet that's basically the size of an Ikea Kallax cabinet.
An externally hosted image should be here but it was not working when we last tested it.
The final product will look something like this
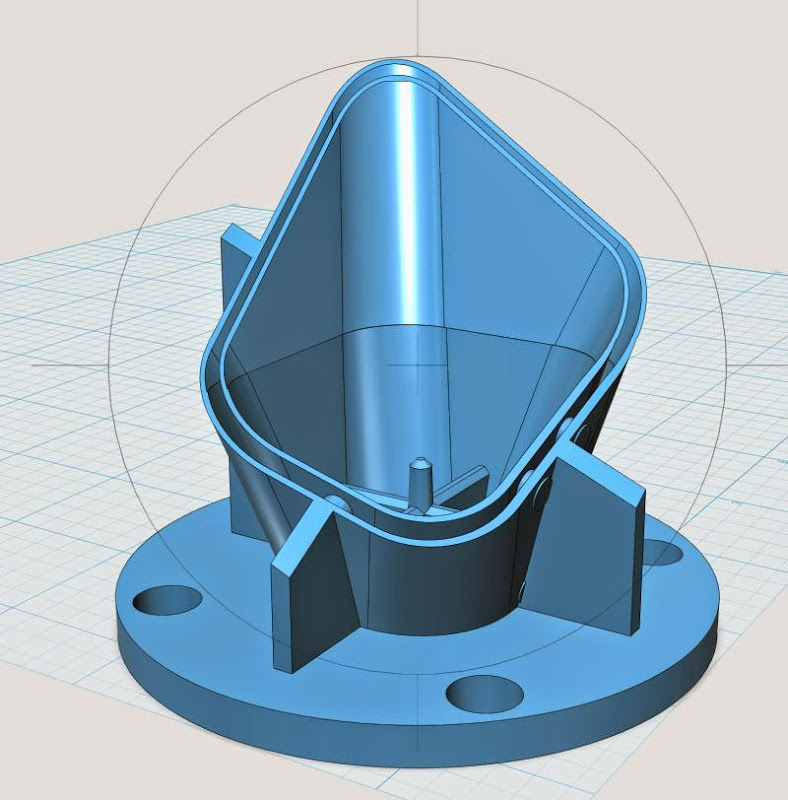
I'm a real big believer in having a really REALLY well crafted entry into the waveguide. IMHO, if you can't make a very very symmetrical and accurate entry, you're entire waveguide won't work correctly.
There are three ways to do this:
1) make it in wood, if your skills are very very good. (mine are not.)
2) buy a commercial waveguide. Honestly, this is the easiest, fastest and least expensive way to go
I need a funky entry into the waveguide, so I had to print mine. My entry costs about five bucks worth of plastic per side, and I printed it on my Printrbot.
If anyone is interested in making this project, I can upload the STL files so you can print them yourselves. I also uploaded it to Shapeways, to see what it would cost to have it printed online. Each "entry" is about $50. (Again, you save about 90% if you print it at home.)
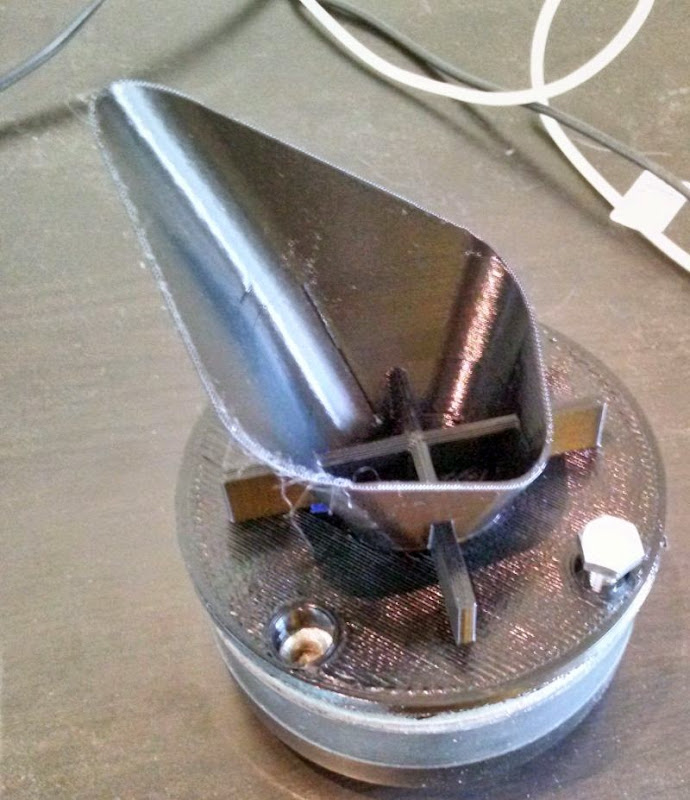

Here's the finished entry to the waveguide
If anyone is interested in making this project, I can upload the STL files so you can print them yourselves. I also uploaded it to Shapeways, to see what it would cost to have it printed online. Each "entry" is about $50. (Again, you save about 90% if you print it at home.)
Could you please? I'd love to mess with this kind of design but don't have enough 3d printing experience to do it on my own.
Could you please? I'd love to mess with this kind of design but don't have enough 3d printing experience to do it on my own.
I need to make some mods to the model before I upload it; basically the walls are too thin.
This wasn't a huge problem for me, I'll just reinforce them with fiberglass, but it will be simpler/faster for everyone else if I tweak the model to make the walls thicker.

If anyone wants to build this, here's some pics showing the dimensions.
Ideally, I'd publish a cut list, but my 3D software doesn't offer that option. (123D)
Sucks that Sketchup isn't free anymore!
Here's how to build this:
1) cut the bottom piece
2) cut the left and right sides
All of the interior pieces have crazy angles, and it gets a lot trickier. For the most part, I used 1/5" plywood in the model. This is insanely thin wood, but I intend to reinforce it with lots of braces and a liberal application of expanding foam. So basically the horn will be plywood and foam, somewhat like a surfboard. The main reason I'm using very thing wood is because of the angles; if I was using thick wood it would be imporant that the edges of all the parts are correct. With thin wall construction, that's not as critical.
The horn will have four twelves(!), four midranges, and two compression drivers. So the wood and foam construction has the benefit of keeping the weight down.
After laying out the bottom piece and the sides, I'm doing the "H" shaped piece in the center next. Again, the dimensions for that piece are pictured.
Yes Patrick,
I was always a believer of using controlled dispersion as the best catalyst for ambiophonics.
You were, so you are not anymore?
-----
@ Patrick,
That's a magnificent structure!
Is the 2nd drawing the front view? So the horn throats hug in the middle and toe out, it that right?
If anyone wants to build this, here's some pics showing the dimensions.
Ideally, I'd publish a cut list, but my 3D software doesn't offer that option. (123D)
Sucks that Sketchup isn't free anymore!
Here's how to build this:
1) cut the bottom piece
2) cut the left and right sides
All of the interior pieces have crazy angles, and it gets a lot trickier. For the most part, I used 1/5" plywood in the model. This is insanely thin wood, but I intend to reinforce it with lots of braces and a liberal application of expanding foam. So basically the horn will be plywood and foam, somewhat like a surfboard. The main reason I'm using very thing wood is because of the angles; if I was using thick wood it would be imporant that the edges of all the parts are correct. With thin wall construction, that's not as critical.
The horn will have four twelves(!), four midranges, and two compression drivers. So the wood and foam construction has the benefit of keeping the weight down.
After laying out the bottom piece and the sides, I'm doing the "H" shaped piece in the center next. Again, the dimensions for that piece are pictured.
Looks like a foam core build if i've ever seen one!
Looks like a foam core build if i've ever seen one!
Totally.
I wish there was somewhere to buy it.
When I lived in Oregon I could buy it easily, but NOBODY stocks it here in SoCal.
Home Depot offers 2x2 sheets of it, but you really need 4x8 sheets or at least 4x4 sheets to do a project properly.
I just checked, here's what I found:
1) There are zero boards anywhere within an hour of my house
2) I can drive a hundred miles and pick two up at a Home Depot near Los Angeles
3) I can buy it online for the same price, but the shipping is $70 per board and the minimum quantity is 48 boards(!)
I think this is a weather thing; the weather in SoCal is 70 degrees +/- 15% all year round, so nobody uses foamular in their houses. In Oregon, where I used to live, the temperatures vary from 20 degrees to 100 degrees.
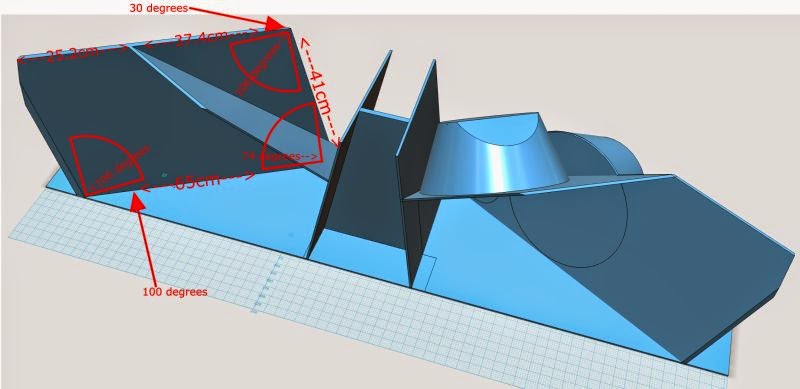
I simplified one of the panels. If you look at the previous pic, you'll notice that this panel is a lot more complex.
This revision of the panel is still quite complex, but at least it's only five sided now.
Note that the two opposite corners are 106 degrees; this simplifies cutting the panel. I increased the panel thickness from 0.2" to 0.5"
I just checked, here's what I found:
1) There are zero boards anywhere within an hour of my house
2) I can drive a hundred miles and pick two up at a Home Depot near Los Angeles
3) I can buy it online for the same price, but the shipping is $70 per board and the minimum quantity is 48 boards(!)
I think this is a weather thing; the weather in SoCal is 70 degrees +/- 15% all year round, so nobody uses foamular in their houses. In Oregon, where I used to live, the temperatures vary from 20 degrees to 100 degrees.
Try Dollar Tree on 8230 Mira Mesa Blvd or 6503 University Ave. 20x30in sheets $1 ea. get the white ones - more durable than black which is a very "crunchy" formulation.
- Status
- This old topic is closed. If you want to reopen this topic, contact a moderator using the "Report Post" button.
- Home
- Loudspeakers
- Multi-Way
- Synergy Sound Bar