Triton II Build
This is my second real box speaker build. I've built a number of ABS pipe speakers and a Metronome and have wanted to expand my experience to larger projects. My daughter needs a pair of speakers for her small living room for mixed music and home theatre use. I selected the Creative Sound Solutions Triton II kit as being a good solution and chose the Jim Griffon MLTL floor standing enclosure for as close to full range output as possible.
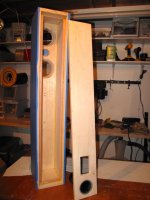
Years ago I picked up a piece of butcher-block countertop off-cut from Ikea and have always wanted to use it as front baffle material. My piece was just big enough for the slim MLTL cabinets and I had enough left over for caps on the cabinet tops. I used 18mm baltic birch for the rest of the box. The back is removable and affixes to cleats with many screws.
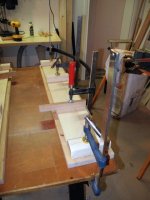
After cutting all of the birch ply pieces to size I started the build by laminating the front of box piece to the front baffle. I drilled a couple of screw holes to register the pieces in correct alignment when sloppy with glue. After glueing, screwing and clamping I let them dry before routing the driver cut-outs.
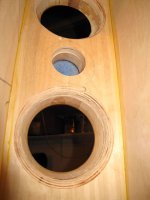
Here's where I ran into my first problem; I was working with 2.25 inches of material which was too much for my poor little .25 inch up-spiral router bit to reach through. The solution was to work from both sides to the center. Then came the related second problem, relieving the woofer cut-outs with a 45deg chamfer bit, which can only done from the back, could only proceed half the distance I needed to go. I looked around town for a much bigger bit without finding one in 45 deg but had to make do with a 22deg bit which had just enough reach. I think the amount of clearance for the woofers to breath at the back is very close to the same as for a 45deg relief cut. I have seen others make double thickness baffles by cutting out driver openings separately before laminating the thicknesses together and I will as well in the future.
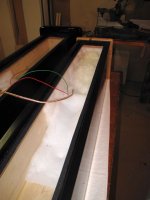
The box glue up was a straight forward glue and clamp process using the front baffle as a spine to mount sides, top and bottom.
I glued a piece of scrap oak inside the box as a cleat to attach the back panel, then drilled the screw holes to hold the back on before finishing.
I made rectangles of double thickness 18mm ply for a base, and made the top caps out of butcher block.
It was now time to fire up the router table to round over the edges on the base, top caps and front baffle sides. The router table made this simple and drama free, what a luxury.
Sanding was next and mostly by hand as all those round overs could be squared off quickly with the palm sander. The butcher block was dead easy to work, no trouble at all, sanded to 180 grit then about 5 coats of wipe on poly.
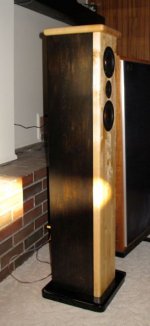
The birch ply was much more trouble. I planned an almost black stain and a smooth finish so sanded to 220 grit. I could not get rid of the ghosts of planer marks and had to call it quits as I was worried about going right through the top veneer. I applied a pre-stain treatment and two coats of ebony stain. Horrors! Dark blotchy patches, very light white grain patterns and a faint tiger stripe from the planer bruising. Since I had planned on a dark finish I decided to use some Minwax Polyshades in espresso to darken uniformly. NOT! This stuff is evil. The problem being that it cannot be applied evenly without spray equipment. Polyshades starts to "go off" immediately on application. Half a minute after being applied it becomes sticky and efforts to paint back into a wet edge result in pulling the stuff into uneven blobs. Thank god for sandpaper as careful between coat sanding brought some smoothness to the coverage. Three coats of satin wipe on poly gave a decent result, but what a struggle. I can see that I will have to learn to apply veneer and stop trying to get a stained high finish from birch.
The bases were finished in gloss black paint, with many coats, and screwed to the bottom of the cabinets. The caps got wipe on poly like the baffles and were screwed to the cabinet tops.
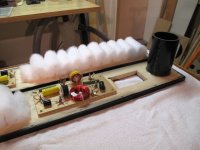
Assembling the crossovers was a breeze helped by the clear drawing supplied with the kit and they were mounted inside the back panels.
Drivers in, stuffing stuffed, back screwed on and were done.
This is my second real box speaker build. I've built a number of ABS pipe speakers and a Metronome and have wanted to expand my experience to larger projects. My daughter needs a pair of speakers for her small living room for mixed music and home theatre use. I selected the Creative Sound Solutions Triton II kit as being a good solution and chose the Jim Griffon MLTL floor standing enclosure for as close to full range output as possible.
Years ago I picked up a piece of butcher-block countertop off-cut from Ikea and have always wanted to use it as front baffle material. My piece was just big enough for the slim MLTL cabinets and I had enough left over for caps on the cabinet tops. I used 18mm baltic birch for the rest of the box. The back is removable and affixes to cleats with many screws.
After cutting all of the birch ply pieces to size I started the build by laminating the front of box piece to the front baffle. I drilled a couple of screw holes to register the pieces in correct alignment when sloppy with glue. After glueing, screwing and clamping I let them dry before routing the driver cut-outs.
Here's where I ran into my first problem; I was working with 2.25 inches of material which was too much for my poor little .25 inch up-spiral router bit to reach through. The solution was to work from both sides to the center. Then came the related second problem, relieving the woofer cut-outs with a 45deg chamfer bit, which can only done from the back, could only proceed half the distance I needed to go. I looked around town for a much bigger bit without finding one in 45 deg but had to make do with a 22deg bit which had just enough reach. I think the amount of clearance for the woofers to breath at the back is very close to the same as for a 45deg relief cut. I have seen others make double thickness baffles by cutting out driver openings separately before laminating the thicknesses together and I will as well in the future.
The box glue up was a straight forward glue and clamp process using the front baffle as a spine to mount sides, top and bottom.
I glued a piece of scrap oak inside the box as a cleat to attach the back panel, then drilled the screw holes to hold the back on before finishing.
I made rectangles of double thickness 18mm ply for a base, and made the top caps out of butcher block.
It was now time to fire up the router table to round over the edges on the base, top caps and front baffle sides. The router table made this simple and drama free, what a luxury.
Sanding was next and mostly by hand as all those round overs could be squared off quickly with the palm sander. The butcher block was dead easy to work, no trouble at all, sanded to 180 grit then about 5 coats of wipe on poly.
The birch ply was much more trouble. I planned an almost black stain and a smooth finish so sanded to 220 grit. I could not get rid of the ghosts of planer marks and had to call it quits as I was worried about going right through the top veneer. I applied a pre-stain treatment and two coats of ebony stain. Horrors! Dark blotchy patches, very light white grain patterns and a faint tiger stripe from the planer bruising. Since I had planned on a dark finish I decided to use some Minwax Polyshades in espresso to darken uniformly. NOT! This stuff is evil. The problem being that it cannot be applied evenly without spray equipment. Polyshades starts to "go off" immediately on application. Half a minute after being applied it becomes sticky and efforts to paint back into a wet edge result in pulling the stuff into uneven blobs. Thank god for sandpaper as careful between coat sanding brought some smoothness to the coverage. Three coats of satin wipe on poly gave a decent result, but what a struggle. I can see that I will have to learn to apply veneer and stop trying to get a stained high finish from birch.
The bases were finished in gloss black paint, with many coats, and screwed to the bottom of the cabinets. The caps got wipe on poly like the baffles and were screwed to the cabinet tops.
Assembling the crossovers was a breeze helped by the clear drawing supplied with the kit and they were mounted inside the back panels.
Drivers in, stuffing stuffed, back screwed on and were done.
Attachments
Great Triton MLTL build! I hope that you are enjoying their sound. They work best in small to medium size rooms as you have you stated in the your listening thread posting. My prototypes produce an out-of-the-box sound which is true to their heritage.
Good to hear that the LD22 tweeter version retains the magic in the original design. CSS supplies the Triton kit with the LD22 while Meniscus Audio still has parts kits for the original design with the LD25X tweeter.
Finally, my last name is 'Griffin'--not 'Griffon'.
Jim
Good to hear that the LD22 tweeter version retains the magic in the original design. CSS supplies the Triton kit with the LD22 while Meniscus Audio still has parts kits for the original design with the LD25X tweeter.
Finally, my last name is 'Griffin'--not 'Griffon'.
Jim
I haven't heard the LD25x version of the kit, so I couldn't say. Having worked aboard locomotives for some 30 years, I would say my ears are pre-rolled off, and my sonic opinions can be easily be dismissed. As a builder I am "measurement challenged" and offer no objective comparisons.
That said, my main living room speakers are IMF TLS80s and I've used just about all of the Fostex full range drivers over the years. I know the sound of an aggressive top end (Fostex) and a laid back top end (IMF).
I find that as built with the LD22s the Tritons offer plenty of high frequency detail, properly proportioned to the rest of the program material. Sort of like the porridge being neither too hot or too cold but just right.
Hope that helps.
I find that as built with the LD22s the Tritons offer plenty of high frequency detail, properly proportioned to the rest of the program material. Sort of like the porridge being neither too hot or too cold but just right.
Hope that helps.
You're always welcome to drag 'em up here to Calgary and I could measure them for you; I'd love to check em out anyways


- Status
- This old topic is closed. If you want to reopen this topic, contact a moderator using the "Report Post" button.