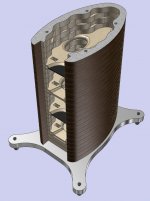
I'm starting this thread to show a different approach on the oval cabinet using 3/4" MDF.I'm not a big fan of full range speakers, but there are many that are good quality but none can reproduce as good as a mid-woofer and tweeter so that's my approach a 2-way line array using 12-mid-woofer's, 12 tweeter's. the woofer's are HiVi b3n ,RMS 10w, max 30w / 100-7000hz /8ohms. Tweeter's are a buy out @ PE / 1/2" Mylar, shielded , w/2.2Ω, 5 watt padding resistor , RMS/ 30 max/60 and to tone these tweeters down Ill put in a 100 watt L -pad & 2x2" ports . Here is a general idea of the shape. Another DIY Audio member Wesayo designed these. Measurements are 51 tall x 13"deep x 8-3/8"w these are internal measurements . These will be used for my TV ? stereo. Ill post pictures of my progress when I get started. 
Attachments
Last edited:
Your design
Yes my friend I told you hade a great design and I love so much for being different that I wanted to build for my self but I give you full credit for the design....Im planning on cutting out the parts Saturday and doing the router work Sunday Those are the only 2 days we have in the next 2 weeks that suitable temp wise to work outside 45-50 both days. My garage took 2 days of cleaning after my last speaker build so I'm taking it OUTSIDE.
Yes my friend I told you hade a great design and I love so much for being different that I wanted to build for my self but I give you full credit for the design....Im planning on cutting out the parts Saturday and doing the router work Sunday Those are the only 2 days we have in the next 2 weeks that suitable temp wise to work outside 45-50 both days. My garage took 2 days of cleaning after my last speaker build so I'm taking it OUTSIDE.
Here are my panels for the side of the cabinet along with a top and bottom. I decided to show this stage before beginning the kerffing as to show the rabbit cuts to receive the top, bottom and braces. these are 3/4" wide rabbits and the shorten work load from taking several passes you will want an industrial router ,mine is a 3hp. Makita this cut it in one pass. Anything less and you will burn up the motor pushing it this hard . Some may question the bracing being so close but remember the sides are kerffed and not as strong as solid wood ,the braces help remedy this condition. The next pictures will assembly. Stay tuned for the next episode
Attachments
![DSCN0201[1].jpg](/community/data/attachments/354/354544-2bedd95e1025070931d08f54927c9ced.jpg)
It will be 52.5 "tall x 12.5 deep with a 8.5" wide baffle stepped up 3/4" for the woofer side with open cell foam stepping down to the tweeter in 1/4"increments , this help with diffraction from the tweeter .... I have even kicked the idea around of a inverted angled baffle this approach which would look allot cleaner without the foam, but figuring the angle can be a bugger of math equations and a hair puller .....
Attachments
![DSCN0198[1].jpg](/community/data/attachments/354/354579-fa017ae346df44a7f6f108e07391efe3.jpg)

Hi. I'm a big fan of the translamination process. If I may, I'd like to make a suggestion. In the drawing you show each layer as one piece. When I do this process, I make the "ribs" with a cut at the back as well as the front. This will save you a ton of material when you start cutting.
Hi. I'm a big fan of the translamination process. If I may, I'd like to make a suggestion. In the drawing you show each layer as one piece. When I do this process, I make the "ribs" with a cut at the back as well as the front. This will save you a ton of material when you start cutting.
I agree docterbad the picture was of another DYI member but I'm building mine out of MDF as the pictures show , I only used his picture as reference to the style and shape. But thanks for your suggestion. I'm cutting allot of time of labor by making the sides out of MDF instead out the stack approach.
Speaker baffle's
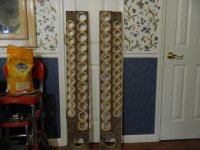
Wow! a lot of holes to punch out and recess, I had to also recess the back of the holes to allow for the 1-1/2" thickness and allow the woofer some breathing room. These HiVi 3" were not intended for 3/4" material let alone 1-1/2" so I recessed the back down to a 1/2" thickness this give space for terminal hookup.
Wow! a lot of holes to punch out and recess, I had to also recess the back of the holes to allow for the 1-1/2" thickness and allow the woofer some breathing room. These HiVi 3" were not intended for 3/4" material let alone 1-1/2" so I recessed the back down to a 1/2" thickness this give space for terminal hookup.
Wow! a lot of holes to punch out and recess, I had to also recess the back of the holes to allow for the 1-1/2" thickness and allow the woofer some breathing room. These HiVi 3" were not intended for 3/4" material let alone 1-1/2" so I recessed the back down to a 1/2" thickness this give space for terminal hookup.
Attachments
![DSCN0204[1].jpg](/community/data/attachments/360/360079-c2e82b799ea7b3c34cbefa5e3f3c356f.jpg)
Front baffles
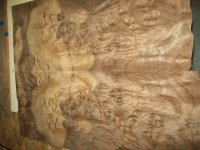
[/QUOTE]Its been a while since my last post but its cold here and slow going on progress but I started laminating and got the front baffles done. The sides are next, I'm having to veneer this in pieces rather than after assembly because of the oval design will not work with a veneer press. If your thinking you could us straps forget it because it takes a 800lb + of pressure to flatten out the veneer evenly and these are big panels at 31"x 51.5" More to come in the next few days .
[/QUOTE]Its been a while since my last post but its cold here and slow going on progress but I started laminating and got the front baffles done. The sides are next, I'm having to veneer this in pieces rather than after assembly because of the oval design will not work with a veneer press. If your thinking you could us straps forget it because it takes a 800lb + of pressure to flatten out the veneer evenly and these are big panels at 31"x 51.5" More to come in the next few days .
Attachments
- Status
- This old topic is closed. If you want to reopen this topic, contact a moderator using the "Report Post" button.
- Home
- Loudspeakers
- Multi-Way
- 2 way Line Array ( oval cabinet )