As I promised in the new member introductions, here’s my project introduced.
Making small coaxials is perhaps not the most exotic project but I figured out a useful way to make waveguides from epoxy/fiberglass. Those who have made molds know that it can be quite tedious.
I started this project because I need new front speakers in my music room/home theatre. The room has a bit difficult acoustics and I don’t want to start complete renovation to improve it. Thus I took the route of making speakers with controlled directivity. The drivers will be 8” coaxials (18Sound 8CX400F). I did some modeling using wavefront simulator of Hornresp and came to conclusion that a short conical horn should work.
So here is how I made the mold:
First I made a plywood frame with an opening which has the exact shape of the mouth of the waveguide. I also cut a disc which has the diameter of the throat.

Then I stretched thick construction plastic over the frame using lots of staples and gaffer tape.

Careful heating with a heat gun took all the wrinkles away.

The shape of the waveguide starts to form...

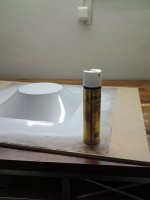
Some measurements in order to ensure that the disc is clamped to the correct position...

First I brushed a layer of epoxy with some colloidal silica mixed into it and then I laminated two layers of 300 gram glass cloth over the plastic. Not shown in this picture, but I reinforced the edges by two additional layers of 300 gram glass cloth. After this, I let the epoxy to set for two hours.

Then I applied a 1 - 2 cm thick layer of mixture of laminating epoxy and sandblasting sand. This will make the mold very strong.

The mold is reinforced by a MDF sheet...

…and here’s the mold. The shape is perfect and the surface is smooth but unfortunately there had been some air bubbles between the plastic and the laminate. I want the surface to be perfect and I will fix the bubbles and paint the mold with automotive filler/primer. That has to wait until the Christmas is over.

Merry Christmas!")
Making small coaxials is perhaps not the most exotic project but I figured out a useful way to make waveguides from epoxy/fiberglass. Those who have made molds know that it can be quite tedious.
I started this project because I need new front speakers in my music room/home theatre. The room has a bit difficult acoustics and I don’t want to start complete renovation to improve it. Thus I took the route of making speakers with controlled directivity. The drivers will be 8” coaxials (18Sound 8CX400F). I did some modeling using wavefront simulator of Hornresp and came to conclusion that a short conical horn should work.
So here is how I made the mold:
First I made a plywood frame with an opening which has the exact shape of the mouth of the waveguide. I also cut a disc which has the diameter of the throat.
Then I stretched thick construction plastic over the frame using lots of staples and gaffer tape.
Careful heating with a heat gun took all the wrinkles away.
The shape of the waveguide starts to form...
Some measurements in order to ensure that the disc is clamped to the correct position...
First I brushed a layer of epoxy with some colloidal silica mixed into it and then I laminated two layers of 300 gram glass cloth over the plastic. Not shown in this picture, but I reinforced the edges by two additional layers of 300 gram glass cloth. After this, I let the epoxy to set for two hours.
Then I applied a 1 - 2 cm thick layer of mixture of laminating epoxy and sandblasting sand. This will make the mold very strong.
The mold is reinforced by a MDF sheet...
…and here’s the mold. The shape is perfect and the surface is smooth but unfortunately there had been some air bubbles between the plastic and the laminate. I want the surface to be perfect and I will fix the bubbles and paint the mold with automotive filler/primer. That has to wait until the Christmas is over.
Merry Christmas!
I want the surface to be perfect and I will fix the bubbles and paint the mold with automotive filler/primer.
niiice
hmm, if its a mold, you would have to do careful wet sanding and lots of polishing in any case anyway
but I suppose you already know this, and how to do it

niiice
hmm, if its a mold, you would have to do careful wet sanding and lots of polishing in any case anyway
but I suppose you already know this, and how to do it
Yes, normally I would apply 2-k primer and thick layer of top coat, wet on wet... Then wet sanding and polishing. Tedious and messy.
In this case I want matt surface and I just apply primer and do wet sanding only. This gives nice satin-like surface and much less work is needed.
Last edited:
The project continues…
The surface of the mold was quite good and needed only two layers of primer paint. Then I wet-sanded it using 800-grit sandpaper.

The surface must be waxed at least six times. Hard carnauba wax is the best for this purpose, liquid and silicon waxes must never be used. The wax must dry a couple of hours after each waxing.

Meanwhile I cut three rings of 4 mm plywood. These will support the drivers.

After waxing, release agent is applied. Release agent is water soluble polymer that forms a very thin film on the surface of the mold. Extra-strong hairspray is very good for this purpose. First I sprayed a thin mist on the surface, let it dry for 15 minutes, and then I sprayed more generously.

Everything must be ready and available when the laminating work begins. I cut 20 pieces of 80 gram and 300 gram cloth, size of them is about 10 x 15 cm. Pieces of sponge are used for laminating; first I spread epoxy resin on the surface, then I apply pieces of cloth by patting them gently on the surface with a sponge.

Epoxy does not smell bad but it is very harmful. Personal protection is of utmost importance. I protect myself with cotton and nitrile gloves and wear a gas mask, and I have good ventilation in the room.
First layers of thin 80 gram cloth have been laminated. Thin cloth on the surface prevents formation of small pinholes.

Several layers of thick 300 gram cloth…

The driver support ring is aligned to correct position…

…and pressed against the wet laminate by some weight. I will reinforce the support ring afterwards.

And voilà, an almost perfect waveguide! It released easily from the mold, and the mold must be cleaned and waxed again before making a new one. I will make the rest of them during the next week.

The surface of the mold was quite good and needed only two layers of primer paint. Then I wet-sanded it using 800-grit sandpaper.
The surface must be waxed at least six times. Hard carnauba wax is the best for this purpose, liquid and silicon waxes must never be used. The wax must dry a couple of hours after each waxing.
Meanwhile I cut three rings of 4 mm plywood. These will support the drivers.
After waxing, release agent is applied. Release agent is water soluble polymer that forms a very thin film on the surface of the mold. Extra-strong hairspray is very good for this purpose. First I sprayed a thin mist on the surface, let it dry for 15 minutes, and then I sprayed more generously.
Everything must be ready and available when the laminating work begins. I cut 20 pieces of 80 gram and 300 gram cloth, size of them is about 10 x 15 cm. Pieces of sponge are used for laminating; first I spread epoxy resin on the surface, then I apply pieces of cloth by patting them gently on the surface with a sponge.
Epoxy does not smell bad but it is very harmful. Personal protection is of utmost importance. I protect myself with cotton and nitrile gloves and wear a gas mask, and I have good ventilation in the room.
First layers of thin 80 gram cloth have been laminated. Thin cloth on the surface prevents formation of small pinholes.
Several layers of thick 300 gram cloth…
The driver support ring is aligned to correct position…
…and pressed against the wet laminate by some weight. I will reinforce the support ring afterwards.
And voilà, an almost perfect waveguide! It released easily from the mold, and the mold must be cleaned and waxed again before making a new one. I will make the rest of them during the next week.
... I was thinking of superelliptical shape also.
elliptic might be a really great match for your method
and shape the wood edge round, where the poly film is pulled down
elliptic might be a really great match for your method
and shape the wood edge round, where the poly film is pulled down
This is not a promise, but I might try elliptical waveguides later, maybe during this winter. This method is perhaps not the easiest DIY method but it makes possible to make difficult shapes quite easily.
So happy to see it working this well. You certainly inspire.
Thanks for the kind words
This is not a promise, but I might try elliptical waveguides ...
I forgot you are doing it for an 8"
elliptic might get much bigger
so probably better for smaller drivers
shape looks great on this photo
Attachments
While we are at it I might throw more questions =)
Where do you expect to control directivity with the waveguide, in the crossover region of the cone driver or on the compression driver? Are you doing it for more gain at X frequency or to control dispersion? Or are you doing it becaise you can?
Where do you expect to control directivity with the waveguide, in the crossover region of the cone driver or on the compression driver? Are you doing it for more gain at X frequency or to control dispersion? Or are you doing it becaise you can?
While we are at it I might throw more questions =)
Where do you expect to control directivity with the waveguide, in the crossover region of the cone driver or on the compression driver? Are you doing it for more gain at X frequency or to control dispersion? Or are you doing it becaise you can?
Good questions. I'm not an expert in this area, so please guide me if I get too deep in the forest...
I am expecting better control of directivity and dispersion in the crossover region of the cone driver. I tried to simulate this behavior with Hornresp wavefront simulator. However, simulations don't tell the whole truth and I'm planning to do proper measurements and comparison to direct baffle when the speakers are ready.
Hello Erkki, nice work.
Recently I saw a work colleagues custom car door pods.
His method was to stretch a polyester cloth over a forming board, similar to your method, but no creases/wrinkles to contend with.
He then soaked polyester resin into the cloth, and allowed that to set.
This forms a shaped stiff layer that can be back filled with glass fibre matt, and more resin, building the thickness up in layers....ala boat building.
The resin soaked cloth then forms the visible surface of the assembly, and this can be left as is, or painted etc.
The driver mounting ring is also locked into the glass/resin.
His result is visually very professional, and extremely durable/inert.
Dan.
Now I have molded all the waveguides I need but my friend got interested and I will make a pair for him also. Now it's been quite easy; I just wax the mold once, spray the hairspray over the surface, cut cloth to pieces and start laminating. About an hour and it's done.
I will start making the enclosures in the weekend (perhaps). Unfortunately I don't have the drivers yet. I ordered (and paid) them in early November but the dealer said there were no drivers available and production was scheduled to December...
I will start making the enclosures in the weekend (perhaps). Unfortunately I don't have the drivers yet. I ordered (and paid) them in early November but the dealer said there were no drivers available and production was scheduled to December...
- Status
- This old topic is closed. If you want to reopen this topic, contact a moderator using the "Report Post" button.
- Home
- Loudspeakers
- Multi-Way
- Two-way coaxial loudspeakers with molded waveguides