How do you all make the endcaps? They are there for decoration and to hide the ends of the cloth. I plan to make them out of oak, and stain them to match the trim on my Magnepan speakers. I'm thinking almost of sending them to a professional wood shop to get the cut, cause I have nothing that can remotely make a perfect circular cut that will be 13" or so.
Well, if you have some time on youre hands, I have a way to make perfect circles without fancy tools. I made the endcaps triple layer (mdf in my case), two layers smaller fitting inside the tube, and one outside, but gluing them all together so they formed simple plugs. As far as the perfect circles go, this is time consuming, but works:
Draw slightly oversized circles for both interior and exterior parts of the endcap, and cut them with a jigsaw, trying to get as close as possible, but making sure that the cuts are always larger than the circle needs to be. if you are using two layers inside the tube, match the two smaller pairs of circles as close as possible and glue them together, making two double layer circles. THEN, stack the smaller and larger circles into two piles. take one of the piles, and try to center them on top of each other as much as possible, but MISMATCH the flaws in the cuts. Then sand them smooth using an orbital sander. keeping them centered again, rotate them until they are mismatched again (about 1/3 rotation), and sand them smooth again. repeat this process several times until no matter how you turn them, the edges no longer mismatch, and PRESTO, you have two perfect circles ( i know, im insane for doing it this way, but its the only way i could think of getting flawless circles using only a hand sander and a jigsaw)
Draw slightly oversized circles for both interior and exterior parts of the endcap, and cut them with a jigsaw, trying to get as close as possible, but making sure that the cuts are always larger than the circle needs to be. if you are using two layers inside the tube, match the two smaller pairs of circles as close as possible and glue them together, making two double layer circles. THEN, stack the smaller and larger circles into two piles. take one of the piles, and try to center them on top of each other as much as possible, but MISMATCH the flaws in the cuts. Then sand them smooth using an orbital sander. keeping them centered again, rotate them until they are mismatched again (about 1/3 rotation), and sand them smooth again. repeat this process several times until no matter how you turn them, the edges no longer mismatch, and PRESTO, you have two perfect circles ( i know, im insane for doing it this way, but its the only way i could think of getting flawless circles using only a hand sander and a jigsaw)
jasper jig
I picked up a plunge router from home depot for a $100 and use the jasper circle jig from parts express. It's almost $200 for router, jig, and cutting bit but you can't cut a better circle.
I've seen people use zip saws to cut decent circles in mdf but it proably won't do a good job on oak.
I picked up a plunge router from home depot for a $100 and use the jasper circle jig from parts express. It's almost $200 for router, jig, and cutting bit but you can't cut a better circle.
I've seen people use zip saws to cut decent circles in mdf but it proably won't do a good job on oak.
The proper way is as ultrachome has done but over the years I have cut circles various lowtech ways. Start out with a ruff circle by cutting with a jig saw or coping saw. Next, find the center of the circle and either drill a hole though or partially if you what one side is to be unholely. Drill the same bit into a scrape piece of ply which is bigger that the circle and use as the the center pin. Now you can spin the circle CAREFULLY around the jig on a tablesaw(this works well but is quite scarey), against a drum sanding attachement on a drill press or even a sabre saw thats been mounted to the jig from underneath with screws.
These are crude methods but work well if you take your time to ensure that everything is properly clamped and secured to eliminate slop and go SLOW.
I cut all my circles/holes with a non-plunge router mounted on a piece of .25" aluminum plate. I create a new pivot point on the drill press each time I need a new diameter and make it with an engraver. The plate has a handle mounted on it for super stability.
amt
Hmmm... well right now I am redoing a 5 year old sonotube setup I had slapped together when I was in high school using a Cerwin Vega car sub. I calculated the response and ports with a program on a laptop computer in the parking lot when I was buying the woofer a long time ago. Its home depot sonotube, thats taped together with particle board as the ends. Its also spray painted. However, it surprisingly sounded very good and blended so well with the main speakers that I never changed it.
I have some spare time now and I bought this much higher quality sonotube from a local concrete supply distributor and its much thicker and 1 continuous piece. Its also already 6 feet so now more cutting is required. This time I'm going to use MDF instead of the particle board and am going to do a good job making it look pretty. I have an extra grille cloth for my Magnepan speakers and I will use it to wrap the tube. I'll have to get it hemmed down at a taylor but that shouldnt be a big deal. Cant wait to hear how it sounds.
I'd really like to get the jig and router.... now that I think about it I have cut alot of circles with jigsaws before, never worked that well.
I made my own circle jig from an 8: x 18" piece of 1/4 plywood bolted to the base of my router. Like the jasper jig, I drive a nail through the ply to serve as a center point. Sometimes takes a few tries to get the diameter correct, so test on scrap before your good stuff.
With a 1/4" straight bit I wouldn't try to cut more than 1/8" per pass in oak, you'll bog down the router and risk scorching the wood.
Route a groove 1/16" or so larger in diameter than your tube on the bottom of the cap, wide enough to fit the tube into to cover the ends of the fabric.
With a 1/4" straight bit I wouldn't try to cut more than 1/8" per pass in oak, you'll bog down the router and risk scorching the wood.
Route a groove 1/16" or so larger in diameter than your tube on the bottom of the cap, wide enough to fit the tube into to cover the ends of the fabric.
An externally hosted image should be here but it was not working when we last tested it.
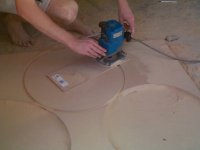
This is a pic of my setup. You can see my old ghetto rigged sub. You can also see the tube that it will be replaced with. The cloth on the Magnepan is the cloth thats gonna go over the sub. You can also see the wood trim on the Maggie. I want it to complement each other. The maggies insides are a black base so once again I'll coat the tube black. I have 6 feet tall speakers and a 6 foot sub
") Its tuned down low, I think I tuned it for 20 Hz and it sounds awesome with movies and music. So now you can see how I'm trying to do the end caps and use spikes instead of those concrete blocks to raise the sub up to let the ports breathe.
Its tuned down low, I think I tuned it for 20 Hz and it sounds awesome with movies and music. So now you can see how I'm trying to do the end caps and use spikes instead of those concrete blocks to raise the sub up to let the ports breathe.I prefer solid state Anyway, what I'm probably going to do, is just make the MDF circles out of my standard jig saw. It does an adequate job. I will probably do this one 2 sheets thick (or 1.5" at .75" each stack of MDF). I will then worry about the end caps later. I too am a college student but I'm god awefully poor right now.
Anyway, what I'm probably going to do, is just make the MDF circles out of my standard jig saw. It does an adequate job. I will probably do this one 2 sheets thick (or 1.5" at .75" each stack of MDF). I will then worry about the end caps later. I too am a college student but I'm god awefully poor right now.thats the great thin about the tubes, i think i made em look pretty good (4 of em) for like $80 in materials.
I did 5 peerless CC line 8 inch woofers. Sounds great. Pretty cheap for 4 TL line enclosures, plus if you ever want to demonsrate the power of the encolsure over sound, you can just take the tube out of the socket and people get amazed.
Like i said, i'll put the pics up in a week or so.
I did 5 peerless CC line 8 inch woofers. Sounds great. Pretty cheap for 4 TL line enclosures, plus if you ever want to demonsrate the power of the encolsure over sound, you can just take the tube out of the socket and people get amazed.
Like i said, i'll put the pics up in a week or so.
I made my own circle jig from an 8: x 18" piece of 1/4 plywood bolted to the base of my router. Like the jasper jig, I drive a nail through the ply to serve as a center point. Sometimes takes a few tries to get the diameter correct, so test on scrap before your good stuff.
I used the same method as BobEllis. One tip I have is make the plugs very tight, then round the inside edge with a curved router bit, this will make it easier the push in when the material has been folded over the edges.
Attachments
I found the solution guys- turns out my dad actually bought this all in one cutter thinga ma bob from Sears a while ago. Its been sitting in his car doing nothing. One of the attachments is a plume router base. The other is- a CIRCLE CUT GUIDE! Woo hoo! It will do up to 12", so ths might just work. I wonder if I can use the Jig (either made or from partsexpress) for larger woofers or my end caps. Ill try to cut the ports and the caps with this tool to see how it goes.
- Status
- This old topic is closed. If you want to reopen this topic, contact a moderator using the "Report Post" button.
- Home
- Loudspeakers
- Multi-Way
- Sonotube Sub "endcaps"