Call me a clutz.........I dropped one of my JBL's from about five feet. Visually, the speaker looks fine, however the board inside is cracked, and the tweeter & the mid-range does not work - and the woofer sounds wrong. A series of questions:
1. How do I break the seal between the woofer and the speaker box to in-turn get at that board?
2. Assuming I can get to that board - can I repair it? (It looks like the board cracked right where a capacitor is soldered into that board.)
3. What else should I look for?
4. Any thoughts on how I should solve this?
If you can't tell by my questions - I am near rookie-status at anything like this. So any and all insights would be appreciated!
Thanks for any help! Jennerz
JBL SW36AWII's - images of problem
Thanks for insights Cal!
Here are the images that show the issue(s) I am trying to solve.
Six images attached:
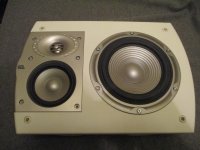
1st - the speaker/enclosure I am trying to get into
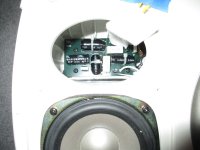
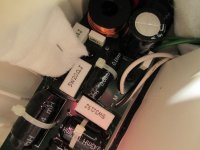
2nd - the easiest access to get to the board that is cracked
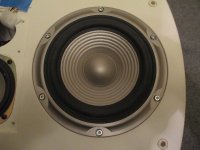
3rd - the woofer that is sealed to the enclosure, that I (think I) need to remove, to get to the other half of the board to remove it, to work on it.
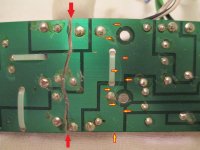
4th - edited, arrowed image to show where crack is on the board
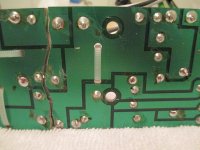
5th - a close-up, to show the extent of the crack
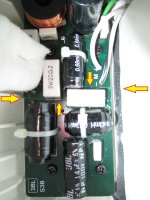
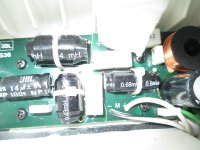
6th - an image that shows the most likely impacted components by the cracked board.
I can easily get access half of the board, however, it appears I have to un-seal the woofer from the enclosure in order to get to the other side of that board - so that I can remove it to work on it.
So here's what I am hoping for help with:
1. How do I best break the seal between the woofer and the enclosure to to in-turn get at the other side of that board that is cracked?
2. Assuming I can get to that board - any thoughts on how to best repair it? Are the caps, etc.. likely okay, and still useable?
3. What else should I look for/consider?
If you haven't figured-it-out by my terminology - I know just-enough-to-be-dangerous.......so any and all insights would be really appreciated!
Thanks! Jennerz
Thanks for insights Cal!
Here are the images that show the issue(s) I am trying to solve.
Six images attached:
1st - the speaker/enclosure I am trying to get into
2nd - the easiest access to get to the board that is cracked
3rd - the woofer that is sealed to the enclosure, that I (think I) need to remove, to get to the other half of the board to remove it, to work on it.
4th - edited, arrowed image to show where crack is on the board
5th - a close-up, to show the extent of the crack
6th - an image that shows the most likely impacted components by the cracked board.
I can easily get access half of the board, however, it appears I have to un-seal the woofer from the enclosure in order to get to the other side of that board - so that I can remove it to work on it.
So here's what I am hoping for help with:
1. How do I best break the seal between the woofer and the enclosure to to in-turn get at the other side of that board that is cracked?
2. Assuming I can get to that board - any thoughts on how to best repair it? Are the caps, etc.. likely okay, and still useable?
3. What else should I look for/consider?
If you haven't figured-it-out by my terminology - I know just-enough-to-be-dangerous.......so any and all insights would be really appreciated!
Thanks! Jennerz
Attachments
-
 JBL S36AWII - a) Speaker.JPG438 KB · Views: 147
 -
 JBL S36AWII - b) Board Access.JPG320.8 KB · Views: 144
 -
 JBL S36AWII - c) Sealed Woofer.JPG431.7 KB · Views: 139
 -
 JBL S36AWII - g) Board Cracks.jpg452.2 KB · Views: 139
 -
 JBL S36AWII - e) Extent of Crack.JPG451.1 KB · Views: 135
 -
 JBL S36AWII - f) Board's Components.JPG437.2 KB · Views: 68
you'll be doing the repairs on the underside of the board, so a pic of that would be useful
edit: I see you haven't got it out of the box yet, if you need to disconnect any wires from the drivers make a careful note of where they're connected...
if you undo the screws holding the xover board down, it may come out of the tweeter hole?
edit: I see you haven't got it out of the box yet, if you need to disconnect any wires from the drivers make a careful note of where they're connected...
if you undo the screws holding the xover board down, it may come out of the tweeter hole?
Last edited:
Thanks for your input. My first-step issue/question is: it appears that in order to get to all the screws that hold the board down, I need to get the woofer out. I can get to four screws through the tweeter hole, but the board will still not budge - so I can only assume there are more, at a place I can not see or get to - that's why I think I need to get the woofer out....but it is both screwed in, and sealed in - I can get the torx screws out, but have no idea how to approach the seal. It is very solidly attached to the enclosure by that sealant. Any ideas? I obviously don't want to do anything do damage either the speaker, or the enclosure - so I am going slowly.
I will certainly take your suggestion about numbering and noting everything! Thanks.
Once I can get the board out, I will post better pics of the top, as well as images of the underside of the board.
Thanks again for your help! It's simply no fun not having any music! This pair is all I have - I move them inside or outside, depending on where I am at. I can't wait to get them fixed! Thanks again!
Remove Woofer from All-Weather Enclosure?
I need to remove the woofer from one of my JBL S36AWII's - so that I can get to and remove a cracked crossover board, deep inside the enclosure - to then be able to try and repair it.
What is the most effective way of breaking that weather-resistant seal - that has the woofer attached to the box - without damaging either the woofer or the enclosure?
Thanks for helping with such an easy question.....but, everyone was a rookie at some point in time.....Jennerz
Attachments


I need to remove the woofer from one of my JBL S36AWII's - so that I can get to and remove a cracked crossover board, deep inside the enclosure - to then be able to try and repair it.
What is the most effective way of breaking that weather-resistant seal - that has the woofer attached to the box - without damaging either the woofer or the enclosure?
Probably just need careful try-it-and-see because many modern products are not built with any consideration of repair, so not intended to be disassembled.
Careful work with paint scraper or similar to mechanically separate the woofer.
There are some products to de-bond sealants. One is in the WEST Marine website, for yacht repairs. Need to be careful not to affect any other plastic parts. Difficult to predict unless you know exact composition of sealant etc. Box is made of ?
At least the board repair is obvious, just solder wire jumpers across broken traces. Unlikely to be any problems with internal breaks of components.
Tell us how it works out, best of luck.
David
Last edited:
Cracked Cross-Over Board - Needs Help
Thanks to everyone for their help so far. Great learning experience.
Next request for assistance: How do I approach fixing the cracked board?
I was finally able to get the woofer dislodged from the enclosure. The trick that finally worked was to use a heat gun, which made the seal plyable enough to pry the woofer off the plastic - and with no damage.
Now for the repair.....
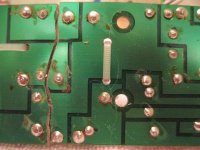
I have attached three images of the cracked crossover board:
1. The first highlights two cracks that exist. The red solid arrow is the obvious, major one - I assume that is the only one that will need to be fixed. The yellow with red outlined arrows point to a micro-crack...it doesn't appear to go through the board.
2. A general picture of the PCB.
3. A close-up of the board and the crack(s).
If someone can tell me how to approach fixing this (these) cracks, I would really appreciate it. As I mentioned in a previous post...these are my only speakers - and I really want to get them back and running. THANKS!
Thanks to everyone for their help so far. Great learning experience.
Next request for assistance: How do I approach fixing the cracked board?
I was finally able to get the woofer dislodged from the enclosure. The trick that finally worked was to use a heat gun, which made the seal plyable enough to pry the woofer off the plastic - and with no damage.
Now for the repair.....
I have attached three images of the cracked crossover board:
1. The first highlights two cracks that exist. The red solid arrow is the obvious, major one - I assume that is the only one that will need to be fixed. The yellow with red outlined arrows point to a micro-crack...it doesn't appear to go through the board.
2. A general picture of the PCB.
3. A close-up of the board and the crack(s).
If someone can tell me how to approach fixing this (these) cracks, I would really appreciate it. As I mentioned in a previous post...these are my only speakers - and I really want to get them back and running. THANKS!
Attachments
Nice to learn that you were able to remove the woofer.
I would just solder bare copper jumpers across the cracks as drawn below.
After a test that all is fixed you could reinforce the board with a quick-set epoxy and cloth. Glass cloth would be nice if you can obtain the small piece you need as an off-cut, but hardly worth the cost if you have to buy a yard or some similar minimum. Just a few layers of cotton would work fine. Or any simple reinforcement that you can do cheaply, a scrap of plywood and glue would be fine - Be proud to use appropriate tech")
Best wishes
David
I would just solder bare copper jumpers across the cracks as drawn below.
After a test that all is fixed you could reinforce the board with a quick-set epoxy and cloth. Glass cloth would be nice if you can obtain the small piece you need as an off-cut, but hardly worth the cost if you have to buy a yard or some similar minimum. Just a few layers of cotton would work fine. Or any simple reinforcement that you can do cheaply, a scrap of plywood and glue would be fine - Be proud to use appropriate tech
Best wishes
David
Attachments

Last edited:
Jennerz, Dave's method is simpler than my PM one... just be quick with the solder so the components don't pop out of the hole. If you're not used to soldering, make sure the iron is nice & hot, & use rosin core solder. Tin your wires first - i.e. melt some solder onto the ends before you solder them to the board. Practise on some wire first to get a feel for how it's done. (Having three hands helps...)
)Would stripped-off thermostat wire be about the right gauge of copper for jumpers?
(I have that or phone wire - but that seems way too thin.)
I am completely confused about the epoxy step....am I basically sealing in the entire board from the bottom? I assume I am trying to keep the board from shifting and separating once I re-assemble it? And when you mention epoxy - is JBWeld the sort of epoxy you are referring to?
Thanks! Jennerz
re:"right gauge of copper" as heavy as you can get, as a min use the wire the same gauge as going to the drivers
re:"am I basically sealing in the entire board from the bottom?' - no just giving it some structural integrity
no idea what your local brands are, I use Araldite here
re:"am I basically sealing in the entire board from the bottom?' - no just giving it some structural integrity
no idea what your local brands are, I use Araldite here
Would stripped-off thermostat wire be about the right gauge of copper for jumpers?
(I have that or phone wire - but that seems way too thin.)
I am completely confused about the epoxy step....am I basically sealing in the entire board from the bottom? I assume I am trying to keep the board from shifting and separating once I re-assemble it? And when you mention epoxy - is JBWeld the sort of epoxy you are referring to?
I don't know what size your thermostat wire is but around a millimetre or so in diameter of copper would be a reasonable minimum. Just a scrap of stripped speaker wire would be fine or any mains wire, from an old appliance power cord etc. Only upper limit on size is what is practical to solder.
You are correct, the epoxy is just to hold the board so it doesn't break and crack any more. Any method to do that is fine, Pete is correct - it is not essential to seal the board. JBweld or any non-water based adhesive will work, after a bit of consideration I think of plywood and one of the quick-stick adhesives would be even easier than saturation of cloth with epoxy - less drips.
Best of luck
David
We have a Winner!
Thanks to everyone who helped me through this!
I now have TUNES again.......
Was worried that the repair would noticably change the sound quality - but if it did, it's too insignificant to tell.....and after a glass of good Australian Shiraz, they may even sound better than they did before.
Thanks again, so very much. Jennerz
I now have TUNES ...
Excellent
What did you eventually do?Best wishes
David.
David - I followed your suggestions (as best I could) to the "T". After completing the soldering - using 14 gauge stranded speaker wire as the jumpers - I attached luan (same dimensions as the PCB) as the base to hold it secure. Because the PCB was originally attached to the enclosure using six screws, I did not use much epoxy to lock the PCB to the luan - just enough to snug it, and then I used six longer screws to make it one unit (luan and PCB) as it attached to the enclosure. It was a great learning experience - one that I hope I never have to repeat - but now I know I can do it. Thanks for all your help! Jennerz
- Status
- This old topic is closed. If you want to reopen this topic, contact a moderator using the "Report Post" button.
- Home
- Loudspeakers
- Multi-Way
- JBL Studio Series AW36's