
Mr. Ed, you are so funny, man, I guess I could call myself Wilbur Woods!!!")
Well, I am on my way as all of the wood has been cut and next week the baffles.
Jim, I am having a difficult time getting laminate as it is not carried here at our Home Depot as all they can get is 30" X 96" ($50+), and Lowes is not of any help.
Found a matt finish aluminum flashing in matt black 10" by 10' roll that was reasonable. Wonder if that would work with an metal circle cutter?
Thanks!
Robert,
Laminate is available from kitchen cabinet/countertop companies who install those products. Now sometimes you can get special orders via Home Despot or Lowes but that is not where they excel. I use Wilsonart and the black for my speakers is #1595, if I recall. Lots of options. It is not likely that the kitchen countertop place will have the color and pattern that you want. My local kitchen cabinet place will accept an order and have a sheet in a few days. I brought a 4' x 8' sheet for my MLTL build and it was $80 plus sales tax.
One thing about laminate is that it is not very adaptable for curved surfaces--say corners and such. It works best for flat surfaces and can be applied before cutouts when used properly.
I never have worked with metal so I'm no help on that front.
Slot Port Implementation for Triton MLTL
You can use a slot port built into the cabinet instead of round port. You can implement a slot port much like Jeff Bagby did with his original bookshelf. You can view the slot port implementation in his review at:
http://meniscusaudio.com/images/Triton Kit Write up.pdf
The area of the slot opening needs to be equivalent to the same area as for a 3 inches diameter round port tube. This area can be calculated by the familiar pi times radius squared as 7.068 square inches. For the Triton MLTL the total slot tunnel length is 6 inches (same as the port tube). The slot port can exit either the front or back of the cabinet as you choose. Also the use of a slot port will eliminate the need for a bottom brace around the bottom of the cabinet as shown in the enclosure drawing.
The largest size width of the slot opening inside the Triton MLTL is the internal cabinet width of 6 inches. For that width the port tunnel opening (and tunnel) height is calculated to be 1.178 inches or approximately 1 3/16 inches. With a wall thickness of 0.75 inch, the tunnel shelf inside the enclosure would be 5.25 inches long to attain a 6 inch length. The sidewalls of the cabinet and the shelf form the slot port tunnel.
Another implementation would be to use a 4.5 inches slot width. For that width the slot port opening would have a height of 1.571 inches or approximately 1 9/16 inches. For this implementation the builder could use a 0.75 inch wide by 1.571 inches high pieces on each side inside the enclosure to construct the slot tunnel. Again the slot tunnel shelf inside the enclosure would be 5.25 inches long. Two 1.571 inches high by 6.5 inches long side pieces form the side walls of the port tunnel in this case.
Bottom line: For a slot port will have to cut the opening in either the front baffle or rear panel accordingly to create the opening as you choose. The bottom of the box may need to the extended to complete the opening. The port tunnel needs to be enclosed as described.
The attached drawings show the two possible implementations.
Attachments
Jim, when a slot port is created as you've depicted in the attached drawings, the length of the port will actually be longer than just the length for the slot itself. The total additional length will be the thickness of the shelf that forms the top of the slot added to the slot's height (picture entering the slot from the top of the opening created by the shelf and measuring the distance along the middle of it, just like measuring down the middle of a line to determine its actual length). In your first example in the drawing, I'm estimating the additional length that's created comes to ~1.6", making the total slot length be more like 7.5".
Another thing I've noticed from my own builds, is that a slot port of the same area as a circular port might have audible port noise even though there will be no difference in the modeling of port air velocity because Martin's worksheets don't take shape into account, only area. Part of this, I think, is attributable to the ports' different circumferences. This may not be an issue in your design here if the port's air velocity is really low to begin with.
I hope my comments aren't considered to be overly critical, especially to you, because I'm just trying to share my experience.
Paul
You can use a slot port built into the cabinet instead of round port. You can implement a slot port much like Jeff Bagby did with his original bookshelf. You can view the slot port implementation in his review at:
http://meniscusaudio.com/images/Triton Kit Write up.pdf
The area of the slot opening needs to be equivalent to the same area as for a 3 inches diameter round port tube. This area can be calculated by the familiar pi times radius squared as 7.068 square inches. For the Triton MLTL the total slot tunnel length is 6 inches (same as the port tube). The slot port can exit either the front or back of the cabinet as you choose. Also the use of a slot port will eliminate the need for a bottom brace around the bottom of the cabinet as shown in the enclosure drawing.
The largest size width of the slot opening inside the Triton MLTL is the internal cabinet width of 6 inches. For that width the port tunnel opening (and tunnel) height is calculated to be 1.178 inches or approximately 1 3/16 inches. With a wall thickness of 0.75 inch, the tunnel shelf inside the enclosure would be 5.25 inches long to attain a 6 inch length. The sidewalls of the cabinet and the shelf form the slot port tunnel.
Another implementation would be to use a 4.5 inches slot width. For that width the slot port opening would have a height of 1.571 inches or approximately 1 9/16 inches. For this implementation the builder could use a 0.75 inch wide by 1.571 inches high pieces on each side inside the enclosure to construct the slot tunnel. Again the slot tunnel shelf inside the enclosure would be 5.25 inches long. Two 1.571 inches high by 6.5 inches long side pieces form the side walls of the port tunnel in this case.
Bottom line: For a slot port will have to cut the opening in either the front baffle or rear panel accordingly to create the opening as you choose. The bottom of the box may need to the extended to complete the opening. The port tunnel needs to be enclosed as described.
The attached drawings show the two possible implementations.
Last edited:
Jim and Paul, would you guys take a look at the last post on my build thread and comment.....
http://www.diyaudio.com/forums/mult...on-kit-designed-jeff-bagby-9.html#post3302266
http://www.diyaudio.com/forums/mult...on-kit-designed-jeff-bagby-9.html#post3302266
I looked at your last post to the thread via your provided link and don't understand what you want a comment on.
I'm shutting my computer down for the day now.
Paul
I'm shutting my computer down for the day now.
Paul
Jim and Paul, would you guys take a look at the last post on my build thread and comment.....
http://www.diyaudio.com/forums/mult...on-kit-designed-jeff-bagby-9.html#post3302266
A couple of comments.
In regrad to the location of the port relative to the location by Wayne on the other thread, that really has no bearing on the MLTL results in my opinion. Essentially, the distance between the drivers and the port is the distance from the tweeter center to the port by design. Martin King's MLTL worksheets effectively includes the specific location of the equivalent woofer (located at the tweeter position) and the distance to the port. Hence, the design accounts for the woofer positions and port location.
In the case of the Triton MTM bookshelf design the distance between the woofers and the port aren't included in the design. But keep in mind that the port effectivity is at very low frequencies so any difference between the woofers and port are mere fractions of a wavelength. Not a source of worry in my opinion.
Paul, I was aware that the thickness of the slot port cover does lengthen the port. Earlier in this thread I presented a study on port length and included a case wherein the port was 7.5 inches long. It is a small decrease in the F3 point--from 37 Hz to 35 Hz for the 6 and 7.5 inch lengths respectively.
Last edited:
A couple of comments.
In regrad to the location of the port relative to the location by Wayne on the other thread, that really has no bearing on the MLTL results in my opinion. Essentially, the distance between the drivers and the port is the distance from the tweeter center to the port by design. Martin King's MLTL worksheets effectively includes the specific location of the equivalent woofer (located at the tweeter position) and the distance to the port. Hence, the design accounts for the woofer positions and port location.
In the case of the Triton MTM bookshelf design the distance between the woofers and the port aren't included in the design. But keep in mind that the port effectivity is at very low frequencies so any difference between the woofers and port are mere fractions of a wavelength. Not a source of worry in my opinion.
Paul, I was aware that the thickness of the slot port cover does lengthen the port. Earlier in this thread I presented a study on port length and included a case wherein the port was 7.5 inches long. It is a small decrease in the F3 point--from 37 Hz to 35 Hz for the 6 and 7.5 inch lengths respectively.
Thanks, Jim for posting the slot port implementation!
And, I found Formica brand laminate for 37.82 sheet (30X8) at lowes, black, matt finish and delivered to the store free and by Tuesday.
Also, Jeff clarified the comment made on my build thread concerning the Triton port!
You're absolutely correct, Jim, and I apologize for forgetting you did show results for several different port lengths. The effects of the slot port being longer are, indeed, small. I guess I got hung up on the port's length being shown in your drawings as 6".
Paul
Paul
A couple of comments.
In regrad to the location of the port relative to the location by Wayne on the other thread, that really has no bearing on the MLTL results in my opinion. Essentially, the distance between the drivers and the port is the distance from the tweeter center to the port by design. Martin King's MLTL worksheets effectively includes the specific location of the equivalent woofer (located at the tweeter position) and the distance to the port. Hence, the design accounts for the woofer positions and port location.
In the case of the Triton MTM bookshelf design the distance between the woofers and the port aren't included in the design. But keep in mind that the port effectivity is at very low frequencies so any difference between the woofers and port are mere fractions of a wavelength. Not a source of worry in my opinion.
Paul, I was aware that the thickness of the slot port cover does lengthen the port. Earlier in this thread I presented a study on port length and included a case wherein the port was 7.5 inches long. It is a small decrease in the F3 point--from 37 Hz to 35 Hz for the 6 and 7.5 inch lengths respectively.
Some Progress!!!
Well, there has been some progress. It took Lowe's a bit longer to get the formica and then they forgot to call.
Due to health problems, the gentleman could not do the baffle cutting, so I have been trying to justify a router, circle cutter and bit. After much debate, I called a cabinet shop just 5 min from me and they are working on the cuts and should be ready by Friday or first of next week. I told him they need to be precise, so we will see.
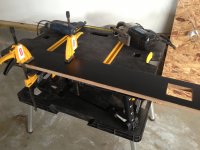
Enclose is a pic of some of the cutting, but mainly wanted to show how the occasional DIYer can accomplish big goals with small equipment in a small space.
This is a portable work bench that when stored is the top size and 5" H with a handle to carry. My son gave it to me for Christmas from Northern Tools on sale for $79.95. Unfolds in 1 sec to this.....
Greatest Christmas present ever. Also comes with 2 clamps stored inside.
Next up to bat are the side walls which will be the challenge of all as our weather now is just 1 degree above freezing, so the painting will be uncertain at this point. However, I have decided on a faux back antique finish with exposed stain wood underneath. This will match and co-ordinate with other furniture in the room.
More updates later.
Well, there has been some progress. It took Lowe's a bit longer to get the formica and then they forgot to call.
Due to health problems, the gentleman could not do the baffle cutting, so I have been trying to justify a router, circle cutter and bit. After much debate, I called a cabinet shop just 5 min from me and they are working on the cuts and should be ready by Friday or first of next week. I told him they need to be precise, so we will see.
Enclose is a pic of some of the cutting, but mainly wanted to show how the occasional DIYer can accomplish big goals with small equipment in a small space.
This is a portable work bench that when stored is the top size and 5" H with a handle to carry. My son gave it to me for Christmas from Northern Tools on sale for $79.95. Unfolds in 1 sec to this.....
Greatest Christmas present ever. Also comes with 2 clamps stored inside.
Next up to bat are the side walls which will be the challenge of all as our weather now is just 1 degree above freezing, so the painting will be uncertain at this point. However, I have decided on a faux back antique finish with exposed stain wood underneath. This will match and co-ordinate with other furniture in the room.
More updates later.
Attachments
Last edited:
An update......
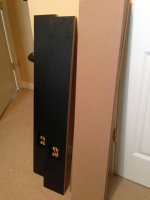
Attached is a size test mock-up. Had to a little trimming, but all is good. The priming is next and the interesting finish which is going to be old antique look meets modern. Even though anitiquing/faux designs are not new to me with my mural/faux finishing career, but this approach/concept is relatively common in decorating. Warming up a stark contemporary setting.....combining the old with the new is the look I am trying to achieve.
Since I will not be rounding over the edges the worn look at some of the sides and corners will act as buffers in case there is a bump in the road, or maybe grandchildren. (Well I can wish, can't I).
The most interesting addition will be the 2" modern corner feet I found that are really impressive and interesting, they will be here this week.
The weather is still bad, but I think I can prime today.
Thanks!
Attachments
Thanks, Jim, the weather is steadily improving and suppose to be 67 tomorrow. So, I see this project that was a standstill moving forward quickly now.
Since I chose the 1 3/16" slot port vent, I had to remove a little more off the bottom of the back panel in keeping within the space volume inside the enclosure. I hope that makes sense.
Robert
Since I chose the 1 3/16" slot port vent, I had to remove a little more off the bottom of the back panel in keeping within the space volume inside the enclosure. I hope that makes sense.
Robert
Attachments
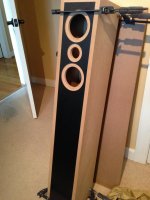
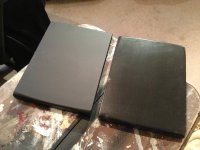
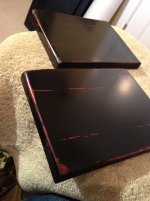
A little experimentation with the finish and I think I like it, matches the finish of several pieces of furniture in our home.
I used just MDF with the edges sealed with wood glue and water, no primer, the Rust-oleum red satin brand Pro for the durability and the final coat was flat black of the same.
First, of course, was the burring/sanding of the edges, then the distressing with steel wool/sandpaper and wax using Fiddes mellow wax and I am happy results.
The side walls tomorrow, then braces, acoustafill, etc. etc.
Thanks!
Attachments
Last edited:
Robert,
Yes, and some of us work like dogs to sand and paint blemished MDF trying to make it look perfect. Your artistry on those new speakers will be beautiful. Those slot ports are ideal. So much more than the rest of us can hope to achieve. I know how I'm going to finish my next set of speakers!
Jim
Yes, and some of us work like dogs to sand and paint blemished MDF trying to make it look perfect. Your artistry on those new speakers will be beautiful. Those slot ports are ideal. So much more than the rest of us can hope to achieve. I know how I'm going to finish my next set of speakers!
Jim
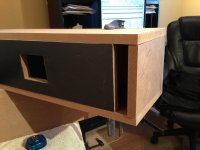
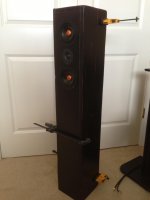
Ha ha, meet the new contentious Triton TL, "The Competitive Serious Speaker" CSS!
Just listening to one now, but sounds really, really nice. Not quite there as the side is just clamped as one can see and the drivers are not in all the way with only 2 screws holding them.
But what I am hearing now are very, very enjoyable speakers or speaker in this case with just the amount of detail and bass for 2 channel.
More details later next week.
Attachments

- Status
- This old topic is closed. If you want to reopen this topic, contact a moderator using the "Report Post" button.
- Home
- Loudspeakers
- Multi-Way
- The Triton MTM Grows Legs--A MLTL Design