Hello all, inspiring with your hobby and concerned by recycling i choose to give to old pair of broken boxes Mission 701 a new life.
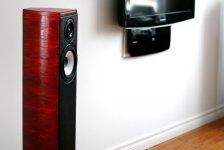
This is a picture of the same speakers ont the internet
This huge bookshelf are made frome 19mm thick MDF and thin plastic baffle. Problem is the plastic-mdf glue fail with time. so i decide to migrate component to a diy elegant floorstander
I'm studant so my budget and setup still modest. But so what... sometime, all we need is a strong want !
Everything i need
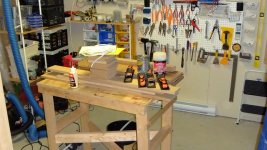
Master, drawing and my diy made router table from 0,99$ LDF rest pannel
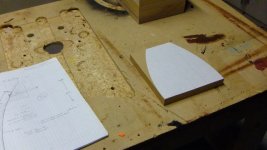
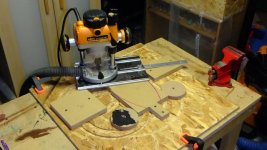
My router and the gig to cut 30cm radius shide shape
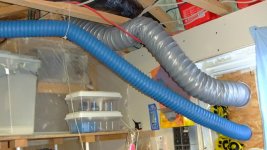
I'm working in the basement and MDF is toxic so i design an foldable negatif air pressure Room
When i have finished, i turn the barrel and the room fond on the roof.
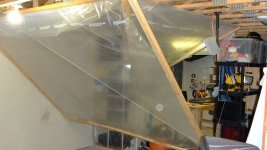
The negatif pressure inside the cutting room is made by two 49cfm restroom fan that put air outside.
The blue tube is the output of the shopvac. No dust outside the room. Inside, i work with a hermetic
mask with cartridge and a white paper suit.
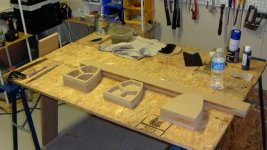
Braces, top and bottom
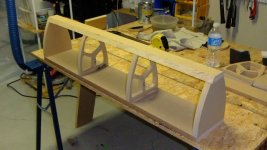
The squeleton, back and baffle
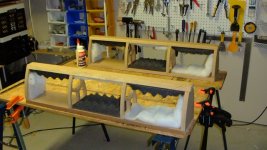
With the small back and the small spaces between braces traverses, imopssible to work
on the cab after it closed. So I have to place stuffing before.
Choose to make curved side from this mdf pannels. I discover that 30cm radius is on the edge of proken point !
It was a challange for me to stack the sidewall
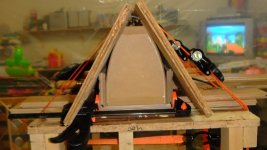
Glued side pannels
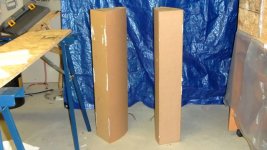
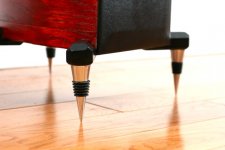
For the port, i cut the original one thas it was made frome one peace with the plastic baffle. The result was aestiticaly horrible but fully fonctional. I make the box floor ported for more feeled bass and less port noise and at last, to make the scratched port invisible. This need long spike to ensure that port is not blocked or extanded by limited area on the bottom.
To follow the recycling idea, i choose stylish wine bottle plugs to make the long spikes.
What we don't see : I have to screw the first side pannel because the gluwed area (only the mdf squeleton) is too small to acheave an cohesion force greater than the recall spring back force of pannels. But for the two more thin mdf layers, glue is enough.
After that, i choose to make 4 legs because with only 3 isostatic spikes on the bottom of natural shape of the boxes, the sustenance polygon was too small and make precarious stability. See picture in my next reply.
To limit the budget on the finish, i cut stripe of real oak veneer that i stack on the side at the Sonys Faber style (inspiration). This method make possible to cover more square inch area with a standard veneer roll. It cut the need of buy two roll. But anyway, later i decide to add a stylish leather baffle .... But this longer effort paid because the result is way more beautifull than just one large peice of vertical veneer on the side.
For the top, i finally go with solid oak. I buy b quality peice with two good loking zone that i keep for the top. There i find that my basic tool was basic tool ! Solid oak is tough to work !
The final result is satisfing. I could do better if i restart new from drawing with what i have learded all the project long but i keep it as is. It's good enough for me
It sound as good as before but i gain the empression of deeper bass. My floor is shaking ! Not as deep as true large volume floorstander or like my Monitor Audio RS8 but with my cheap diy subwoofer with 10 inches 32$ Dayton and 75w active sub amp in 120L ported box it make 25-20kz with no problem.
This project learn to me that the component itself, the component receipe and the baffle design is way more important than the rest in hi-fi. Everything but bass (less than 80hz) sound near identical that original with a so different encosure !
Fut to consider the drivers are made with plastic and crossover are small... Sound better than all my attempt on DIY before with Overnight Sensation, Silver Flute, TB speakers or Fostex fullrange... The same guy on the saw...
What are you thinking about that ?
Thank you all !
This is a picture of the same speakers ont the internet
This huge bookshelf are made frome 19mm thick MDF and thin plastic baffle. Problem is the plastic-mdf glue fail with time. so i decide to migrate component to a diy elegant floorstander
I'm studant so my budget and setup still modest. But so what... sometime, all we need is a strong want !
Everything i need

Master, drawing and my diy made router table from 0,99$ LDF rest pannel

My router and the gig to cut 30cm radius shide shape

I'm working in the basement and MDF is toxic so i design an foldable negatif air pressure Room
When i have finished, i turn the barrel and the room fond on the roof.

The negatif pressure inside the cutting room is made by two 49cfm restroom fan that put air outside.
The blue tube is the output of the shopvac. No dust outside the room. Inside, i work with a hermetic
mask with cartridge and a white paper suit.

Braces, top and bottom

The squeleton, back and baffle

With the small back and the small spaces between braces traverses, imopssible to work
on the cab after it closed. So I have to place stuffing before.

Choose to make curved side from this mdf pannels. I discover that 30cm radius is on the edge of proken point !
It was a challange for me to stack the sidewall

Glued side pannels

For the port, i cut the original one thas it was made frome one peace with the plastic baffle. The result was aestiticaly horrible but fully fonctional. I make the box floor ported for more feeled bass and less port noise and at last, to make the scratched port invisible. This need long spike to ensure that port is not blocked or extanded by limited area on the bottom.
To follow the recycling idea, i choose stylish wine bottle plugs to make the long spikes.
What we don't see : I have to screw the first side pannel because the gluwed area (only the mdf squeleton) is too small to acheave an cohesion force greater than the recall spring back force of pannels. But for the two more thin mdf layers, glue is enough.
After that, i choose to make 4 legs because with only 3 isostatic spikes on the bottom of natural shape of the boxes, the sustenance polygon was too small and make precarious stability. See picture in my next reply.
To limit the budget on the finish, i cut stripe of real oak veneer that i stack on the side at the Sonys Faber style (inspiration). This method make possible to cover more square inch area with a standard veneer roll. It cut the need of buy two roll. But anyway, later i decide to add a stylish leather baffle ....
 But this longer effort paid because the result is way more beautifull than just one large peice of vertical veneer on the side.
For the top, i finally go with solid oak. I buy b quality peice with two good loking zone that i keep for the top. There i find that my basic tool was basic tool ! Solid oak is tough to work !
The final result is satisfing. I could do better if i restart new from drawing with what i have learded all the project long but i keep it as is. It's good enough for me
It sound as good as before but i gain the empression of deeper bass. My floor is shaking ! Not as deep as true large volume floorstander or like my Monitor Audio RS8 but with my cheap diy subwoofer with 10 inches 32$ Dayton and 75w active sub amp in 120L ported box it make 25-20kz with no problem.
This project learn to me that the component itself, the component receipe and the baffle design is way more important than the rest in hi-fi. Everything but bass (less than 80hz) sound near identical that original with a so different encosure !
Fut to consider the drivers are made with plastic and crossover are small... Sound better than all my attempt on DIY before with Overnight Sensation, Silver Flute, TB speakers or Fostex fullrange... The same guy on the saw...
What are you thinking about that ?

Thank you all !
Last edited:
Baffle and finish
After that, i got the leather idea !
My idea consist on adding an one inch quarter thin pannel on the baffle, covering it with leather (only 6,50$ for the two pieces !), and glu it on the enclosure face.
I buld a simle setup to cut nice angle with little router flycutter
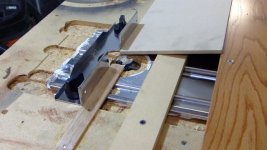
Raw result of the baffle addon
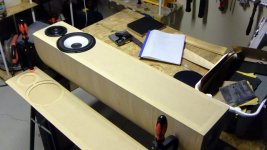
After that, i make the spike legs with hardwood, router, miter saw and router again I glue the leather with spray glue (not the better quality, so if you plan to do it, buy a better one) I wtack the over-baffle with PL glue and have to be verry carefull with this thin pannel where i done the counterbore.
And now the result
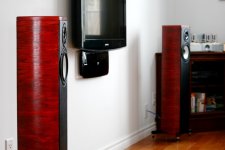

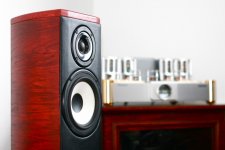
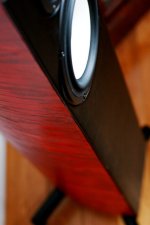
It is the coolest project i ever made probably because it was done frome stuff few inches near the garbage, low investment etc.
Your comments ?
This speakers have no flaws
Certainly not. It a true home made naive thing with this imperfections, measure mistake and angle mismatch. We are all humain and we make
this for fun
But i found the result more beautifull than my RS8 when grill is on.
Have a nice day !
After that, i got the leather idea !
My idea consist on adding an one inch quarter thin pannel on the baffle, covering it with leather (only 6,50$ for the two pieces !), and glu it on the enclosure face.
I buld a simle setup to cut nice angle with little router flycutter

Raw result of the baffle addon

After that, i make the spike legs with hardwood, router, miter saw and router again
And now the result


It is the coolest project i ever made probably because it was done frome stuff few inches near the garbage, low investment etc.
Your comments ?
This speakers have no flaws

Certainly not. It a true home made naive thing with this imperfections, measure mistake and angle mismatch. We are all humain and we make
this for fun
But i found the result more beautifull than my RS8 when grill is on.
Have a nice day !
beautiful result, wish I had the patience to make cabinets that good...
While old speakers still take dust in my storage, someone in this forum explain to me that air volume in the enclosure is a pressure question. It one of detail that make me think about redesign the mission 701. I think that if i leave the same air amount without speed constraint or bottleneck it will result in same "air-displacement-resistance" and same pressure. And i think it will result in same k (Hooke spring constant).
Just take inside enclosure volume of old boxes and reproduce the same.
Curved side is regulac circle arc with 30cm radius so it's fair easy to calculate the shape air for extrusion volume deduction. I draw this shape in squared paper sheet so i can use the little squares to calculate the air too. Finaly, for someone at ease with calculus it can be verry precise even with parabolic shapes.
And finaly, the port stay exactly the same. A fact with pos. and con. I feel it will be a good thing to adjust the port a bit but i like the wound as is. I like let the speakers do all the bass it can and assist it with 23-45hz active subwoofer. I don't like subwoofer when it produce 50hz and higher frequencies. Too easy to locate. IMO, this mid bass should be stereo and coherent.
Post #6 states
And finaly, the port stay exactly the same.
by the way isn't the internal volume bigger in the new speaker?Post #6 states
Mission 701 speaker Vibration problem!
Ok the adhesive would be for re glueing the plastic face plate that the speakers mount to, back onto the slots in the wood speaker cabinet. Basically doing the job right the second time around, using the proper adhesive. Should it dry hard, or stay flexable? what type and brand of adhesive should I use?
Thanks in advance
I'm back after few years !
I still use theses loudspeaker today in my main sound system.
The enclosure volume stay the same from old cabinet from the new one. I cut the original port from plastic baffle and put it floor ported in the floorstander. This is why they are so high from the floor (long spikes).
Still sound good
I still use theses loudspeaker today in my main sound system.
The enclosure volume stay the same from old cabinet from the new one. I cut the original port from plastic baffle and put it floor ported in the floorstander. This is why they are so high from the floor (long spikes).
Still sound good
- Status
- This old topic is closed. If you want to reopen this topic, contact a moderator using the "Report Post" button.
- Home
- Loudspeakers
- Multi-Way
- Broken Mission 701 converted in elegent floorstander w photos