This will be a build thread, complete with pictures and a bunch of pedantic commentary that people are free to skip over. The ZRT components are en-route from Madisound & I should be receiving them on 11/2. I will be going to a lumber yard later this afternoon to get enclosure materials.
-----------------------------------
Since I get so much fun from the optimization & analysis aspect of speaker design, it is sort of a challenge then to embark on this ZRT project. The fact is that John K was probably designing loudspeakers since before I was born (not calling him an old-guy or anything), and at this point I have only a few designs under my belt. So, no matter how much I want to tweak this or that, I am not going to so that I can see how well an "off the shelf" design that originated with a seasoned designer can do compared to my efforts. Hopefully, my builds' performance will seem totally feeble once I listen to the completed stock ZRTs. Being that the ZRTs will use far more expensive and lower distortion drivers than stuff I have used in the past, I think that there's some automatic performance improvement right there.
-----------------------------------
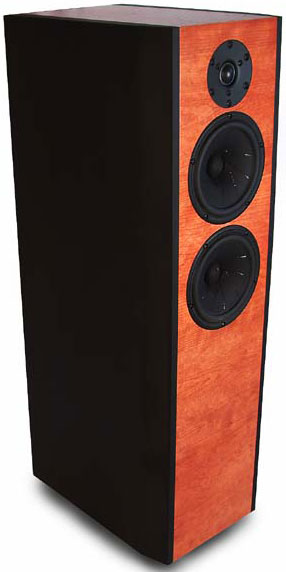
The enclosures will be constructed of 0.75" MDF. The aesthetics will be something along the lines of the enclosure shown on the kit parts page at Madisound. This design by Lee Taylor & Co. is absolutely gorgeous!
I will NOT be copying the design, as gorgeous as it is, since would feel akin to stealing (and probably is, legally). The paint/trim will be along the same lines though, with satin black sides and stained wood for the top/front. At this point I am still debating between veneer, or maybe just using solid hardwood for those panels. Workability seems like it can be an issue with a lot of exotic hardwoods (sort of thinking about Cocabola, Zabrawood, Tigerwood or Padauk). Trimming veneer has been problematic for me in the past...although it is probably worlds cheaper to redo messed-up veneer than it is to replace a piece of solid exotic hardwood!
Construction will begin this evening. Future posts will have more pictures and less uninteresting commentary!
Here are the previous projects that I have posted about on here. These are MOSTLY pictures, which is more interesting than a wall of text.
First 2-Way's
Excessive Subwoofer
-----------------------------------
Since I get so much fun from the optimization & analysis aspect of speaker design, it is sort of a challenge then to embark on this ZRT project. The fact is that John K was probably designing loudspeakers since before I was born (not calling him an old-guy or anything), and at this point I have only a few designs under my belt. So, no matter how much I want to tweak this or that, I am not going to so that I can see how well an "off the shelf" design that originated with a seasoned designer can do compared to my efforts. Hopefully, my builds' performance will seem totally feeble once I listen to the completed stock ZRTs. Being that the ZRTs will use far more expensive and lower distortion drivers than stuff I have used in the past, I think that there's some automatic performance improvement right there.
-----------------------------------
The enclosures will be constructed of 0.75" MDF. The aesthetics will be something along the lines of the enclosure shown on the kit parts page at Madisound. This design by Lee Taylor & Co. is absolutely gorgeous!
An externally hosted image should be here but it was not working when we last tested it.
I will NOT be copying the design, as gorgeous as it is, since would feel akin to stealing (and probably is, legally). The paint/trim will be along the same lines though, with satin black sides and stained wood for the top/front. At this point I am still debating between veneer, or maybe just using solid hardwood for those panels. Workability seems like it can be an issue with a lot of exotic hardwoods (sort of thinking about Cocabola, Zabrawood, Tigerwood or Padauk). Trimming veneer has been problematic for me in the past...although it is probably worlds cheaper to redo messed-up veneer than it is to replace a piece of solid exotic hardwood!
Construction will begin this evening. Future posts will have more pictures and less uninteresting commentary!
Here are the previous projects that I have posted about on here. These are MOSTLY pictures, which is more interesting than a wall of text.
First 2-Way's
Excessive Subwoofer
Last edited:
And now for something completely different. Pictures (sorry about the quality, this was from my phone)!
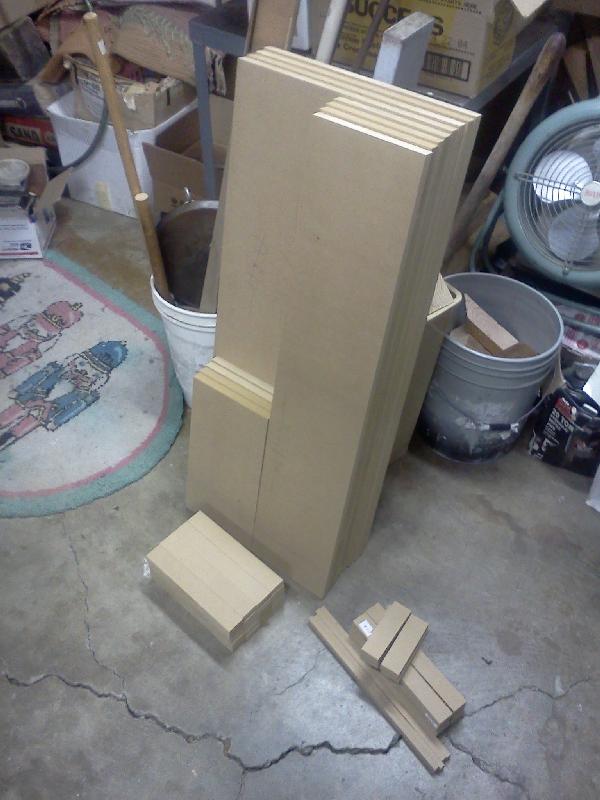
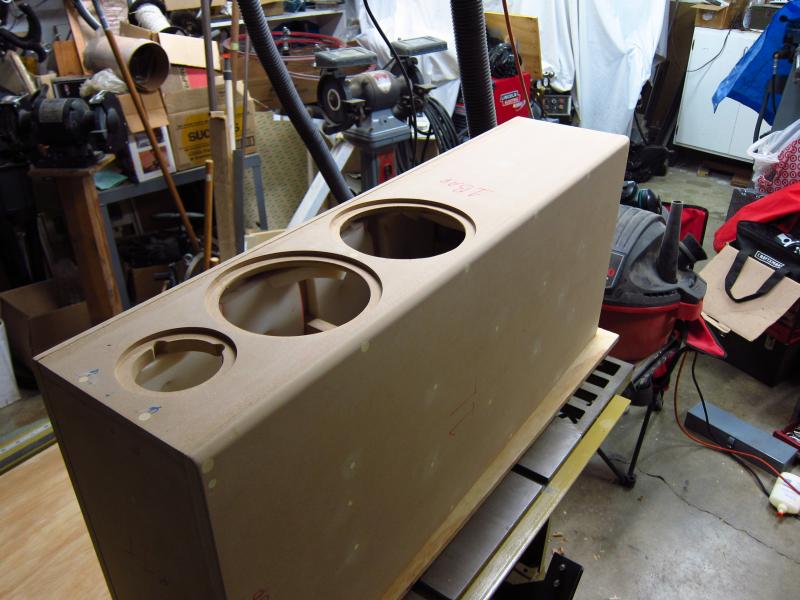
All of the basic panel cuts are done now. The little pile to the right is the waste. It's the least waste I've ever had after cutting panels...I wonder if this was deliberate in the design of the 65L enclosure.
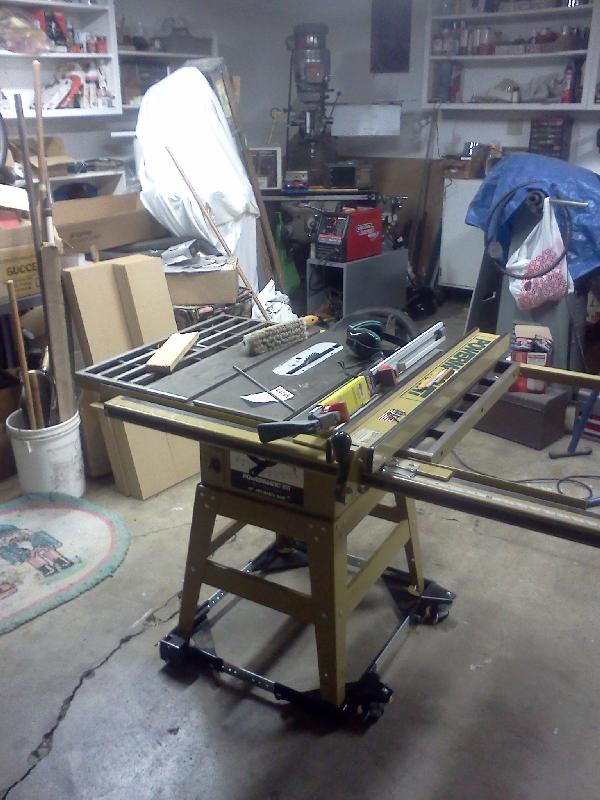
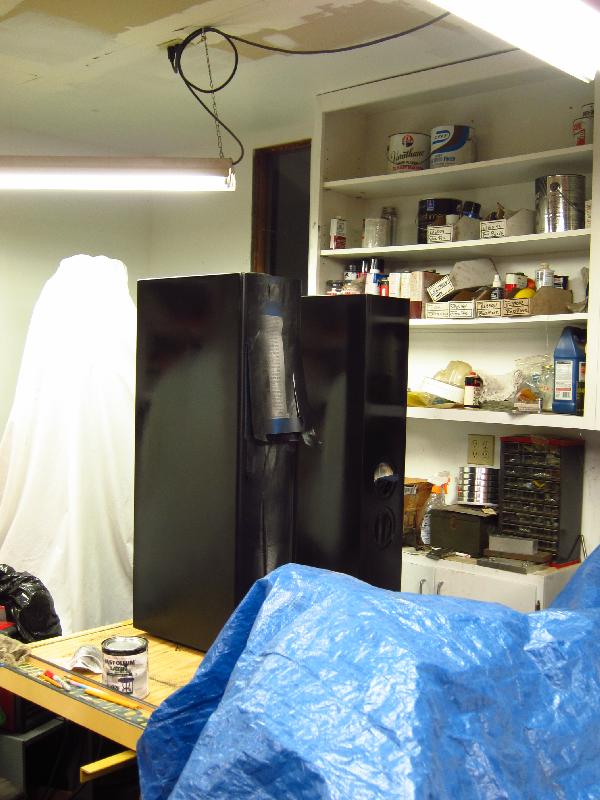
This is "my" workshop. My parents live about 25 minutes away from me, and I routinely go over there to make a mess in their garage since I don't yet have my own. Someday...stupid Bay Area housing prices!
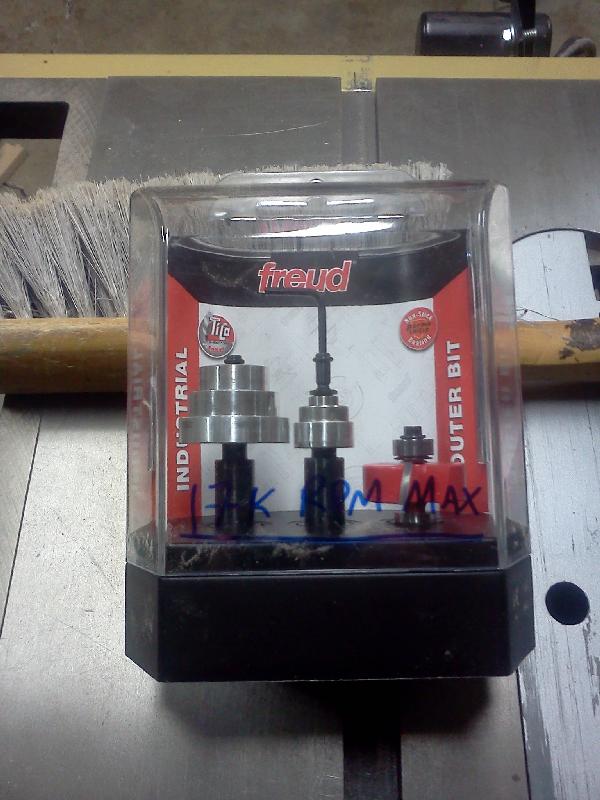
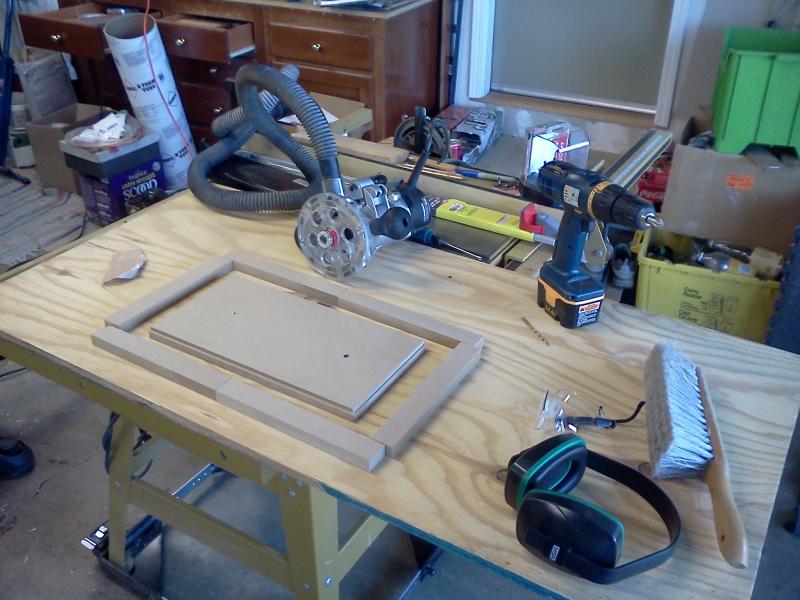
I also picked up a rabbet bit kit with bearings in all the sizes I need for this project (and more).
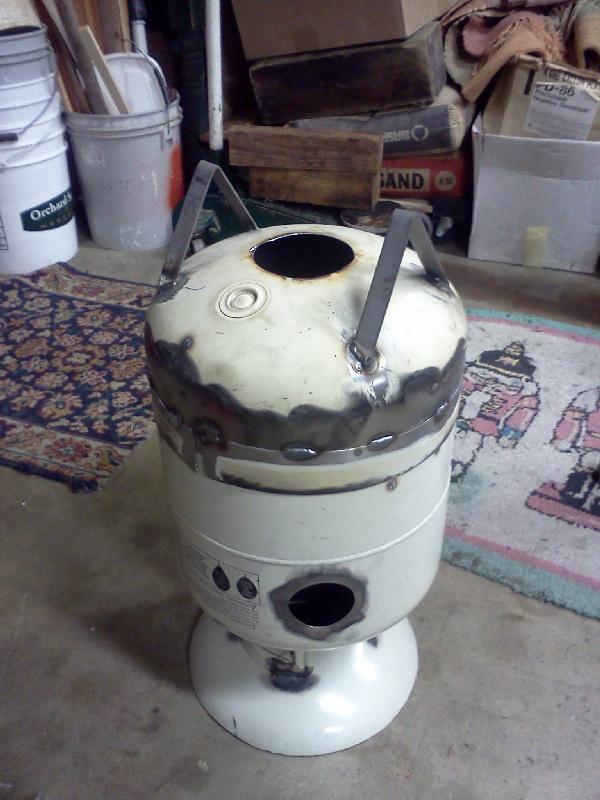
One other silly project I have been playing around with is a DIY aluminum smelter. My dad is interested in building functional internal combustion engine models, and I have no idea what I might do with this, but it seems like a good idea anyway.
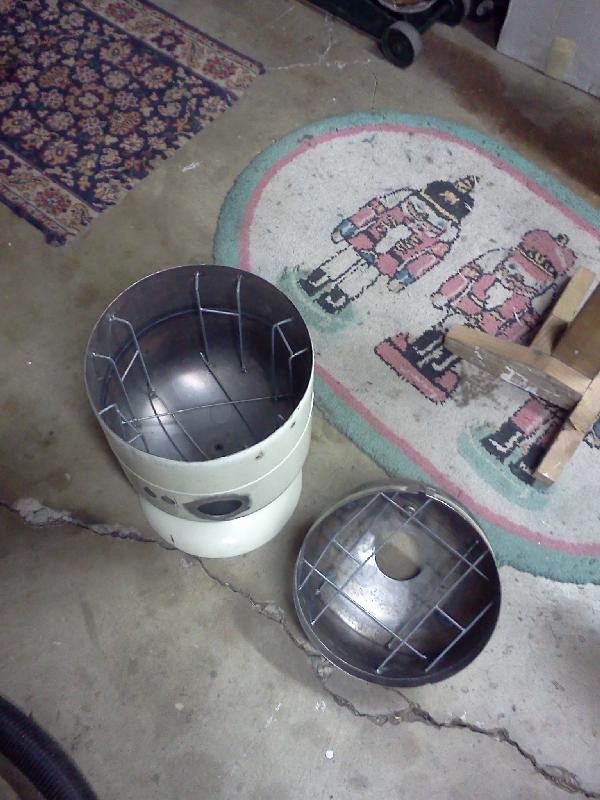
It is made from an old helium tank. We are still working out the right mixture to use for the refractory cement that will line the smelter & lid. We have a size-B4 graphite crucible that it is sort of being designed around. Anyway, I probably won't dwell on this project too much since it isn't really speaker-related. It is fun & kind of nerdy so I figured I'd share anyway.
All of the basic panel cuts are done now. The little pile to the right is the waste. It's the least waste I've ever had after cutting panels...I wonder if this was deliberate in the design of the 65L enclosure.
This is "my" workshop. My parents live about 25 minutes away from me, and I routinely go over there to make a mess in their garage since I don't yet have my own. Someday...stupid Bay Area housing prices!
I also picked up a rabbet bit kit with bearings in all the sizes I need for this project (and more).
One other silly project I have been playing around with is a DIY aluminum smelter. My dad is interested in building functional internal combustion engine models, and I have no idea what I might do with this, but it seems like a good idea anyway.
It is made from an old helium tank. We are still working out the right mixture to use for the refractory cement that will line the smelter & lid. We have a size-B4 graphite crucible that it is sort of being designed around. Anyway, I probably won't dwell on this project too much since it isn't really speaker-related. It is fun & kind of nerdy so I figured I'd share anyway.
As another ZRT builder, I can't wait to see your results. I decided on a sealed box and am interested to hear (no pun intended) how your ported version turns out.
As far as the crossovers go, I would say to try the DCX2496. I wouldn't think there is any reason not too. You can't really go wrong with the active crossovers except watch out for DC on your tweeters. You may want to use a cap in series with 6600 to protect your investment. I would also recommend trying to find a way to get access to the series inductor meant to be used with the lower woofer. You should try to use this even with the active version.
Good luck. Any updates?
Yeah, my thoughts were that running active shouldn't hurt anything, but I wanted to give the stock design some justice first. At ~$300 for the XOs from Madisound, I might just hang onto them lol.As another ZRT builder, I can't wait to see your results. I decided on a sealed box and am interested to hear (no pun intended) how your ported version turns out.
As far as the crossovers go, I would say to try the DCX2496. I wouldn't think there is any reason not too. You can't really go wrong with the active crossovers except watch out for DC on your tweeters. You may want to use a cap in series with 6600 to protect your investment. I would also recommend trying to find a way to get access to the series inductor meant to be used with the lower woofer. You should try to use this even with the active version.
Good luck. Any updates?
What is this about a series inductor for the lower woofers?
I have made a lot of progress on them, but have been lazy & have not put pics up. I am away on business travel, but I think I have some pics on my phone I can put up.
Thanks. I was afraid that I got way too pedantic about "personal experiences" and whatnot...I was still on Hong Kong (+16hrs) time when I wrote all that out. The rest will be pictures & less commentary, I swear!Huh, just read all your commentary and found it very interesting. I'm a lot like you.
OK, so here are some pictures. A bunch are on my home PC and I will try to remember to post them when I get back.
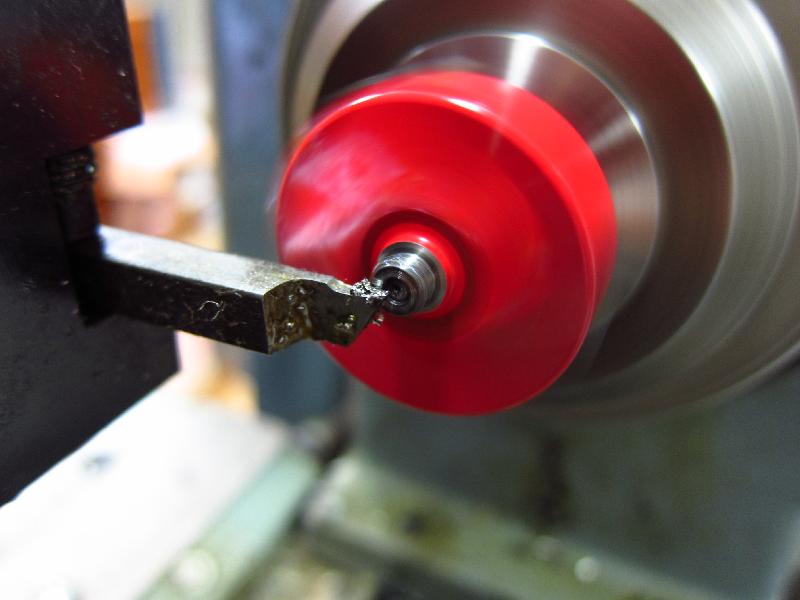
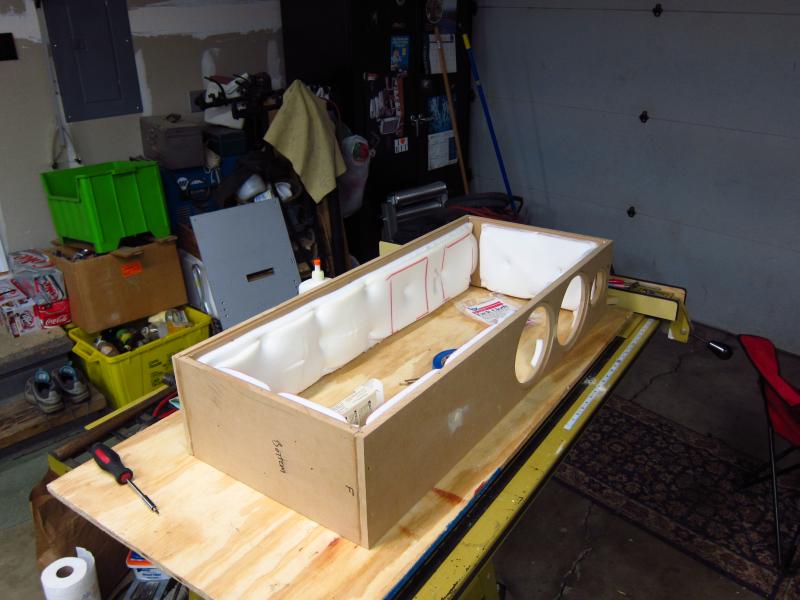
All of the joints used non-locking rabbet grooves. All of my previous enclosures used interlocking rabbet joints, but I have found that it gets cumbersome to adjust width, depth & offset. I seem to get tighter tolerances with just width & depth as variables. Initially, I was being dumb and routing everything with no outer guides, so I inevitably had to re-do them all with some equal-thickness guides and 1/32" deeper to knock out my mistakes. To do that, I used the lathe to turn out some Delrin bushings to fit over the stock rabbet bushing/bearings to get the right width.
Skipping way ahead...
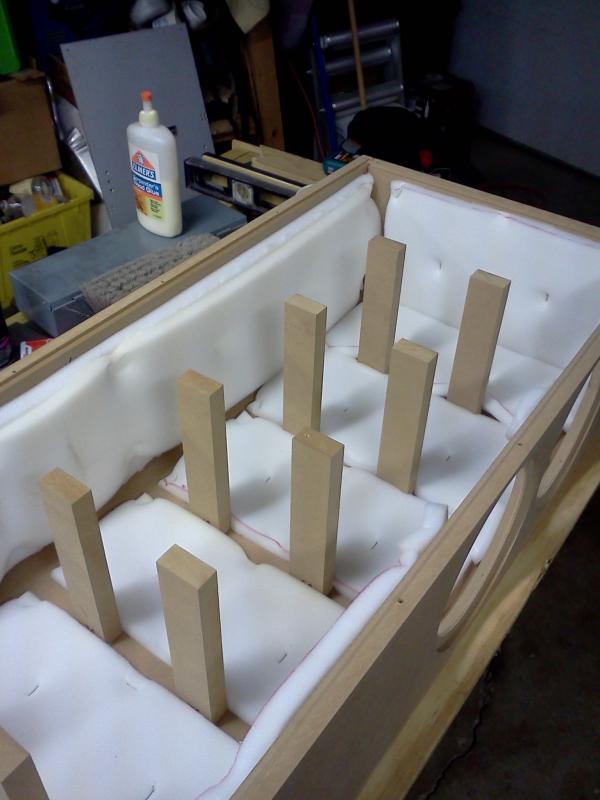
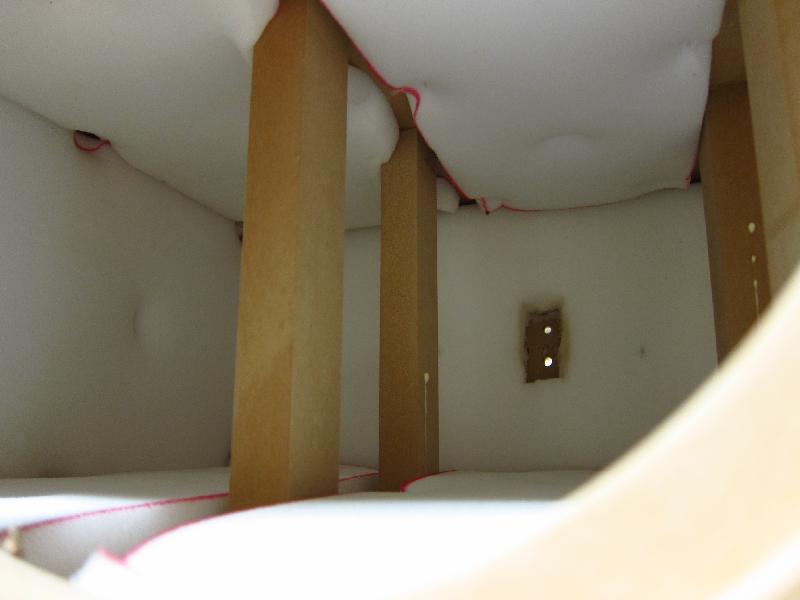
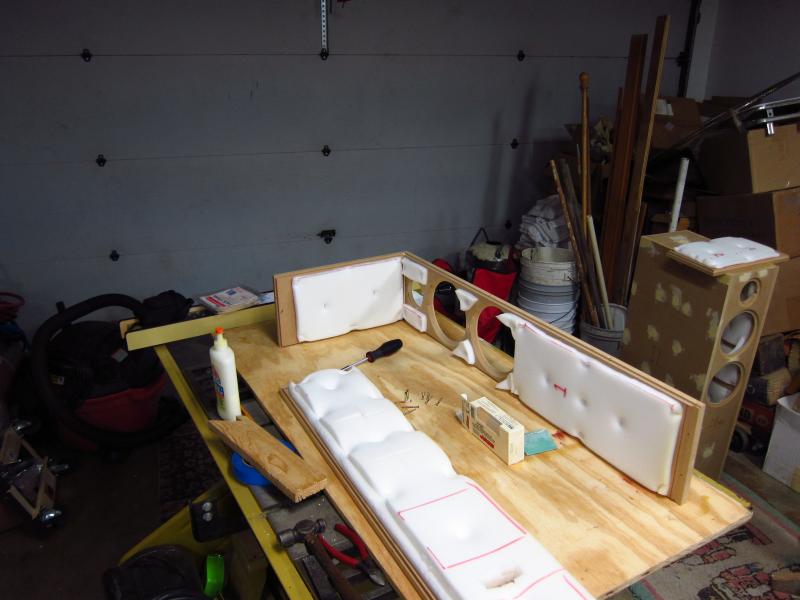
I have lined the inside of the panels with 5/8" open-celled foam. In the past I have used a spray adhesive, but I didn't feel like killing brain cells this time, so I just stapled it in place. No panels are glued together yet. The braces WERE glued & screwed.

I am still figuring out where the crossovers will go. Since the baffle will not be removable, they need to go somewhere accessible. I am thinking of sticking them on the sides up around the drivers. Will that be problematic? I don't know, but it seems unlikely. If I decide to electronically filter everything, I can always drill new homes for binding posts & remove the passive XOs.
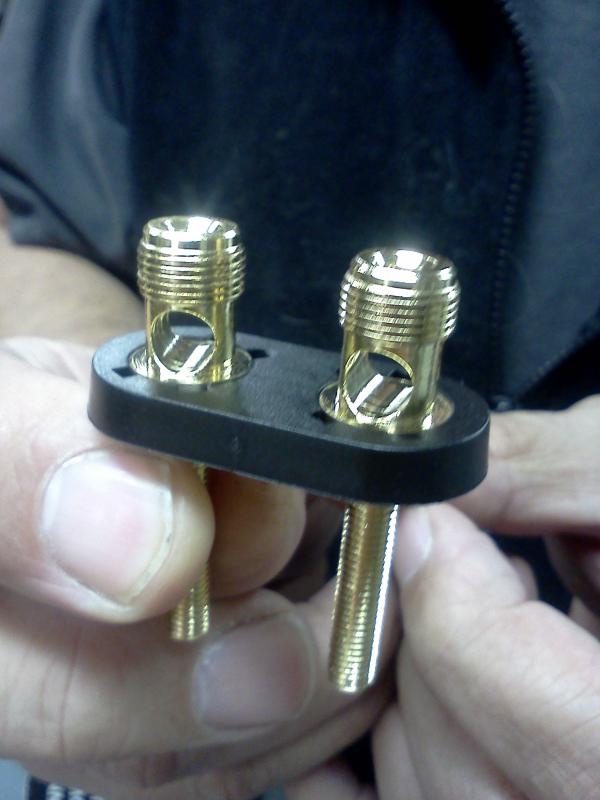
Speaking of binding posts, the ones I received didn't quite fit into the plastic spacers I had. Well, that is not a problem when you have a lathe in the garage! Damn I love brass...I think it is even more nice to work with then Delrin.
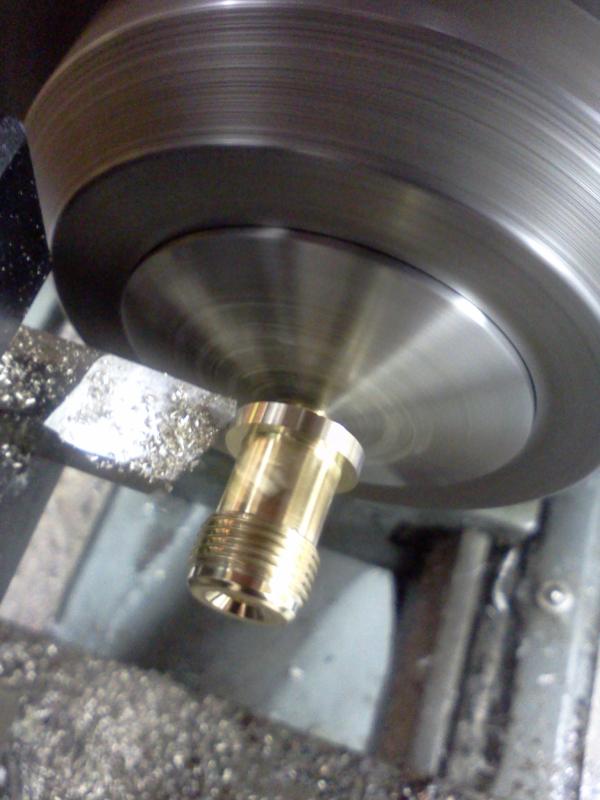
Here they are all fitted nicely.
This is where I left-off before heading out for my trip. I am actually in Redmond, WA for an acoustic measurement seminar being given by a consultant my employer brought in for a couple of days. The audio fun never ends!

This will probably be the last project that uses MDF. I hate the stuff...what a mess! I rigged the shop-vac to attach to the router, and it helped, but it is a real nuisance to work with the stuff. Maybe it is nice and dense, and cheap, but I don't care. Baltic Birch is the way I am going in the future.
I have decided to use some 0.025" Zebrawood veneer for the front & top. The chamfer bit mashed up the woofer bores, so I can't just use their profile to use a flush-trim bit, and the counter bore is too shallow to get a bearing into. So, I will have to make a jig and veneer, trim and mask the baffles prior to gluing 7 screwing the walls. The tops will just have to be done after assembly because of how the panels interlock.
What are people's recommendations for finishing the Zebrawood veneer? The natural colors are nice, although a TINY hint of red might be cool, but I think I will avoid taking chances with stains on expensive veneers that don't usually need it. Some sort of satin finish to seal & protect them is also preferable. Wax maybe?
I will have a LOT of screw countersinks to fill & sand too. Once I have done that, I will apply a R0.125" round to all edges (except veneered ones), and a R0.5" one to the front-side edges to attempt to soften baffle diffraction ripple. After some sanding sealer, I will be painting the non-veneered sides some sort of satin black. I have an HVLP gun...does anyone have recommendations for paints that work well in those? I used black tool enamel thinned with mineral spirits on my subwoofer, and that gave it a nice slightly textured finish isn't matte, but not satin either. I really like that, but it was a huge pain to pass through the gun!
All of the joints used non-locking rabbet grooves. All of my previous enclosures used interlocking rabbet joints, but I have found that it gets cumbersome to adjust width, depth & offset. I seem to get tighter tolerances with just width & depth as variables. Initially, I was being dumb and routing everything with no outer guides, so I inevitably had to re-do them all with some equal-thickness guides and 1/32" deeper to knock out my mistakes. To do that, I used the lathe to turn out some Delrin bushings to fit over the stock rabbet bushing/bearings to get the right width.
Skipping way ahead...
I have lined the inside of the panels with 5/8" open-celled foam. In the past I have used a spray adhesive, but I didn't feel like killing brain cells this time, so I just stapled it in place. No panels are glued together yet. The braces WERE glued & screwed.
I am still figuring out where the crossovers will go. Since the baffle will not be removable, they need to go somewhere accessible. I am thinking of sticking them on the sides up around the drivers. Will that be problematic? I don't know, but it seems unlikely. If I decide to electronically filter everything, I can always drill new homes for binding posts & remove the passive XOs.
Speaking of binding posts, the ones I received didn't quite fit into the plastic spacers I had. Well, that is not a problem when you have a lathe in the garage! Damn I love brass...I think it is even more nice to work with then Delrin.
Here they are all fitted nicely.
This is where I left-off before heading out for my trip. I am actually in Redmond, WA for an acoustic measurement seminar being given by a consultant my employer brought in for a couple of days. The audio fun never ends!
This will probably be the last project that uses MDF. I hate the stuff...what a mess! I rigged the shop-vac to attach to the router, and it helped, but it is a real nuisance to work with the stuff. Maybe it is nice and dense, and cheap, but I don't care. Baltic Birch is the way I am going in the future.
I have decided to use some 0.025" Zebrawood veneer for the front & top. The chamfer bit mashed up the woofer bores, so I can't just use their profile to use a flush-trim bit, and the counter bore is too shallow to get a bearing into. So, I will have to make a jig and veneer, trim and mask the baffles prior to gluing 7 screwing the walls. The tops will just have to be done after assembly because of how the panels interlock.
What are people's recommendations for finishing the Zebrawood veneer? The natural colors are nice, although a TINY hint of red might be cool, but I think I will avoid taking chances with stains on expensive veneers that don't usually need it. Some sort of satin finish to seal & protect them is also preferable. Wax maybe?
I will have a LOT of screw countersinks to fill & sand too. Once I have done that, I will apply a R0.125" round to all edges (except veneered ones), and a R0.5" one to the front-side edges to attempt to soften baffle diffraction ripple. After some sanding sealer, I will be painting the non-veneered sides some sort of satin black. I have an HVLP gun...does anyone have recommendations for paints that work well in those? I used black tool enamel thinned with mineral spirits on my subwoofer, and that gave it a nice slightly textured finish isn't matte, but not satin either. I really like that, but it was a huge pain to pass through the gun!
Last edited:

Transfer functions
Hi,
FWIW for once it does seem you can very near the designed
passive c/o using some fairly simple active c/o functions.
rgds, sreten.
I was in the same boat with you for the crossovers. I ended up putting them on the back wall behind the drivers. They actually fit through the driver cut outs nicely. Mind you, your enclosure is deeper than mine since it will be ported.
You may have different experiences, but I have always found that a few braces should be on each wall for the deadest enclosure. Have you thought about adding any going front to back?
You may have different experiences, but I have always found that a few braces should be on each wall for the deadest enclosure. Have you thought about adding any going front to back?
Thanks sreten. I tossed the XOs into LTSpice to get an idea of the cut-off frequencies. Since the drivers themselves are a part of the filtering in the passive design, I figured I would see how that worked out. Maybe I will play around a bit with my measurement mic. Since the DCX2496 is so darn easy to use, I can probably take some measurements with active and passive setups. Since the DCX lets me also control delay, I might be able to get the main vertical response lobe close to where it is with the passive XO.
reactivepower, I am sort of thinking of mounting them on the back. We'll see what I think up. I thought about using the back wall, but the ZRT page says that the back wall can be a reflection issue (hence 2x the foam) so I wanted to keep the XOs out of that path. As far as bracing goes, I just decided to keep it simple. I went way over-board with bracing in my subwoofer, and I don't know if that is of any real value. Since the largest panels are braced in this design, and the front/rear are about 25% as wide as those (almost the same width as the brace spacing) I figured it would not be too big a deal. Plane resonance in the sides seems like the biggest realistic issue to me (although eery little bit helps). As I sort of mentioned in the (overly wordy) original post, this is an exercise for me to let go of some of the obsessive-compulsive tendencies I have when it comes to fabrication.
reactivepower, I am sort of thinking of mounting them on the back. We'll see what I think up. I thought about using the back wall, but the ZRT page says that the back wall can be a reflection issue (hence 2x the foam) so I wanted to keep the XOs out of that path. As far as bracing goes, I just decided to keep it simple. I went way over-board with bracing in my subwoofer, and I don't know if that is of any real value. Since the largest panels are braced in this design, and the front/rear are about 25% as wide as those (almost the same width as the brace spacing) I figured it would not be too big a deal. Plane resonance in the sides seems like the biggest realistic issue to me (although eery little bit helps). As I sort of mentioned in the (overly wordy) original post, this is an exercise for me to let go of some of the obsessive-compulsive tendencies I have when it comes to fabrication.
I built an amplifier enclosure with zebrawood. To finish, I rubbed it with teak oil. The more coats you apply, the shinier it gets. It's really easy to work with. Zebrawood smells really funky, but that seems to go away with some finish. If you put a tint in the finish, I'd be worried that it would take away the contrast between light and dark, which is the most redeeming characteristic, to me.
I agree...I think that the natural color is best. I was thinking about using Danish or Tung oil, but I will also rad-up on Teak oil. I like Watco Danish oil because it gives a really nice, HARD durable finish and isn't too shiny. I used it on some red oak speaker tables and it ended up quite nice. Do you have any idea how Teak oil compares to Tung oil or Danish oil? Thanks!
I picked up some Teak Oil, along with the veneer & other supplies today. I'll test out that, Tung Oil and Danish Oil on a scrap section of the veneer to see what I think. As far as surface hardnesses/durability, Danish Oil seems to penetrate well and polymerize to a nice hard finish. It doesn't give a smooth gloss finish like clear varnishes, but it does penetrate & turn the wood itself into the hard surface.
Anyway, picture time!
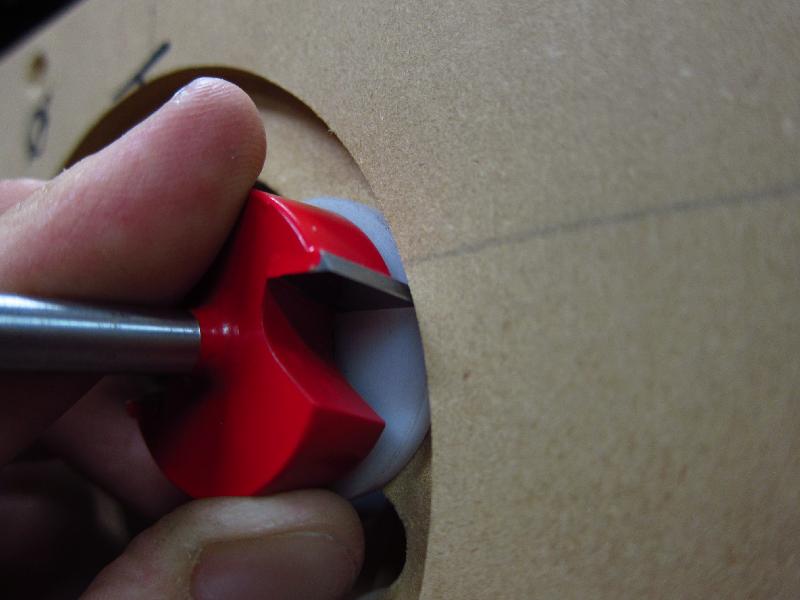
In order to trim the veneer flush to the speaker cut-outs, I needed to modify my rabbet bit. The speaker recesses are too shallow for any stock flush-cutter I could find, so I cut down the bearing shoulder & shank on this one. I love having access to a lathe!
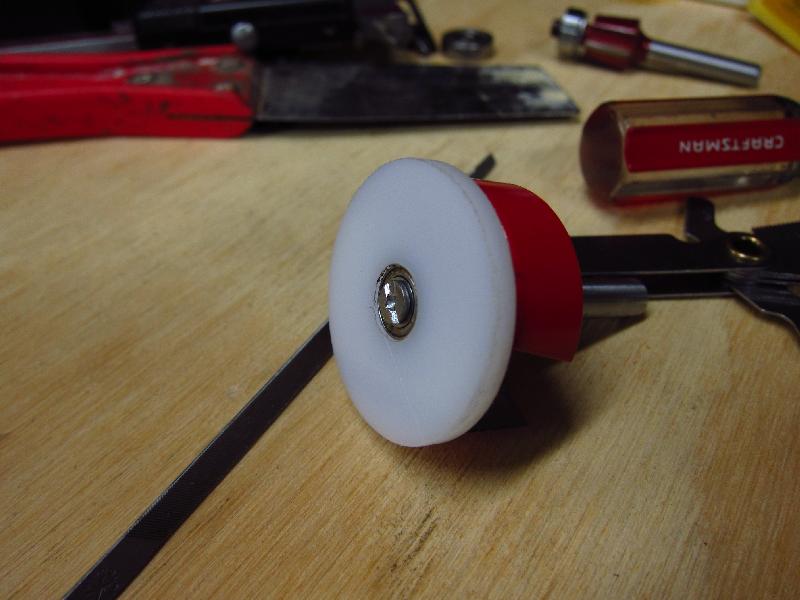
To get a flush cut, I turned out another bushing from some Delrin bar stock I had on-hand. I bored the hole to about 0.001" smaller than the bearing's outside diameter, and then carefully used sandpaper to enlarge it until I could just press the bearing in with about 35lbs of force. I also grabbed an extra M3x6 screw and ground the head down to keep things together (the original was too long and had too large of a head). I do NOT want this thing coming loose when I trim things, because the trimming operation will occur on fully assembled boxes! There are NO re-do's for that step!
Here is how it will be used. The outside diameter of the bushing is about 0.002" larger than the cutter. I wanted to be darn sure that I was not going to be enlarging the cut-outs & making an ugly gap. This should give a very snug fit between the drivers and veneer (it is already snug with the baffle).
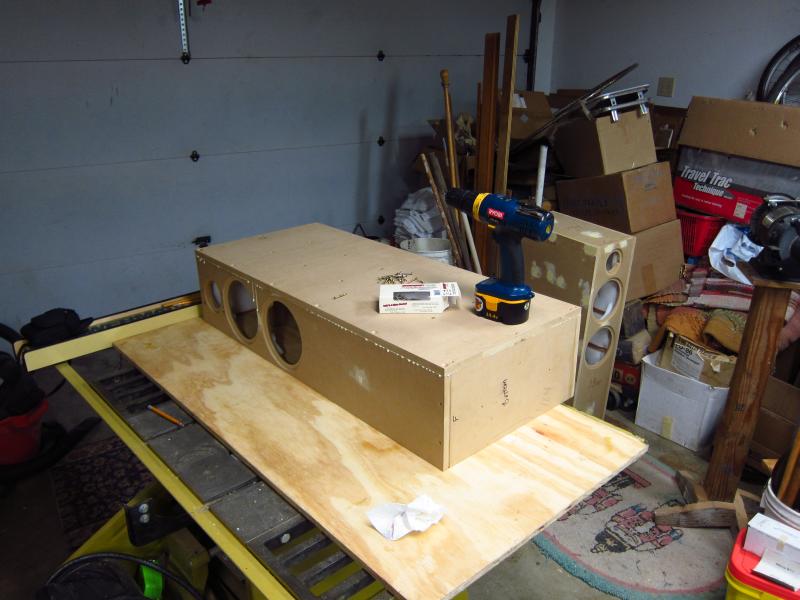
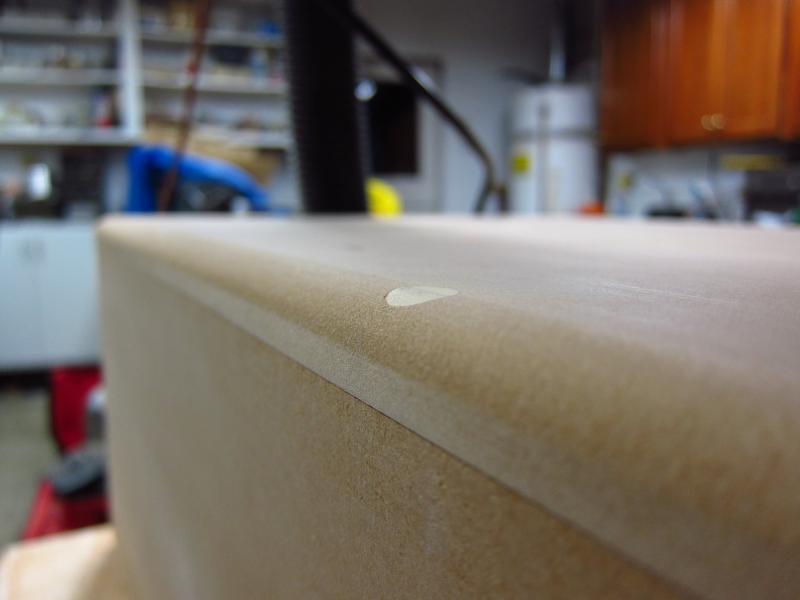
I got one of the boxes glued & screwed today. I started by gluing the top panel to the baffle & rear and making sure that it was all aligned properly, and then adding the bottom & aligning it to the baffle & rear. I then added the side with the pre-glued & screwed braces, dry-fitted the other side and pre-drilled the brace holes, countersunk them and then glued it into place. All sides were pre-drilled before this (dry assembly with really tight packing tape to get things in place for drilling). I can tell that I will need to do 3-4 rounds of puttying and sanding before I even think about paint. All edges will get a 0.125" round on them, and the front-side edges will get a 0.5" round. Among other benefits, it will help to hide all the dings in the soft MDF edges!

A gratuitous shot of the inside...because I can. I know, I know, that glue drip of about 2" length will add a nasty resonance around 7kHz! 😛
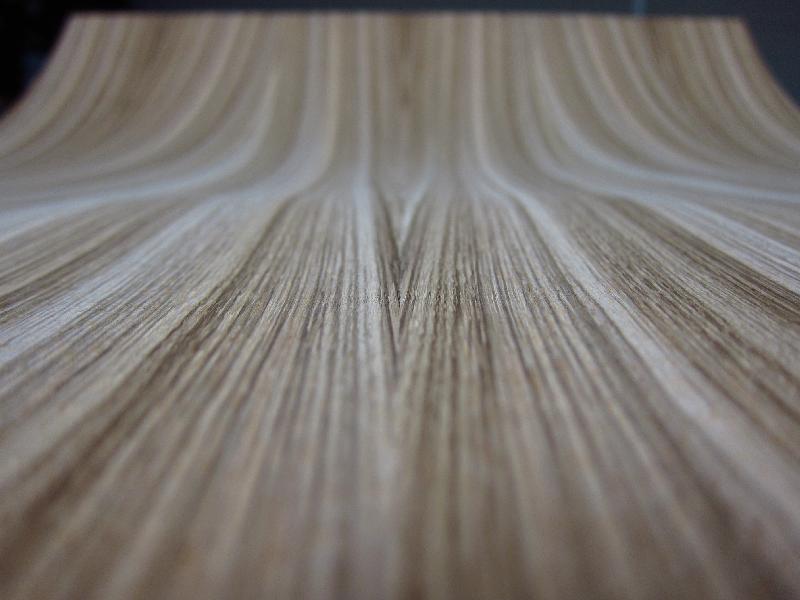
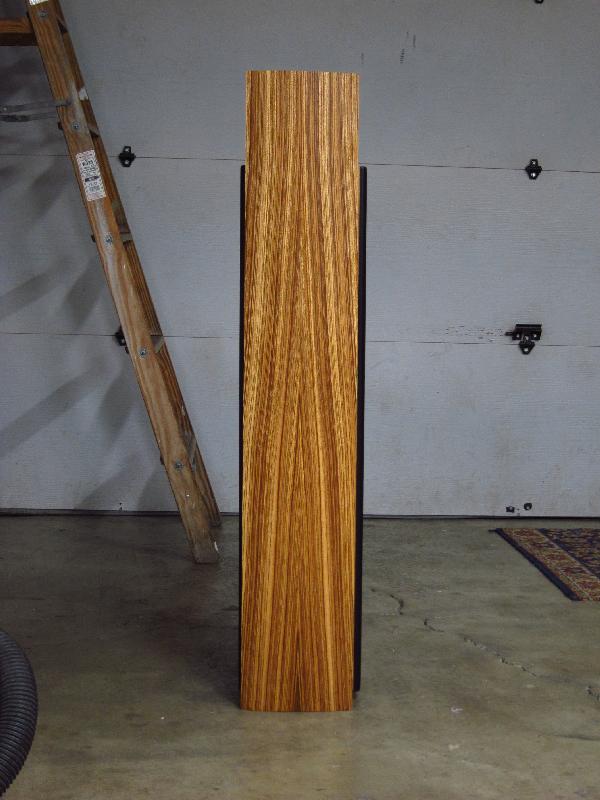
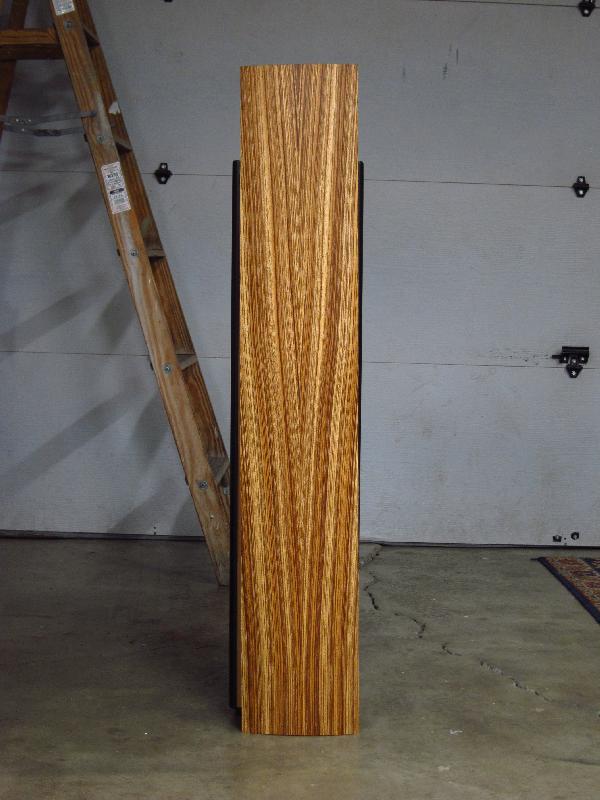
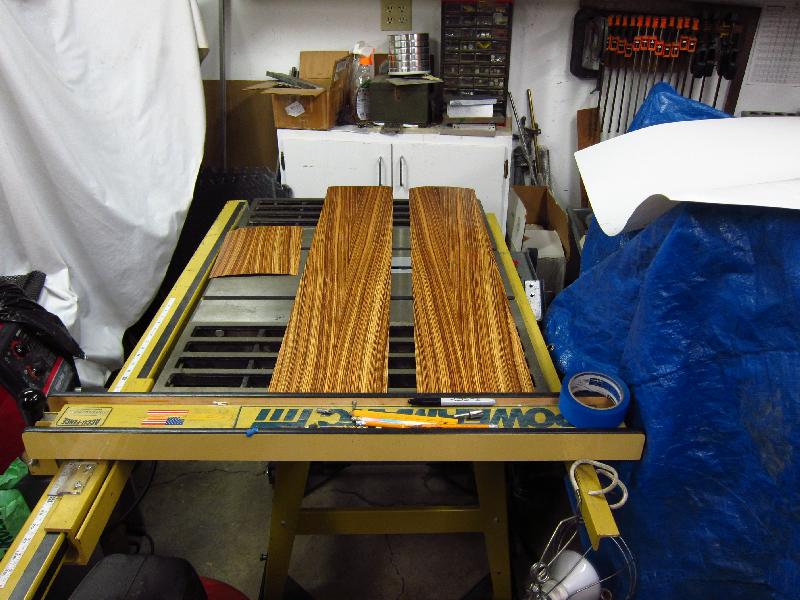
Yes, I decided upon Zebrawood. The local woodworking supply place had a fair amount of stuff available. Walnut was tempting, as was Cherry. In the end, I saw a pristine sheet of Zebrawood veneer and had to go with it. It was originally a 2'x8' sheet, but they were cool and cut it in half and let me just buy that (Southern Lumber in San Jose, CA...still have great service and great exotic wood selection).
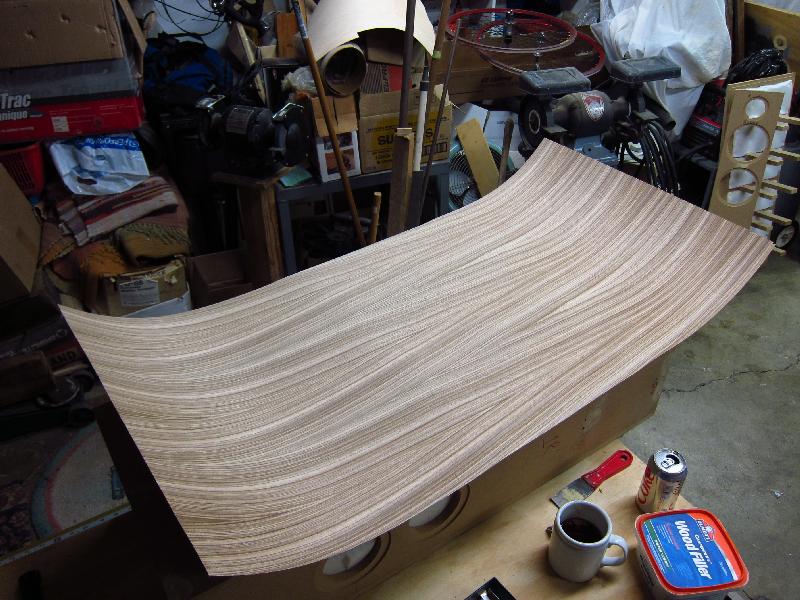
Another gratuitous shot. It is quarter-sawn, book-ended veneer. NICE! The 2'x4' piece seen here came out to $43, which isn't TOO bad. The birds' eye maple veneer they had goes for $214 for a sheet of the same size.
This is where the port flares will go. I slitted the acoustic foam so I can just glue & push them into place after painting.
So that is where I am. Tomorrow I plan to assemble the other box and then spend the next week or so puttying & sanding until everything is super smooth. After that I will apply the edge rounds. From there, I will add the Veneer, trim it and then spend a lot of time masking things prior to painting. The end is within sight (on the horizon, so to speak)!
Anyway, picture time!
In order to trim the veneer flush to the speaker cut-outs, I needed to modify my rabbet bit. The speaker recesses are too shallow for any stock flush-cutter I could find, so I cut down the bearing shoulder & shank on this one. I love having access to a lathe!
To get a flush cut, I turned out another bushing from some Delrin bar stock I had on-hand. I bored the hole to about 0.001" smaller than the bearing's outside diameter, and then carefully used sandpaper to enlarge it until I could just press the bearing in with about 35lbs of force. I also grabbed an extra M3x6 screw and ground the head down to keep things together (the original was too long and had too large of a head). I do NOT want this thing coming loose when I trim things, because the trimming operation will occur on fully assembled boxes! There are NO re-do's for that step!
Here is how it will be used. The outside diameter of the bushing is about 0.002" larger than the cutter. I wanted to be darn sure that I was not going to be enlarging the cut-outs & making an ugly gap. This should give a very snug fit between the drivers and veneer (it is already snug with the baffle).
I got one of the boxes glued & screwed today. I started by gluing the top panel to the baffle & rear and making sure that it was all aligned properly, and then adding the bottom & aligning it to the baffle & rear. I then added the side with the pre-glued & screwed braces, dry-fitted the other side and pre-drilled the brace holes, countersunk them and then glued it into place. All sides were pre-drilled before this (dry assembly with really tight packing tape to get things in place for drilling). I can tell that I will need to do 3-4 rounds of puttying and sanding before I even think about paint. All edges will get a 0.125" round on them, and the front-side edges will get a 0.5" round. Among other benefits, it will help to hide all the dings in the soft MDF edges!
A gratuitous shot of the inside...because I can. I know, I know, that glue drip of about 2" length will add a nasty resonance around 7kHz! 😛
Yes, I decided upon Zebrawood. The local woodworking supply place had a fair amount of stuff available. Walnut was tempting, as was Cherry. In the end, I saw a pristine sheet of Zebrawood veneer and had to go with it. It was originally a 2'x8' sheet, but they were cool and cut it in half and let me just buy that (Southern Lumber in San Jose, CA...still have great service and great exotic wood selection).
Another gratuitous shot. It is quarter-sawn, book-ended veneer. NICE! The 2'x4' piece seen here came out to $43, which isn't TOO bad. The birds' eye maple veneer they had goes for $214 for a sheet of the same size.
This is where the port flares will go. I slitted the acoustic foam so I can just glue & push them into place after painting.
So that is where I am. Tomorrow I plan to assemble the other box and then spend the next week or so puttying & sanding until everything is super smooth. After that I will apply the edge rounds. From there, I will add the Veneer, trim it and then spend a lot of time masking things prior to painting. The end is within sight (on the horizon, so to speak)!
Last edited:
OK, time for more updates!
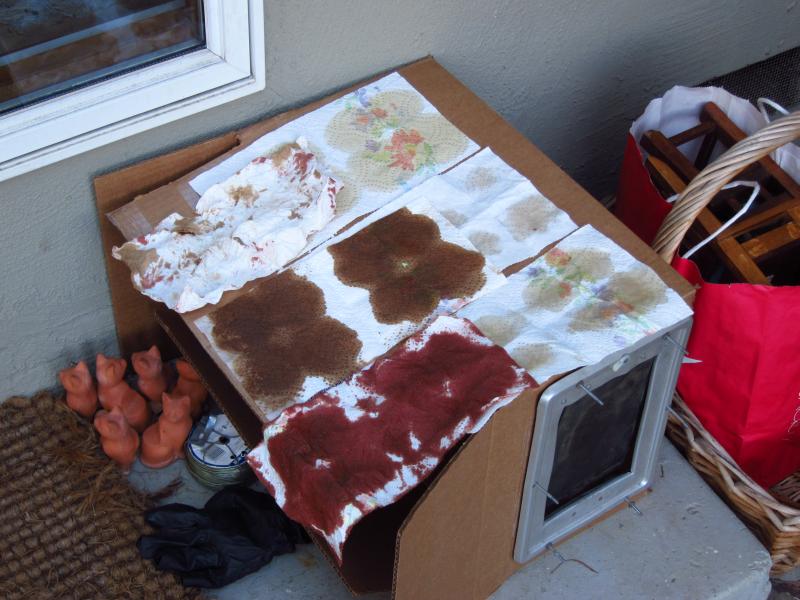
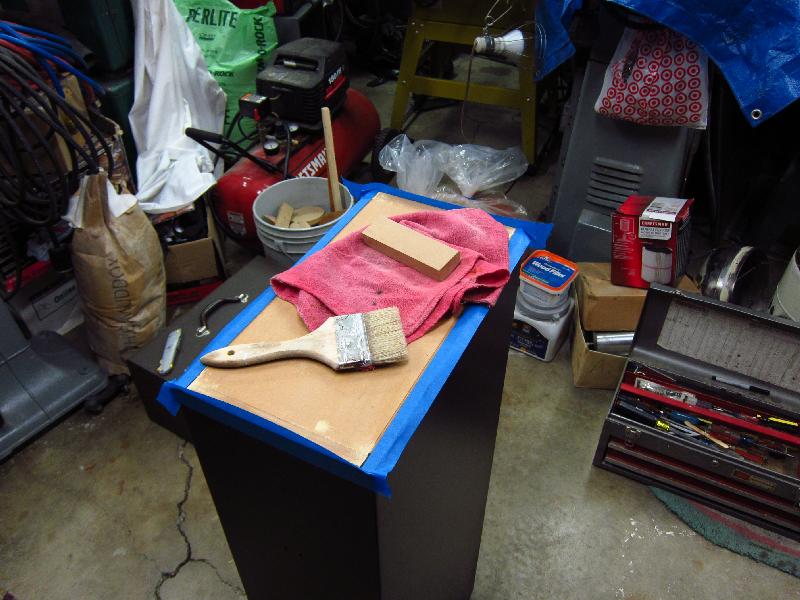
I spent a few minutes playing with some oil finishes. Here were the five contenders. The two colored ones on the right were tested just "because I can."
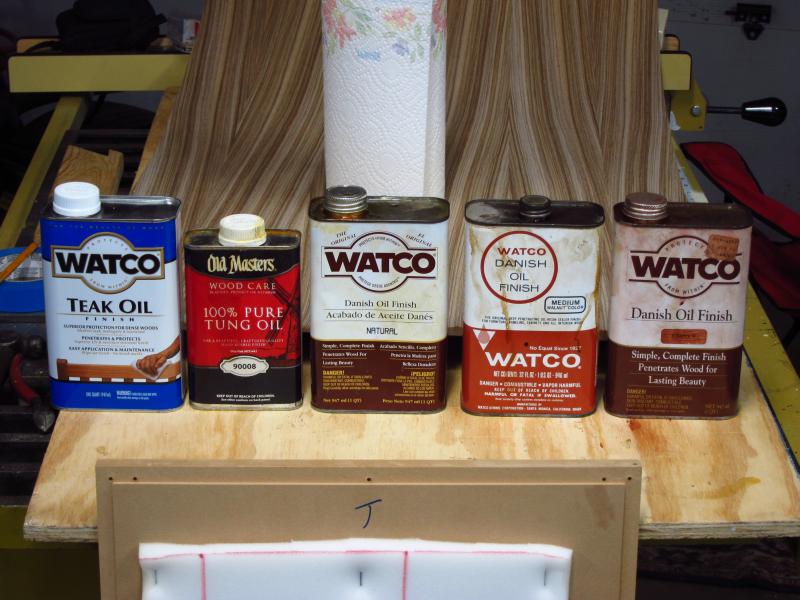
This is what they looked like about 20 minutes after application (same order as the cans above). I will need to give them a couple of days to fully cure though. They already look a little different by now. And of course, the angle and source of light also have a big effect.

A word of caution when dealing with finishing oils: the curing process is exothermic. Don't wad up the rags/paper towels and toss them into a waste bin unless you want to risk a fire. It is probably REALLY unlikely to have ignition, but it is not unheard of. Just let them cure out in the open and you will be fine.
I got around to assembling the second enclosure. The first step was to align, glue and screw the top and baffle together.
Next, I glued & scewed the back to the top, and then the bottom. I used screws since I don't have 38" wide wood clamps.
The right side was installed next. Do you think that I had enough glue in there?!
From there, I dry-fitted the left panel and drilled the pilot holes in the braces (that were pre-installed in the right panel). I then removed the left panel, drilled its brace holes out, countersunk them and then glued & screwed it all together.
I ran some 220 grid sandpaper along all joints prior to gluing to make sure that there was no debris in them.
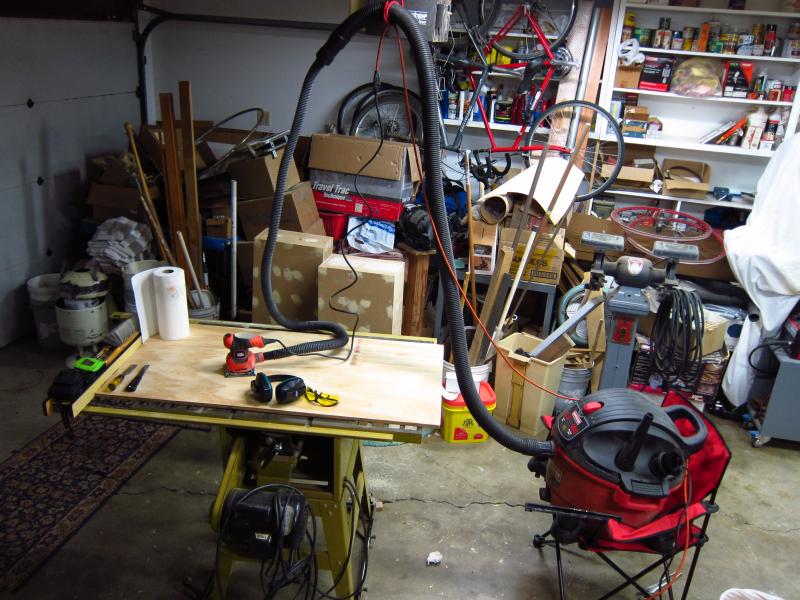
Since the other enclosure already had dry putty on it, it was ready for round-one of sanding. This was my nifty dust-collection apparatus.
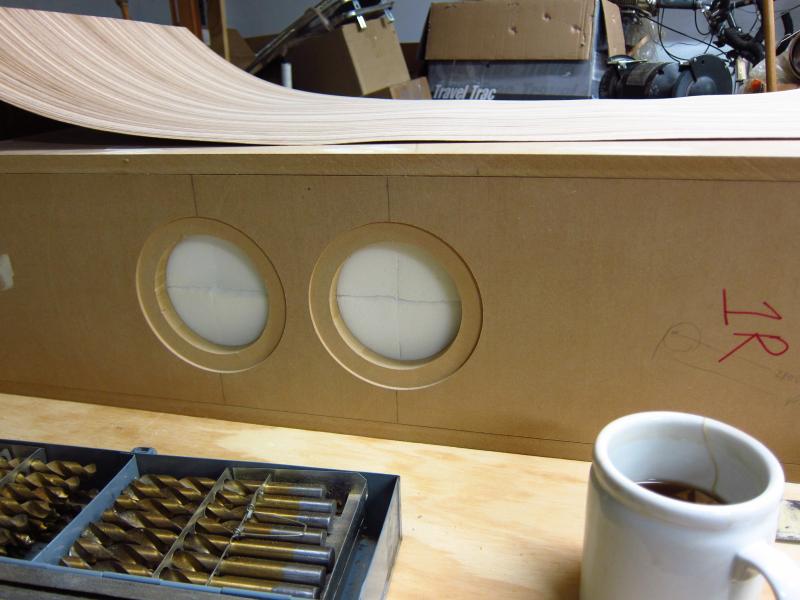
While I was at it, I added rounds to the edges. All non-veneered edges got a 0.125" radius on them.. The front side edges got 0.5" rounds. Since the bearing was sticking down into the veneer inlay recess, I stuck some strips of scrap veneer in there to guide the bearing properly.
Here is a closer look at the setup. I definitely countersunk the front edge screws further than they needed to be for this!

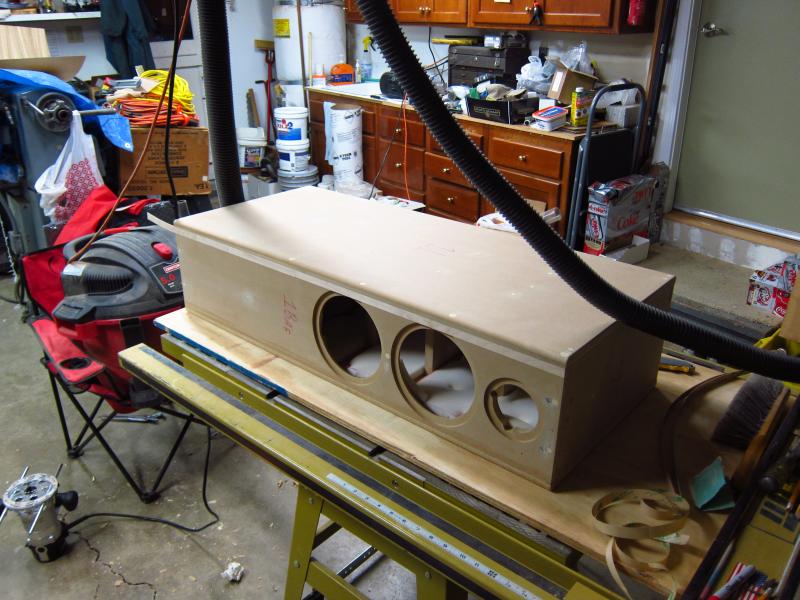
A little light sanding got things cleaned up a little. These still need one more application of putty, sanding with 220 & 400 grit, and 2-4 coats of sanding sealer.
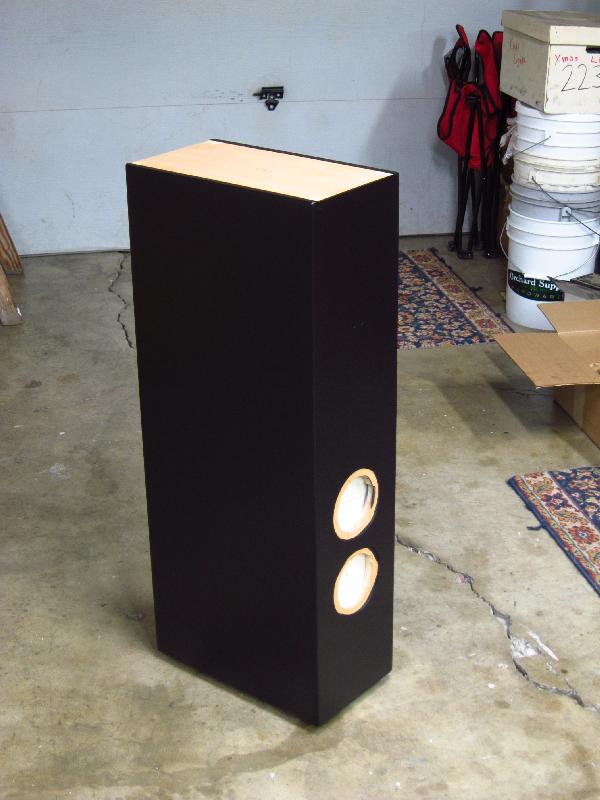
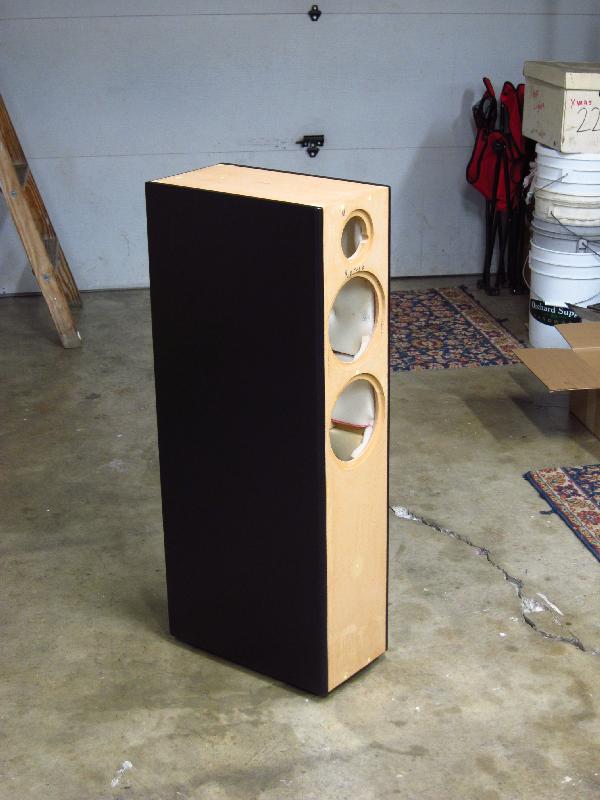
So, here we are. One of them is starting to shape-up well.
One thing that I need to do is widen the veneer inlay by 1/16" on each side. The edge got all messed up from the wood glue and stuff, so I am going to knock it off so that the veneer will have a nice straight mating edge. The thing is that no flush-trim router bit can work for this since the driver cut-outs are too close. My current idea is to adjust the table saw to make a 1/32" deep cut, with the fence spaced so it will take off 1/16" from the (banged up) inlay edge) and push the enclosure across the table saw, baffle faced down. I sort of wish that I had a sliding-blade table saw...pushing the enclosure across the table is a risky operation!
Also, what is the best way to attach the veneer? I am going to paint the cabinets FIRST (not the inlay sections though). Contact cement seems to be recommended a lot, but I worry about it squishing out and onto the paint or veneer (which will be pre-finished). I see that people have used a clothes iron on wood glue, which sounds nice since you can move the veneer around, but I am concerned about the heat damaging the wood. I guess I will have to play around with some scraps to get my contact cement technique honed.
I spent a few minutes playing with some oil finishes. Here were the five contenders. The two colored ones on the right were tested just "because I can."
This is what they looked like about 20 minutes after application (same order as the cans above). I will need to give them a couple of days to fully cure though. They already look a little different by now. And of course, the angle and source of light also have a big effect.
A word of caution when dealing with finishing oils: the curing process is exothermic. Don't wad up the rags/paper towels and toss them into a waste bin unless you want to risk a fire. It is probably REALLY unlikely to have ignition, but it is not unheard of. Just let them cure out in the open and you will be fine.
I got around to assembling the second enclosure. The first step was to align, glue and screw the top and baffle together.
Next, I glued & scewed the back to the top, and then the bottom. I used screws since I don't have 38" wide wood clamps.
The right side was installed next. Do you think that I had enough glue in there?!
From there, I dry-fitted the left panel and drilled the pilot holes in the braces (that were pre-installed in the right panel). I then removed the left panel, drilled its brace holes out, countersunk them and then glued & screwed it all together.
I ran some 220 grid sandpaper along all joints prior to gluing to make sure that there was no debris in them.
Since the other enclosure already had dry putty on it, it was ready for round-one of sanding. This was my nifty dust-collection apparatus.
While I was at it, I added rounds to the edges. All non-veneered edges got a 0.125" radius on them.. The front side edges got 0.5" rounds. Since the bearing was sticking down into the veneer inlay recess, I stuck some strips of scrap veneer in there to guide the bearing properly.
Here is a closer look at the setup. I definitely countersunk the front edge screws further than they needed to be for this!
A little light sanding got things cleaned up a little. These still need one more application of putty, sanding with 220 & 400 grit, and 2-4 coats of sanding sealer.
So, here we are. One of them is starting to shape-up well.
One thing that I need to do is widen the veneer inlay by 1/16" on each side. The edge got all messed up from the wood glue and stuff, so I am going to knock it off so that the veneer will have a nice straight mating edge. The thing is that no flush-trim router bit can work for this since the driver cut-outs are too close. My current idea is to adjust the table saw to make a 1/32" deep cut, with the fence spaced so it will take off 1/16" from the (banged up) inlay edge) and push the enclosure across the table saw, baffle faced down. I sort of wish that I had a sliding-blade table saw...pushing the enclosure across the table is a risky operation!
Also, what is the best way to attach the veneer? I am going to paint the cabinets FIRST (not the inlay sections though). Contact cement seems to be recommended a lot, but I worry about it squishing out and onto the paint or veneer (which will be pre-finished). I see that people have used a clothes iron on wood glue, which sounds nice since you can move the veneer around, but I am concerned about the heat damaging the wood. I guess I will have to play around with some scraps to get my contact cement technique honed.
When working with contact cement,make sure you use wax paper between the non tacky enclosure wall and the non tacky veneer face, then it assures good alignment technique. Then slowly slip the wax paper out while rolling the veneer flat. This is fairly difficult with large boxes🙁 There is only ONE take when the two sides touch and that's it.if you screw up you'll be chiselling the veneer off ....bit by bit.
I have no idea what you're trying to do with the "veneer inlay" but if the holes are going to make the router unstable you can always cut MDF discs to fit onto the rabbets to create a make-shift "flat top".
Thanks for the suggestions.
I will practice the wax paper technique. If I mess up, I am tossing the veneer, facing the baffle and painting it all black.
454Casull, the idea with the veneer inlay is to achieve a result somewhat like the pic of the really nice professional cabinet in the first post. For some reason, I can't resist making my life difficult.
Oh and good suggestion on putting supports in the cut-outs. I have been a bit concerned about keeping the router flat. Since I still have the circles that came out of the baffles, I am sure I can use some other scraps to mount them from the inside. Good call!
Quick update:
- I have 4 coats of Teak Oil applied to the Zebrawood veneer sheet now (2 coats the first day, 3rd coat 2 days later and 4th coat 4 days later). I hit it with some 600# sandpaper before the 4th coat, wiped it with tack cloth, and it is looking pretty darn nice.
- The enclosures have received a heavy coat of Minwax sanding sealer, and it was allowed to dry for 3 days. I then took some 220# to it with an aluminum block to level all bubbles & drips, and then hit it by hand with some 600#. They seem to be ready for paint now.
So, I really only need to paint them, let it cure for a week or so, and then install the veneer. The paint is Rust-Oleum Satin Black enamel, and I will be thinning it with some acetone and then applying it in 2-4 light coats with an HVLP gun. The other day I played with some wood & veneer scraps to get a feel for the contact cement I will be using (DAP Pro CC). Yeah, I will definitely need to make sure that I get the veneer positioned perfectly on the first try.
I'll get some pictures of the action when I get to this (hopefully this weekend).
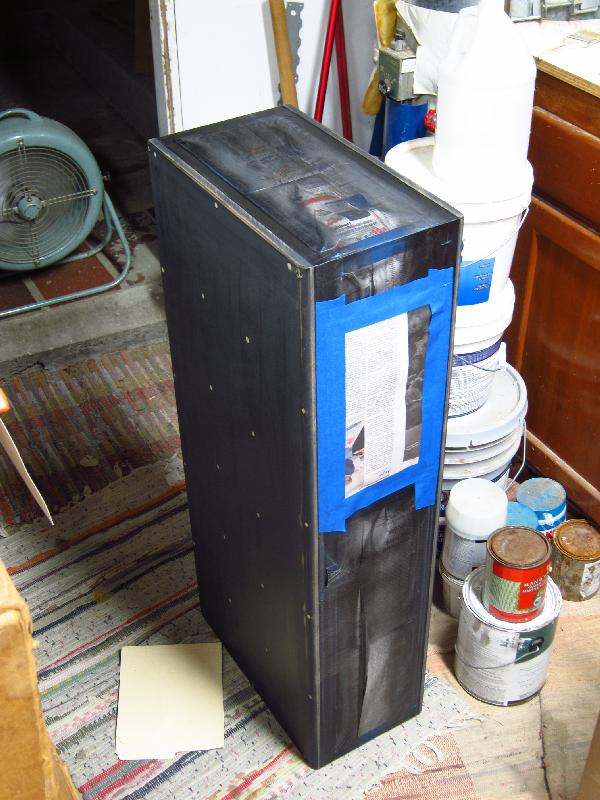
Here are some updates. The end is within sight!
Painting consisted of 4-6 layers of Rust-Oleum satin black enamel (oil-based). Why Rust-Oleum? Well, it cuts GREAT with acetone and applies really well from an HVLP gun. Thinning it with 1 part Acetone to 4 parts paint gives it a really fast dry time (sandable in 48 hours with 40-50F temperatures), and it is still just thick enough to give a VERY slight texture, which helps to hide small imperfections.
Here is one of them after 2 coats and some sanding. The acetone in the paint caused the wood putty to swell, which is why the puttied screw holes are so clearly seen after block-sanding.
Here it is after another 2 coats (two thin ones, with about 30 minutes between). I WISH I had a real spray booth, rather than a dusty garage! Truly though, I am the only one that will ever know about the small imperfections caused by dust landing in the wet paint...which is why it drives me nuts...I KNOW!
Here they both are, drying. The speaker holes and ports are good places to grab for moving. Just peel back the masking tape and lift...carefully. Since a car is supposed to go in the garage, one part of the "deal" with building speakers in there is that things get cleared at the end of the day.
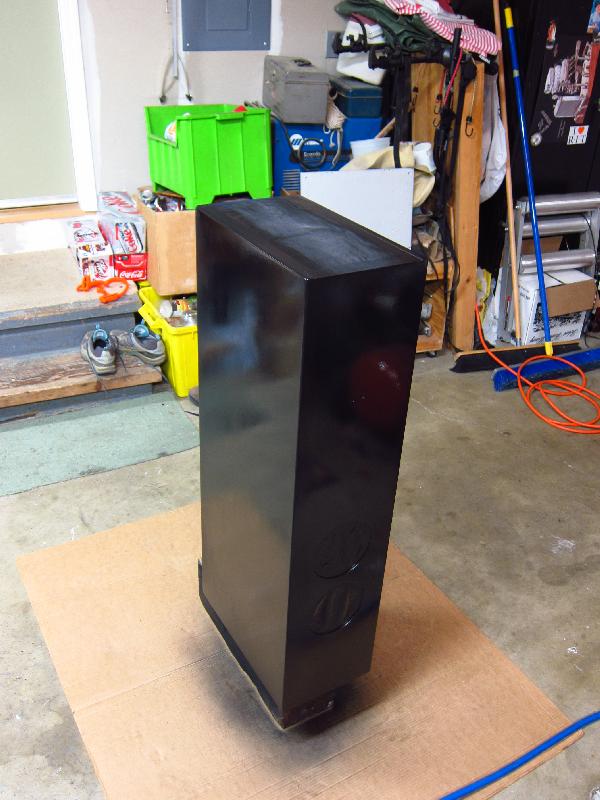
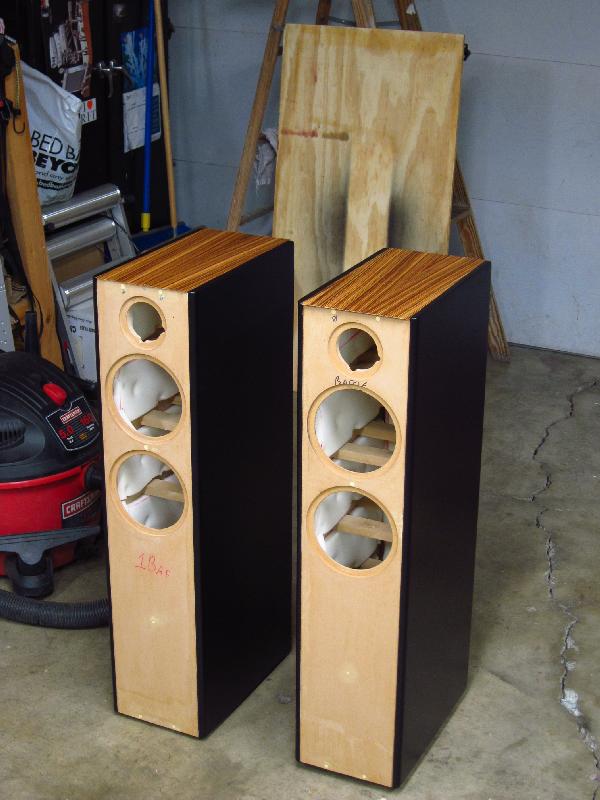
So, here we are about 4 days later. They are both looking great. One has 4 coats of paint (sanded between coats 2 & 3), and the other has 6 (sanded between coats 2 & 3, and 4 & 5). One needed more paint because the putty reacted to the acetone a second time, and I needed to block-sand it flat. After running a tack cloth over them, 50-70% of the crap that landed in the wet paint went away, which makes me happy.
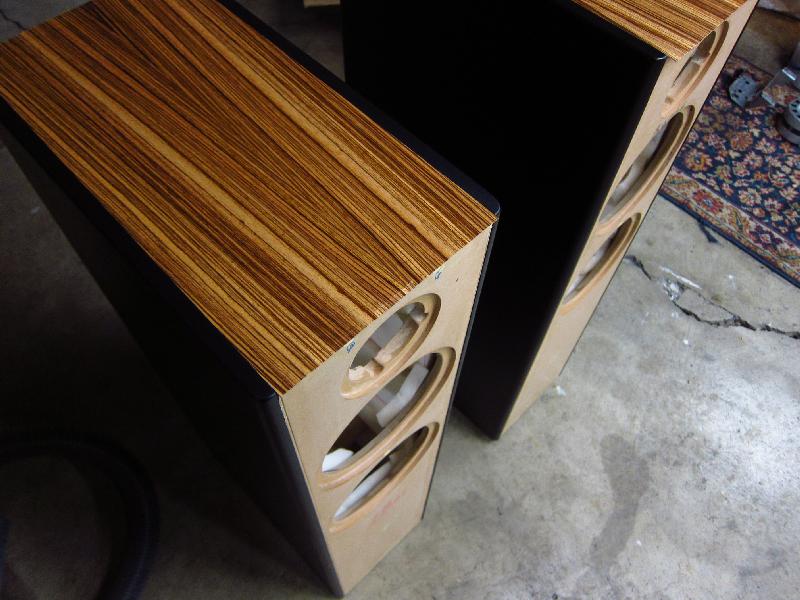
And from the front...
Now, the biggest challenge begins. Getting the veneer right is a one-chance operation. At least with paint, I can sand & re-apply. Not so with veneer & contact cement! BTW, the veneer is looking great after 4 coats of Teak Oil and getting hit with some 0000 steel wool. Anyway, I have to decide which way I want to orient the veneer.
Ultimately, I am going to go with the second choice ("V-up"). It draws the eyes up, rather than down into the floor.
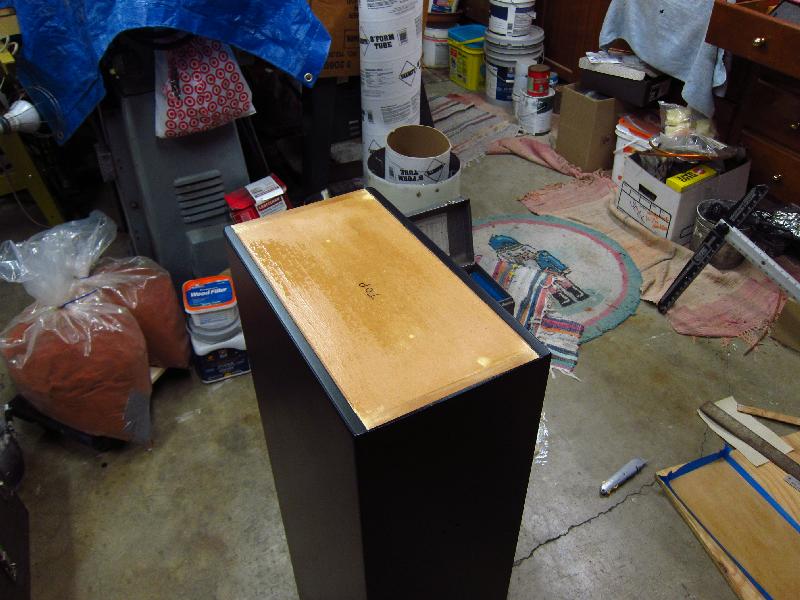
I did apply veneer to the tops tonight. I practiced using contact cement a week ago with some scraps. It isn't as bad to work with as I had thought. Everything you read says that "once the coated pieces touch, that is it and you cannot ever move them again." This isn't 100% true. If you let the cement cure for 20-30 minutes, you can generally have pieces making contact but not permanently sticking. Once you apply pressure though...game over, parts aren't separating again.
I used blue painter's tape to mask off the tops. I tested the cement to see if it would dissolve the paint with some scraps, and it does NOT harm it. Still, I do not want to have to go rubbing the speakers down with mineral spirits...it is faster to spend extra prep time than to have to spend time doing clean-up after. The cement was applied with a cheap-o brush. I also made a veneer scraper out of some MDF scrap that I sanded an edge off of, and then wrapped in a clean rag.
Similarly, I masked the veneer piece that I had trimmed to the exact width of the top inlay of the speaker. I do not want contact cement finding its way into the wood grain! I do not imagine that cleaning up with mineral spirits would be good for the oil finish. Also, the length is ~1/2" longer than necessary, which lets me use a router to trim it to the front/back exactly.

OK, so the cement has been applied and is starting to dry. I gave this another 25 minutes until it was no longer shiny & wet, and I could touch a finger to it without it being super sticky. The masking tape was removed about 10 minutes after application when it was still a little wet. I didn't want the tape getting glued on and leaving bright blue chunks.
I applied the veneer as follows:
- Lay 2 pieces of wax paper on the top, with a 1/2" gap in the middle, and only overhanging one inlay edge.
- Position the veneer over the top and align one full edge with the uncovered inlay edge.
- Run a finger firmly across the middle (where the wax paper gap is) from left to right. The veneer should be perfectly aligned with both inlay edges, and be cemented in the middle.
- Start sliding the wax paper out a couple of inches at a time toward the front/back, widening the center gap and pressing the veneer down with the scraper (swiping the middle & working outward, but WITH the grain...so multiple swipes).
- Repeat until the front/back are reached.
- Run a rag-wrapped index finger FIRMLY along all edges to ensure that the edges are completely joined.
So, I am going to give these a day or two to dry and then trim them off with a router.
I did manage to press too hard in a couple of places and crack the veneer where it overhung. Hopefully it will just trim off & be flush with the edge anyway. We shall see...
I still need to figure out how to trim the front edge of the top piece. I want the front veneer piece to overlap on top of the top piece, but it will not be easy to get a router into the front thanks to the inlay. I may have to do this with an X-Acto knife.
Here are the un-trimmed front pieces and a scrap. I think I will build my fiancee some small PC or bookshelf speakers and use these scraps on them!
Painting consisted of 4-6 layers of Rust-Oleum satin black enamel (oil-based). Why Rust-Oleum? Well, it cuts GREAT with acetone and applies really well from an HVLP gun. Thinning it with 1 part Acetone to 4 parts paint gives it a really fast dry time (sandable in 48 hours with 40-50F temperatures), and it is still just thick enough to give a VERY slight texture, which helps to hide small imperfections.
Here is one of them after 2 coats and some sanding. The acetone in the paint caused the wood putty to swell, which is why the puttied screw holes are so clearly seen after block-sanding.
Here it is after another 2 coats (two thin ones, with about 30 minutes between). I WISH I had a real spray booth, rather than a dusty garage! Truly though, I am the only one that will ever know about the small imperfections caused by dust landing in the wet paint...which is why it drives me nuts...I KNOW!
Here they both are, drying. The speaker holes and ports are good places to grab for moving. Just peel back the masking tape and lift...carefully. Since a car is supposed to go in the garage, one part of the "deal" with building speakers in there is that things get cleared at the end of the day.
So, here we are about 4 days later. They are both looking great. One has 4 coats of paint (sanded between coats 2 & 3), and the other has 6 (sanded between coats 2 & 3, and 4 & 5). One needed more paint because the putty reacted to the acetone a second time, and I needed to block-sand it flat. After running a tack cloth over them, 50-70% of the crap that landed in the wet paint went away, which makes me happy.
And from the front...
Now, the biggest challenge begins. Getting the veneer right is a one-chance operation. At least with paint, I can sand & re-apply. Not so with veneer & contact cement! BTW, the veneer is looking great after 4 coats of Teak Oil and getting hit with some 0000 steel wool. Anyway, I have to decide which way I want to orient the veneer.
Ultimately, I am going to go with the second choice ("V-up"). It draws the eyes up, rather than down into the floor.
I did apply veneer to the tops tonight. I practiced using contact cement a week ago with some scraps. It isn't as bad to work with as I had thought. Everything you read says that "once the coated pieces touch, that is it and you cannot ever move them again." This isn't 100% true. If you let the cement cure for 20-30 minutes, you can generally have pieces making contact but not permanently sticking. Once you apply pressure though...game over, parts aren't separating again.
I used blue painter's tape to mask off the tops. I tested the cement to see if it would dissolve the paint with some scraps, and it does NOT harm it. Still, I do not want to have to go rubbing the speakers down with mineral spirits...it is faster to spend extra prep time than to have to spend time doing clean-up after. The cement was applied with a cheap-o brush. I also made a veneer scraper out of some MDF scrap that I sanded an edge off of, and then wrapped in a clean rag.
Similarly, I masked the veneer piece that I had trimmed to the exact width of the top inlay of the speaker. I do not want contact cement finding its way into the wood grain! I do not imagine that cleaning up with mineral spirits would be good for the oil finish. Also, the length is ~1/2" longer than necessary, which lets me use a router to trim it to the front/back exactly.
OK, so the cement has been applied and is starting to dry. I gave this another 25 minutes until it was no longer shiny & wet, and I could touch a finger to it without it being super sticky. The masking tape was removed about 10 minutes after application when it was still a little wet. I didn't want the tape getting glued on and leaving bright blue chunks.
I applied the veneer as follows:
- Lay 2 pieces of wax paper on the top, with a 1/2" gap in the middle, and only overhanging one inlay edge.
- Position the veneer over the top and align one full edge with the uncovered inlay edge.
- Run a finger firmly across the middle (where the wax paper gap is) from left to right. The veneer should be perfectly aligned with both inlay edges, and be cemented in the middle.
- Start sliding the wax paper out a couple of inches at a time toward the front/back, widening the center gap and pressing the veneer down with the scraper (swiping the middle & working outward, but WITH the grain...so multiple swipes).
- Repeat until the front/back are reached.
- Run a rag-wrapped index finger FIRMLY along all edges to ensure that the edges are completely joined.
So, I am going to give these a day or two to dry and then trim them off with a router.
I did manage to press too hard in a couple of places and crack the veneer where it overhung. Hopefully it will just trim off & be flush with the edge anyway. We shall see...
I still need to figure out how to trim the front edge of the top piece. I want the front veneer piece to overlap on top of the top piece, but it will not be easy to get a router into the front thanks to the inlay. I may have to do this with an X-Acto knife.
Here are the un-trimmed front pieces and a scrap. I think I will build my fiancee some small PC or bookshelf speakers and use these scraps on them!
Last edited:
- Status
- Not open for further replies.
- Home
- Loudspeakers
- Multi-Way
- Current Project: Zaph ZRT 2.5 - A Change of Methodology