I'm starting this thread to document my build of paper mache horns designed by John, aka Carpenter. There'll be build pics, final pics and some measurements. Hopefully, someone else will get the itch to build these... or buy them from John.
If you've never heard about or seen a paper mache horn, go here:
Home of the Paper Mache Horn
It all started back in September 2010. John and I got acquainted when I visited him to hear the horns. They were so impressive I knew I had to have that sound. So, its been almost one year and here we are with the first horn done.
John has done a great job of describing how the horn is built. I'm not going to go into detail, but just list the steps I followed. John was there holding my hand all the way with all the little details like getting out blisters that form as the paper dries. There are many more little details that make a good paper horn into a great paper horn. And, it takes a lot of time and patience to put all those layers of paper.
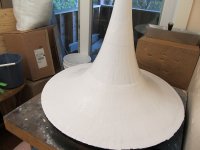
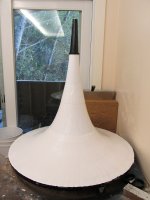
Below I've listed some of the steps I followed during the build. It all starts with the mould. The profile is tractrix. The driver is a JBL2445, with a 2 inch exit. So, we want the throat to be 2 inches in dia.
1. We* started by cutting about 1.1" x 11" strips of cotton paper. Any larger and the paper doesn't curve properly on the expanding tractrix-shaped mould. We used cotton paper, goes by the name strathmore and available at fedex.
2. Next we put vaseline all over the mould. This is so that the glue, which we will be applying later to the paper, doesn't stick the paper to the mould.
3. Then we took those cut up strips of paper, wetted them with water and started putting them on the vaseline-coated mould, starting on the widest side of the expansion. The strip of paper is laid with the long side (11") along the axis of the horn. We applied glue to each strip of paper that we laid on to the mould. The glue is normal wood glue, but its white in color so that the finished horn doesn't look yellow.
4. The next strip of paper we laid down was overlapping half the area of the strip before it. Then apply glue and keep moving to the right, rotating the mould as you go.
5. After finishing one full circle, which takes the longest, we applied hot mud, a plaster like thingy, on top of the paper layer. The hot mud adds strength to the bottom part of the horn. This, John says, is important for the larger part of the horn. We will be putting more layers on this part, so the hot mud doesn't show on the outside of the horn.
6. Next, we put more layers on the mould, but this time on the upper part. We overlap the new layer of paper with the already laid down layer by about 1.5". What next? More paper and more glue.
7. Next, we put down a layer on the now hardened hot mud. This is a layer directly above the first paper layer on the largest part of the expansion. Then, more glue.
8. Then, just keeping piling on the layers on the top part. We need a total of 12 layers on the horn. I got only 6 before running out of patience
*"We" means me and my gf, who was cool enough to travel with me, and help me with the build... everything from laying down the paper mache layers to nailing the perch with a pneumatic gun.
Those 6 layers took a total of 16 hours, approximately. This is ofcourse because we were doing it for the first time. But it still is a long time to be laying strips of paper and coating them with glue. On the other hand, if you want to meditate, this is just the project for you.
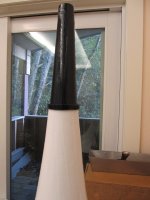
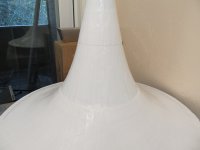
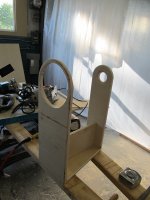
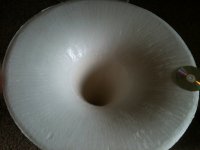
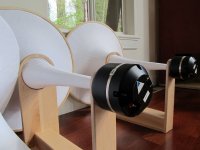
Well, after 6 layers, we took the horn off the mould. John has also designed a perch/linkage system for the horn to sit on, and also for mounting the compression driver to the horn.
Attached are some build pics of the horn, the mould, the linkage. The last pic shows the horn taken off the mould, with a CD for size reference. The uneven surface appearance is due to the vaseline that will be removed soon.
If you've never heard about or seen a paper mache horn, go here:
Home of the Paper Mache Horn
It all started back in September 2010. John and I got acquainted when I visited him to hear the horns. They were so impressive I knew I had to have that sound. So, its been almost one year and here we are with the first horn done.
John has done a great job of describing how the horn is built. I'm not going to go into detail, but just list the steps I followed. John was there holding my hand all the way with all the little details like getting out blisters that form as the paper dries. There are many more little details that make a good paper horn into a great paper horn. And, it takes a lot of time and patience to put all those layers of paper.
Below I've listed some of the steps I followed during the build. It all starts with the mould. The profile is tractrix. The driver is a JBL2445, with a 2 inch exit. So, we want the throat to be 2 inches in dia.
1. We* started by cutting about 1.1" x 11" strips of cotton paper. Any larger and the paper doesn't curve properly on the expanding tractrix-shaped mould. We used cotton paper, goes by the name strathmore and available at fedex.
2. Next we put vaseline all over the mould. This is so that the glue, which we will be applying later to the paper, doesn't stick the paper to the mould.
3. Then we took those cut up strips of paper, wetted them with water and started putting them on the vaseline-coated mould, starting on the widest side of the expansion. The strip of paper is laid with the long side (11") along the axis of the horn. We applied glue to each strip of paper that we laid on to the mould. The glue is normal wood glue, but its white in color so that the finished horn doesn't look yellow.
4. The next strip of paper we laid down was overlapping half the area of the strip before it. Then apply glue and keep moving to the right, rotating the mould as you go.
5. After finishing one full circle, which takes the longest, we applied hot mud, a plaster like thingy, on top of the paper layer. The hot mud adds strength to the bottom part of the horn. This, John says, is important for the larger part of the horn. We will be putting more layers on this part, so the hot mud doesn't show on the outside of the horn.
6. Next, we put more layers on the mould, but this time on the upper part. We overlap the new layer of paper with the already laid down layer by about 1.5". What next? More paper and more glue.
7. Next, we put down a layer on the now hardened hot mud. This is a layer directly above the first paper layer on the largest part of the expansion. Then, more glue.
8. Then, just keeping piling on the layers on the top part. We need a total of 12 layers on the horn. I got only 6 before running out of patience
*"We" means me and my gf, who was cool enough to travel with me, and help me with the build... everything from laying down the paper mache layers to nailing the perch with a pneumatic gun.
Those 6 layers took a total of 16 hours, approximately. This is ofcourse because we were doing it for the first time. But it still is a long time to be laying strips of paper and coating them with glue. On the other hand, if you want to meditate, this is just the project for you.
Well, after 6 layers, we took the horn off the mould. John has also designed a perch/linkage system for the horn to sit on, and also for mounting the compression driver to the horn.
Attached are some build pics of the horn, the mould, the linkage. The last pic shows the horn taken off the mould, with a CD for size reference. The uneven surface appearance is due to the vaseline that will be removed soon.
Attachments
Last edited:
Oh no... these are too big, too delicate, and just too precious to haul across 200 miles. I'm bringing my OB speakers... not as much fun, but not bad at all.
Yeah, I read his instructions too, but didn't get it until he showed me how. Without John's help, they are next to impossible to build.
John's a great guy too! Have you met him? A great innovator.
Yeah, I read his instructions too, but didn't get it until he showed me how. Without John's help, they are next to impossible to build.
John's a great guy too! Have you met him? A great innovator.
Oh no... these are too big, too delicate, and just too precious to haul across 200 miles. I'm bringing my OB speakers... not as much fun, but not bad at all.
Yeah, I read his instructions too, but didn't get it until he showed me how. Without John's help, they are next to impossible to build.
John's a great guy too! Have you met him? A great innovator.
After all that work, it wouldn't do to take a chance and I sure don't blame you for being reluctant. I'm sure that your OB's are pretty good as well!
I've never met him, isn't he lucky!
I'm not the jealous type so I usually enjoy being around talented people.
Where abouts does John live?
Best Regards,
Terry
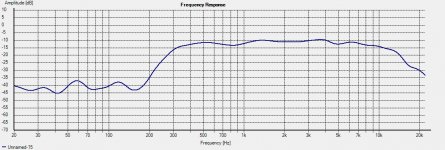
Initial Measurements
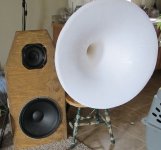
Here's the on-axis response at approximately 2'-0" from the horn mouth. Its within 5 db from 300 Hz to 10 kHz. To me, that's awesome.
I only got to listen to it for a little while today. I sat the horn and the linkage on a chewed-out chair next to the OB. It is crossed to a Eminence Deltalite 2515II on an OB. Crude 24db BW crossover at 400 Hz. Even with the crude crossover and a thorough mismatch with the bass section, it sounded awesome. Horns have an effortless quality to them that makes them very easy to listen to. It fills the room with sound. Voices have this palpable, real quality which I really enjoy. Plus the paper, IMO, adds a very soft and natural flow to the sound. More listening impressions after the second horn is done.
The bass was obviously lagging behind by 15-20db in efficiency. The bass amp went into protection several times trying to supply enough power to keep up with the top horn.
The bass section really needs a horn for itself. I'm planning to build a reflex loaded front horn that can get me down to 40 Hz.
Attachments
Last edited:
Hey there RA7! Nice job of documenting your adventure. I love the homespun horn stand you conjured up
It's exciting to see your enthusiasm. Get some acetone and rub off that Vaseline and you can add a few layers to the inside of your creation to smooth things out. If it's back-heavy, a wooden rim and another six layers of paper will offset the weight of the compression driver. If that doesn't help (or you've just grown weary of applying paper ), you can always extend the base so that it protrudes beneath the driver.
It's been a lot of fun getting to know you and your girlfriend, Greased-Lightning
It's exciting to see your enthusiasm. Get some acetone and rub off that Vaseline and you can add a few layers to the inside of your creation to smooth things out. If it's back-heavy, a wooden rim and another six layers of paper will offset the weight of the compression driver. If that doesn't help (or you've just grown weary of applying paper
), you can always extend the base so that it protrudes beneath the driver. It's been a lot of fun getting to know you and your girlfriend, Greased-Lightning
purchase it from FedEx: Strathmore Ultimate White. 100% pure cotton writing paper. You can use any paper you want, just make certain that it doesn't fall apart easily when wet.
Thanks John
The driver is mounted to the wood perch and exits through a 2 inch hole. The 2 inch hole is only 1/2 inch deep. On the other side, the horn has a PVC ring that is slightly bigger than 2 inches and so, the hole of the horn mounting side is also made bigger by the same amount as the PVC pipe outer dia.
I still have to get the vaseline off the paper, and maybe add one or two layers just to make it pretty. After all that is done, the horn goes on the perch and the perch and is glued using epoxy.
This is all John's technique, I'm just the trying the best I can to describe it.
I still have to get the vaseline off the paper, and maybe add one or two layers just to make it pretty. After all that is done, the horn goes on the perch and the perch and is glued using epoxy.
This is all John's technique, I'm just the trying the best I can to describe it.
I know this is an old thread, but I'm looking at building a paper horn just like this. My concern is that paper walls would be 'paper thin' when it comes to transmitting sound and vibrations outside the walls of the horn? I can see a wood or metal horn being much better at this? I do however find my metal horns color the sound to be a bit metallic, and have always loved paper cone woofers for matching vocals in it's pleasing coloration.
I can wamly suggest getting the prints from John, for me it was an "a-ha" moment when I realized that John was not a wizard after all, at least not a kind that would take to make such pretty horns without developing a very fine (and complex) procedure.
A couple of bucks bought me a way out of many hours of frustration
(and the thrill of developing the technique myself, but sometimes we have to focus the energy and fast forward some parts... so, free choice )
A couple of bucks bought me a way out of many hours of frustration
(and the thrill of developing the technique myself, but sometimes we have to focus the energy and fast forward some parts... so, free choice
)I can wamly suggest getting the prints from John, for me it was an "a-ha" moment when I realized that John was not a wizard after all, at least not a kind that would take to make such pretty horns without developing a very fine (and complex) procedure.
A couple of bucks bought me a way out of many hours of frustration
(and the thrill of developing the technique myself, but sometimes we have to focus the energy and fast forward some parts... so, free choice
Thank you for the generous compliment, Nikola.
I hope you are well, and that your projects are moving forward.
- Status
- This old topic is closed. If you want to reopen this topic, contact a moderator using the "Report Post" button.
- Home
- Loudspeakers
- Multi-Way
- Building John's Paper Mache Horns