I'm thinking maybe the leg is a little too fat.
Nice craftsmanship David that leg respect.
For the looks a simple square one looks better I think, that is my taste clean simple. Spikes in the foot of the leg will make a cool impression.
Last edited:
Nice craftsmanship David that leg respect.
For the looks a simple square one looks better I think, that is my taste clean simple. Spikes in the foot of the leg will make a cool impression.
I'm a curvy sort of guy
")

No way. Any thinner and it would look insignificant. You don't want it to look like a skinny dining table chair leg do ya?
I only mean a little bit, but I take you point. There is a slight flat spot near the top you can't see, I'll make one more test piece & make my mind up from there.
Progress has been slow, it's not from a lack of trying though.
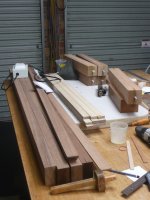
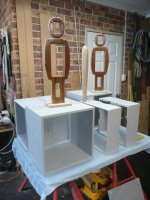
I have now made three prototype legs & modified one of them to finally arrive at a shape I am happy with. Now all I have to do is make eight more, why eight if I already have one I'm happy with, well it turns out I'm not happy with the colour of the Tasmanian Blackwood I bought from the local supplier. It is too blond and will not give the appearance I am looking for. When I bought the wood I compromised, because the next supplier about 160klm away. Once I had seen the finished (Blond, see photo) leg I knew it wasn't right and would only annoy me for the rest of my life if I didn't change the timber. Each leg takes at least half a day to make so I still have a long road ahead.
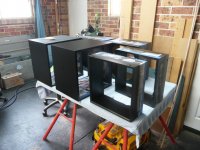
I have sprayed the base boxes with 2k primer, the next step for them is to spray them with K&H Bumper Texture coat & then with automotive acrylic enamel. The color is from an Alfa and is called Bronze Metallic.
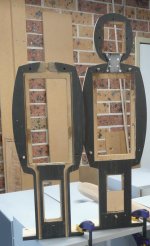
I have spent the last day & a half joining the Mid driver section to the tweeter driver section, it turns out the CNC router didn't cut the recesses as I expected, it was surprisingly difficult to get everything to line up properly.
Hopefully I will get the speakers finished over the Christmas break.
I still haven't decided what to do for feet, the speakers have to be about 35mm off the floor to accommodate the speaker connections which will be under the bass box, spikes are out, I'm not a fan.
I have now made three prototype legs & modified one of them to finally arrive at a shape I am happy with. Now all I have to do is make eight more, why eight if I already have one I'm happy with, well it turns out I'm not happy with the colour of the Tasmanian Blackwood I bought from the local supplier. It is too blond and will not give the appearance I am looking for. When I bought the wood I compromised, because the next supplier about 160klm away. Once I had seen the finished (Blond, see photo) leg I knew it wasn't right and would only annoy me for the rest of my life if I didn't change the timber. Each leg takes at least half a day to make so I still have a long road ahead.
I have sprayed the base boxes with 2k primer, the next step for them is to spray them with K&H Bumper Texture coat & then with automotive acrylic enamel. The color is from an Alfa and is called Bronze Metallic.
I have spent the last day & a half joining the Mid driver section to the tweeter driver section, it turns out the CNC router didn't cut the recesses as I expected, it was surprisingly difficult to get everything to line up properly.
Hopefully I will get the speakers finished over the Christmas break.
I still haven't decided what to do for feet, the speakers have to be about 35mm off the floor to accommodate the speaker connections which will be under the bass box, spikes are out, I'm not a fan.
Attachments
Cable Suggestions Requested
I have been pondering what type of cable to use to connect the drivers to the speaker terminals at the bottom of the Bass box. Because of all the effort I have gone to, I thought it would be nice to use a good quality cable, I don't want to break the bank though.
All suggestions are welcome.
the recess for the cable either side of the mid driver is 3.9mm wide so the cable can't be too large
Attachments

Hi D
Looking great as usual , do you need to put a flexy aid in with the acrylic enamel since its going over the top of Bumper texture .
CHeers
Mal
Mal
I know so little about this stuff I thought acrylic enamel was water based
Given the bass boxes shouldn't flex like a bumper might, maybe I don't need the flexy aid?
The Bumper Texture coat say's I need to use acrylic lacquer over it, which I assume is acrylic enamel.
What brand is the Bumper texture and do you have a link to the product . Acrylic lacquer is a single step product use with the required thinners and spray not water based .
Search on the NETT for its TDS.
As for cables I'm going with MOGAMI® - Bulk Cables
Cheers
Search on the NETT for its TDS.
As for cables I'm going with MOGAMI® - Bulk Cables
Cheers
Last edited:
What brand is the Bumper texture and do you have a link to the product . Acrylic lacquer is a single step product use with the required thinners and spray not water based .
Search on the NETT for its TDS.
As for cables I'm going with MOGAMI® - Bulk Cables
Cheers
The Bumper Texture is, or was, made by K&H, which have been taken over by 3M, it is very hard to find any data on the product & it doesn't show up in the 3M K&H Product list, I had some info on in but now I cannot find it. The info I had indicated you couldn't use 2K finishes over it hence the Acrylic Lacquer.
I'm a bit lost by what you mean with "Search on the NETT for its TDS."
Sorry David , Technical Data sheet .
I would say just use a acrylic paint with the correct thinners .
Is it
SMASH SUPPLIES :: Paint :: K&H Bumper Coat 1lt
http://solutions.3m.com.au/3MConten...assetId=1273667071216&blobAttribute=ImageFile
Cheers
At about 11:45pm while I was trying to get to sleep the words "Technical Data sheet" popped into my head
This is the product, your previous advice would still stand with this product as well.
SMASH SUPPLIES :: Paint :: K&H Bumper Texture Coat Black 1lt
This is the product, your previous advice would still stand with this product as well.
SMASH SUPPLIES :: Paint :: K&H Bumper Texture Coat Black 1lt
At about 11:45pm while I was trying to get to sleep the words "Technical Data sheet" popped into my head
This is the product, your previous advice would still stand with this product as well.
SMASH SUPPLIES :: Paint :: K&H Bumper Texture Coat Black 1lt
I have called #M & they cannot find it in their system, it may have been discontinued
I better go out & buy another can, then of course if it doesn't do the job I'm stuck with 2 cans of bumper texture coatI don't think it's ever going to end!
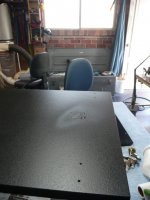
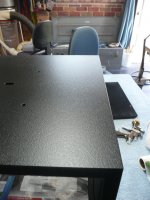
I had just finished spraying the texture coat on the base boxes when I found a blob of something on one of the sides that was still wet, and of course it wasn't on the bottom. Initially I managed to get get most of it off, but when I tried to get that last little bit off, it turned into the disaster you see in the photo. There's always tomorrow I guess, I was hoping to spray the topcoat tomorrow.
I had just finished spraying the texture coat on the base boxes when I found a blob of something on one of the sides that was still wet, and of course it wasn't on the bottom. Initially I managed to get get most of it off, but when I tried to get that last little bit off, it turned into the disaster you see in the photo. There's always tomorrow I guess, I was hoping to spray the topcoat tomorrow.
Attachments
Its a prick when something like that happens .What was it a peice of unmixed product in the paint .
What you really need to do is strain it through a filter into another container then pour it back into the can to remove contaminants .
I roll masking tape back on itself to make it double sided and press lightly on the foreign particle to remove it . But you need to do this while the paints wet .
Looking really nice David .
Cheers
Mal
Its a prick when something like that happens .What was it a peice of unmixed product in the paint .
What you really need to do is strain it through a filter into another container then pour it back into the can to remove contaminants .
I roll masking tape back on itself to make it double sided and press lightly on the foreign particle to remove it . But you need to do this while the paints wet .
Looking really nice David .
Cheers
Mal
I'm not sure what it was, it was too large to have come out of the gun & it wasn't wriggling so it wasn't a bug, it was just a piece of bad luck
I did the respray today & am happy to report all went well.
Originally I was going to spray the colour coat on all surfaces but have decided to only coat the outside of the large boxes as that is all you will see once the grill covers go on.
Getting a good coat inside the boxes is a real challenge.
Denibbing
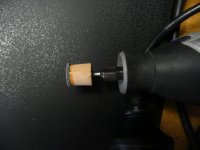
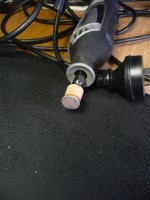
While I was at the auto shop buying the paint I saw this De-nibbing tool & sanding pads 3M? Perfect-It? Denibbing System - YouTube, great idea but a bit expensive so I made my own which I will use in my Dremel.
I used an old dremel bit, Araldited on a Western Red Cedar disc, which was cut using a sharpened piece of SS curtain rod, I then sanded the disc so it was perfectly round, coated the end of the in Araldite, stuck on a piece of self adhesive hook & loop, cut a disc of P1500 grit hook & loop paper & $350.00 was saved, the $350.00 doesn't include the pad larger disc sander in the clip.
Attachments

Last edited:
Cool , how about the foam between the sand paper and the arb .Have you used it yet ,make sure it doesn't run off across the job with something hard like the red cedar as a cushion.
Theres some great little tools out there .
CHeers
Hmm, maybe there is a design change in the offing, I probably have a bit of foam somewhere.
The Velcro does add a little bit of give, I have tested it but not on the actual finish, I was thinking of making an even smaller one, there is a couple of minor dirt flecks that I could sand out before the finish coats.
- Status
- This old topic is closed. If you want to reopen this topic, contact a moderator using the "Report Post" button.
- Home
- Loudspeakers
- Multi-Way
- OB Project Design Started, Help Requested.