http://users.tpg.com.au/users/gradds/curved sided loudspeakers.htm
still very much under construction, so if anyone wants to contribute, feel free to respond here or email me.
more actual construction pics to be added soon i hope !!
still very much under construction, so if anyone wants to contribute, feel free to respond here or email me.
more actual construction pics to be added soon i hope !!

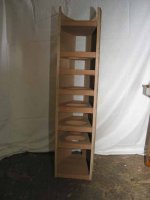
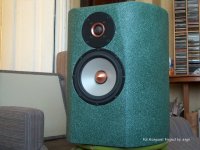
the speaker is in 3 sections. the top sction 4" high houses the XO. the middle sction 10" high houses a 6" and 1" and the bottom section about 30" high houses a 8". this is rear view. the black marks on the braces ar burn makes from the table saw.
Attachments
Jennice said:Interesting subject...
I've bookmarked the page and intend to drop by later. It'll be as a viewer for now, as I don't have any speaker projects planned at the moment.
Nice inspiration, though.
Jens
Indeed, this is a great site, very inspiring. Thanks for hosting it.
Dave
An excellent resource, Andy.
Did you coin the expression "Translam". I never realised before that I'm a Translamer but I'm not surprised.
What a fantastic collection of interesting looking speakers. I'd love to listen to them. Maybe we should we hold a show for all the curvers out there?
Also, I believe that there are some interesting speakers with a moulded construction. Do you have any plans to feature any?
All in all, it's wonderful that so many builders and manufacturers are starting to get away from the straight sided cabinets of old. Curves can solve a number of design problems and look better too.
Keep up the good work. Thanks.
Steve
A question for Keith, Rob and Ron
Can I pose a couple of questions to my fellow translamers?
With the Nonsuch 4, I held the segments together with wooden dowels (I had to abandon the single steel dowel shown in the photo). The wooden dowels were a fair solution but a pain in the butt to assemble. If you built your translams without dowels, did you have any problems with the segments sliding once the glue was on?
Also, if you used MDF, did you encounter any problems with the segments expanding and contracting heightwise as they absorbed and lost moisture? I'm having to move to moisture-resistant MDF.
Steve
to 7V
i actually have an air brad gun, I just fire a few brads trough each layer as I add it, no slippage.
have not have any appreciable problem with mdf moving etc. with glue absorption, although when using the thin layer lamination method I do find myself having to sand back the edges again after painting on primer/sealer.
angshudas said:Good work Navin, how do you keep the layers in shape after gluing, do you nail them in.
Angshu
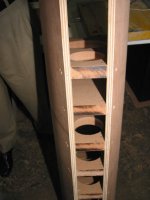
nope the nails you see in the close up are to positioning only. no nails were used. only wood glue and bands. I made a skeleton of one side. then assembled 6 layers of one side first. repeated the sme process for the second side.
the sides i thus built were free standing they did not need the braces to keep their shape. the braces are braces. pure and simple.
the nails are there to keep the braces movig while the gluw is drying.

- Status
- This old topic is closed. If you want to reopen this topic, contact a moderator using the "Report Post" button.
- Home
- Loudspeakers
- Multi-Way
- Cureved loudspeaker construction page started