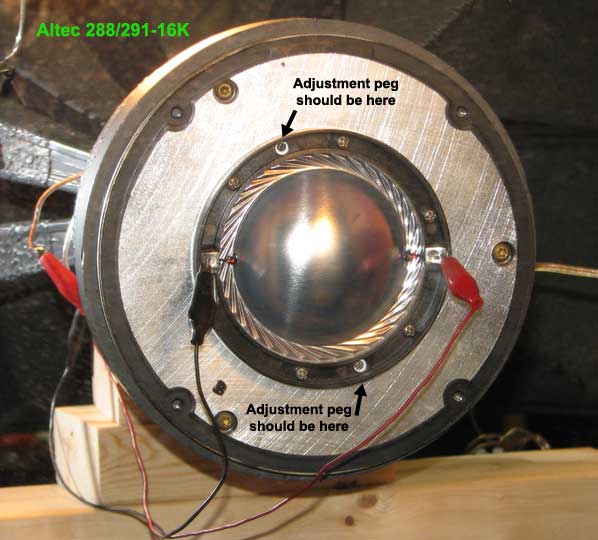
Here is a photo of the beast with its bare backside showing. Notice the size of the magnet compared to the diaphragm. 
6 screws + 2 little screws where the adjustment pegs should be.
Steve Schell over on the Altec board suggested that they may be dirt in the gap. I'll clean it again to hear what happens. Does seem to be rubbing.
6 screws + 2 little screws where the adjustment pegs should be.
Steve Schell over on the Altec board suggested that they may be dirt in the gap. I'll clean it again to hear what happens. Does seem to be rubbing.
Attachments

Ummmm,
The beauty of pictures ;
- You know, using the pictured orientation ( with the top-plate vertical to the ground ), I would never attempt the critical work of aligning a diaphragm .
- That position is just too awkward for my purposs .
- I usually place the driver ( exit down ) on a table where I can sit up close & get my face right into the DUT ( while steadying all hand movements so as to not put a screwdriver into the dome ) .
- Most times I place the drivers' exit over a pair of 1"x3" pine boards ( to allow the exit to breathe a bit ) .
- ie; most of the testing is done with the driver acting as a dome radiator .
- Maybe that's just me .
<> EarlK
Last edited:
The last screw out of the 6...
Hmm....
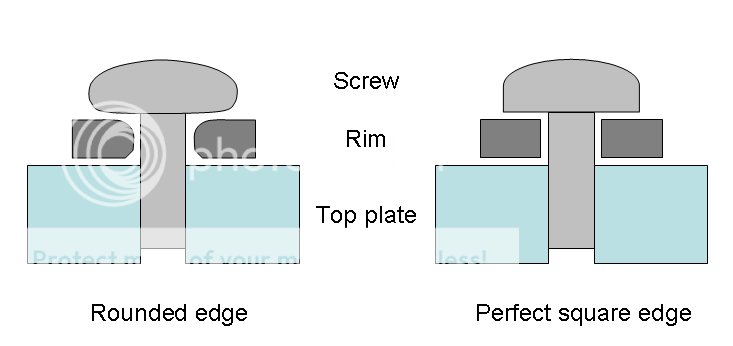
Is the 'rim' plastic? It looks narrow and there's not much area for pressure-evening washers
I'd guess maybe the edges of screw hole and the screw are rounded too much, or, in addition, the contact surface of screw is somewhat uneven. So the rim distorts under pressure. I suppose the the plastic rim is squeezable (to a degree).
Hmm....
Is the 'rim' plastic? It looks narrow and there's not much area for pressure-evening washers
I'd guess maybe the edges of screw hole and the screw are rounded too much, or, in addition, the contact surface of screw is somewhat uneven. So the rim distorts under pressure. I suppose the the plastic rim is squeezable (to a degree).
You're right, CLS. There may be no room at all for the washers. It's pretty tight.
I'm really not squeezing it that hard, but it probably does not take much.
No matter what I do, tightening raises the 3rd harmonic. The one I don't want. We shall see what a good cleaning and rework will bring.
I'm really not squeezing it that hard, but it probably does not take much.
No matter what I do, tightening raises the 3rd harmonic. The one I don't want. We shall see what a good cleaning and rework will bring.
panomaniac said:So what do you do ?
- Most all of my diaphragm fit-ups of have been accomplished within the time period of the mid 1980s till the mid 2000s .
- These "fram-swaps" were all on JBL drivers ( used in my SR business ) /and were either of the 2425/6/7 or 2441s variety of driver .
- These models lack precision locating pins for diaphragm centering .
- Centering ( of a diaphragm ) was best accomplished by running a pure sine wave tone ( @ 650 Hz ) through the unit and adjusting for the cleanest tone .
- Sweeping upwards through the octaves to check for other problems was the second step .
- Checking the resulting FR (on an RTA ) was the final step .
- Sometimes a different driver/diaphragm match-up ( mixing & matching ) was necessary ( the advantage of dealing with a dozens of drivers ) .
- This worked quite well until my Loftech generator went on the fritz .
FWIW:
- Experience teaches one what's acceptably "clean" ( for SR ) . This subjective evaluation is just about always borne out by the check of the FR on the RTA ( one does need to know what the FR should be on any given horn / which again points to having familiarity with all the products in the inventory ).
- Problematic diaphragms will generally manifest their problems within the FR world ( if one knows where to look ) .
- Distortion by-products are usually quite audible ( as you previously mentioned ) .
- I have yet to try to center up a diaphragm in an Altec 288 ( Altecs are my "hobby" driver of choice right now ) . Maybe I'll try my old method ( on my worst performing 288 ) & then compare the results with the spider-shim method when that arrives .
- I've also got a few surplus 1.4" entrance horns ( a Selenium copy of an older Emilar design ). Maybe I'll stuff the mouth of one with fiberglass / mount the driver / place the horn mouth down on the floor / & try a STEPS sweep off the backside after I'm done . I'll get back to you .
<> EarlK
a tiny bit of white silicone grease...
Hi, Panomaniac.
Hope this trick will help you.
When centering membranes on a very cranky Eminence unit, after fiddling a lot with the screw´s torque (no matter what I was doing, I was getting audible distortion in the final instance, when adjusting the third screw... ), I resorted to this simple trick: I put a very, very thin layer of dissipator´s grease in the dome support frame (on the face that contacts the plate): that stabilized a lot the fixture frame/plate, acting as a bond, and avoiding micro-movements of the rim. Then, with 650 Hz tone or so, I performed a ¨hand alignment¨(do so very carefully, but with confidence. In my case, only a steady pressure was needed, helping the structure to set into place, ´till the dome centered by itself). Then, I adjusted gradually the 3 screws, always with the tone playing. The driver must be placed with mouth down on a flat surface or, as EarlK suggested, on two cinder blocks to provide some breathe to the compression chamber.
The layer of grease must be very thin, so you don´t screw up (sorry for the pun) voice coil height with respect to polepiece.
It worked nicely.
Cheers
Hi, Panomaniac.
Hope this trick will help you.
When centering membranes on a very cranky Eminence unit, after fiddling a lot with the screw´s torque (no matter what I was doing, I was getting audible distortion in the final instance, when adjusting the third screw...
), I resorted to this simple trick: I put a very, very thin layer of dissipator´s grease in the dome support frame (on the face that contacts the plate): that stabilized a lot the fixture frame/plate, acting as a bond, and avoiding micro-movements of the rim. Then, with 650 Hz tone or so, I performed a ¨hand alignment¨(do so very carefully, but with confidence. In my case, only a steady pressure was needed, helping the structure to set into place, ´till the dome centered by itself). Then, I adjusted gradually the 3 screws, always with the tone playing. The driver must be placed with mouth down on a flat surface or, as EarlK suggested, on two cinder blocks to provide some breathe to the compression chamber.The layer of grease must be very thin, so you don´t screw up (sorry for the pun) voice coil height with respect to polepiece.
It worked nicely.
Cheers
Timely post Pano,
I've been meaning to ask for quite some time if you finally got your 288s playing properly ( now that the 416-8a situation is winding its way towards a final determination ) .
My STEPS software went flakey on me ( or maybe it was the other way around ) . So I haven't been able to use it for a while .
- Anyways, I did try to reseat my poorest performing 288 .
- The movable dowels make the diaphragm sit so tightly that nothing changed with this "B-grade" 288 ( likely because I didn't bothr to adjust the dowels ) . Did you ever get any dowels from GPA ?
Something to consider, the large ( old ) phenolic loading caps ( for 288s ) do spread out the downward pressure of any screws holding them & a diaphragm in place.
Perhaps something similar is in order for your diaphragms .
- ie; A large "sealer-jar sized" rigid washer to spread out the load/torque .
<> cheers
I've been meaning to ask for quite some time if you finally got your 288s playing properly ( now that the 416-8a situation is winding its way towards a final determination
) .My STEPS software went flakey on me ( or maybe it was the other way around
) . So I haven't been able to use it for a while .- Anyways, I did try to reseat my poorest performing 288 .
- The movable dowels make the diaphragm sit so tightly that nothing changed with this "B-grade" 288 ( likely because I didn't bothr to adjust the dowels ) . Did you ever get any dowels from GPA ?
Something to consider, the large ( old ) phenolic loading caps ( for 288s ) do spread out the downward pressure of any screws holding them & a diaphragm in place.
Perhaps something similar is in order for your diaphragms .
- ie; A large "sealer-jar sized" rigid washer to spread out the load/torque .
<> cheers
Last edited:
Ummmm,
<snip>
- I usually place the driver ( exit down ) on a table where I can sit up close & get my face right into the DUT ( while steadying all hand movements so as to not put a screwdriver into the dome ) .
- Most times I place the drivers' exit over a pair of 1"x3" pine boards ( to allow the exit to breathe a bit ) .
- ie; most of the testing is done with the driver acting as a dome radiator .
- Maybe that's just me .
<> EarlK
Funny Earl, I this exactly how I do it as well, I usually do it by ear and then if I am (highly) motivated do a couple of fixed tone FFTs at different frequencies. (I use a different FFT tool than you guys..) Mostly I just listen for the purest tone and that usually works well enough for me.. The orientation is pretty critical to getting it right - and don't overtighten the screws! Washers may not be a bad idea.
Mike - Any possibility that these diaphragms actually don't fit properly? Gap depth and width, etc? A good set of calipers and feeler gauges might be advisable, not to mention a good gap cleaning..
Note: All of my experience has been with jbl smaller format drivers like the 2420 and similar 1" drivers. I used a somewhat similar approach with my 2402 ring radiators because when I installed a new JBL diaphragm in one I noted some audible distortion problems.
Last edited:
Well what I did with driver #2 was to "build a guide."
I used the paper spider shim provided and tightened down the fram on top of the shim. Thus the fram should be centered. At this point one is supposed to adjust the locating pins, but I don't have any.
So I built a guide out of rope putty. As this proved too soft, I used epoxy putty. Basically I built hills of putty at 3 points around the diaphragm rim as guides. To keep the putty from sticking to the fram edge, I put a piece of paper right against the rim. So between the hill of putty and the plastic rim of the fram, the paper acts as a slip release. The putty was pushed tight against the slip paper, which is tight against the rim.
So now there are 3 blobs of putty pressed tightly against the plastic diaphragm rim (with a paper slip layer) so that the fram can not move laterally. But it can come straight up. The screws are removed and the fram and shim lifted out. Then the fram is replaced and has to go back in exactly the same spot because of the putty guides. Similar to the adjustable guide pegs, just from the outside.
The rope caulk proved too flexible, it pushes away when the fram is lifted, thus the epoxy putty - it's rigid when cured. I put masking tape on the back plate under the epoxy so that it could be removed. Not that there would be a problem leaving it, at least until the next diaphragm swap when the adjustment will need to be different.
I hope that this method works on fram #1, the one that has been so much trouble.
If I can, I'll post photos before I hit the road tomorrow. If not, when I get back.
I'll keep my fingers crossed. Distorting diaphragms can be insanely frustrating at times. I remember it was relatively easy on my 2420, although as has been pointed out there is no alignment mechanism built into most JBL drivers (none of the ones I've messed with) - I think given the very tight tolerances of the gap and variations in the diaphragms this may be a benefit as you have complete freedom to find the optimum spot. (If it exists for a specific driver and diaphragm combination..)
I would try it without the epoxy first in a horizontal orientation and see what you get.. Also the condition of the screws might be important, a dab of something that will not migrate under the screw heads might also prevent torquing of the diaphragm as you tighten the screws. (The suggestion of silicone heatsink goo sounds good to me..)
The tape idea on driver #2 was a good idea, just don't leave it there as the residue can get messy. I had some drivers so treated and it took goo gone and then a real good gap cleaning to those drivers playing right.
My one pair of JBL 2440 sound so good that I have not messed with the D16R2445 diaphragms someone installed prior to receiving them last week end. I think I will leave them alone for now... No messing with the diaphragms or gap cleaning for the moment anyway..
Last edited:
- Status
- This old topic is closed. If you want to reopen this topic, contact a moderator using the "Report Post" button.
- Home
- Loudspeakers
- Multi-Way
- Centering compression driver 'frams by tone.