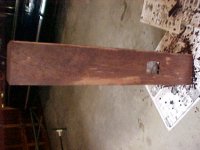
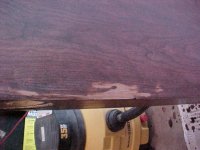
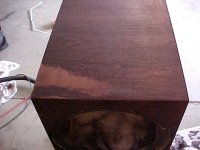
I'm getting close to finishing up my Kit281s, and have veneered them and stained them. The stain is just not soaking into areas as you can see below. My best guess is that I got overzealous with the sanding, and created some thin spots that are no obsorbing the stain. I need a product or technique that could help this out because right now it is driving me mad. Check out the pictures.
Thanks.
Thanks.
Attachments
Well, I don't know that I'm an expert, and can't offer a neato solution, but to answer *how* to avoid this problem:
Uneven absorption of stain by wood is quite normal and to be expected. To avoid it, you need to either use a gel stain, which will not penetrate deeply, or apply a coat of pre-stain sealer *before* stain.
I know of no fix other that removing what you have applied and starting over. Maybe somebody else will have a shortcut.

Staining Wood
I'm not an expert either, but I am into some woodworking. I think what you have is not that un-common, lots of wood will blotch. You could try an analine dye, you work the areas that are light, being a dye you kept applying, let dry apply again until you reach your desired colour. This technic gets as little tricky where the edges of the light and dark meet, but you can use water to pull out some of the dye. Analine dye is available at most woodworking speciality stores. Worst case scenario you will have to re-veneer. Good luck
Bob2
Thanks for the suggestions, and maybe some more information would help. I agree that I probably sanded it a little too thin... this being my first speaker/woodworking project if this is the only problem i think I will be ok. The pictures are after 3-coats of stain, and the guy at the local hardware store said a pre-treatment wouldn't have helped it since it is just veneer. Basically my problem is not too-much absorption, it is too-little.
Since it was apparent after the first coat that there was a problem in those areas, I had expected them to go away as I increased the coats. While the dark areas have continued to get darker, the light areas have no changed much since the first coat. Because of this, I am skeptical to try a darker stain since it doesn't seem like it will change the color that much. I wish I would have just gone with a light stain, then I wouldn't have been able to see these areas.
Since that is about $100 of veneer on there, I really hate to just rip it off and start over. I think if it comes to that, I will probably paint the back and sides a piano-black, and leave the front finished in that color. The fronts really look great as they are, no spots of splotches on them for whatever reason.
Thanks,
rob
Wood staining
Rob
Analine dye works differently than stain. Stain actually puts pigment on the wood, wood will only take pigment until the grain is full, dye actually colours the grain itself, or should I say the fibres itself. Anyway, I think it may be your only option other new veneer.
Bob2
Rob
Analine dye works differently than stain. Stain actually puts pigment on the wood, wood will only take pigment until the grain is full, dye actually colours the grain itself, or should I say the fibres itself. Anyway, I think it may be your only option other new veneer.
Bob2
The pictures are after 3-coats of stain, and the guy at the local hardware store said a pre-treatment wouldn't have helped it since it is just veneer. Basically my problem is not too-much absorption, it is too-little.
Free advice is often the most expensive.
You're problem was not too-little absorption, it was uneven absorption.
wotan2525 said:The pictures are after 3-coats of stain, and the guy at the local hardware store said a pre-treatment wouldn't have helped it since it is just veneer. Basically my problem is not too-much absorption, it is too-little.
Hmm, your hardware guy doesn't know much about wood finishing then
")
Looking at your photos, another reason for your problem comes to mind. Did you get wood glue on the veneer, and not clean it up properly? This sometimes causes the effect you have, if you don't take off carpenters glue with plenty of water when it is still wet, or scrape it off when fully dry.
Or was the surface contaminated with oil, grease or silicon polish?
There had been some wood glue on the veneer, but oddly not in the spots that were miscolored. I think when I was trying to send the remnants of the wood-glue is when I probably sanded the veneer too thin. My best guess is that the light spots are the paper-backing showing through, and that the paper backing refuses to stain the correct color. What shades are the anoline dyes available in?
there was also not really any conaminates at all on the wood. I sanded with 150grit, then used mineral spirits to clean them. I let the wood dry overnight, and then stained them. 3-coats over 2 days, but it was apparent from the first one that I would have problems. The light spots didn't show up until the stain was wiped off during the first coat.
Thanks,
rob
Yep, definitely looks like you sanded thru the veneer. Nothing will fix it except re-veneering, unfortunately. The smaller spots may be due to glue contamination, but those are beyond help, as well.
Next time, just sand the veneer lightly with 220 grit to remove any fuzzies. Veneer doesn't need much to get a nice flat finish. The most important step is making sure the substrate is near perfect before applying the veneer.
Give those 281s some break in time before judging them. Mine just sounded better and better.
Good luck!
Pete
Finishing veneeers is always difficult, but the first thing I would strongly reccommend that if you have the veneer make some small test panels and perfect the finish on them, cuts down the stress levels mightyly.
My thoughts in no particular order;
You don't say how you veneered the speakers but with liquid glue it can be possible to have glue pass through the veneer and end up on the surface.
There is a type of stain called gel stain, bartley is a well known brand in the US, that can be locally applied to build up layers of color, by wiping on and then off, rather than a dye this is a finely ground pigment in a varnish type body, so while you can apply multiple layers it will start to cloud the veneerif you add too many layers.
The drastic solution would be to bleach out the stain, apply a seal coat and then restain.
But I would try all this on the test panels, I would also try to reproduce the effect by sanding through so I was absolutlely sure that is what I am looking at.
I took some of the above from Fine Wooworking iss158 oct 2002 their web site has articles on all aspects of wood working including finishing
HTH
here is how i veneered them and it worked fairly well (especially for a noob like myself) i put a layer of elmers wood-glue down on my speakers, and then laid the speakers down on the veener for about 20 minutes. Then I cut the veneer near the correct size and used an iron and rolling pin to get a closer fit than just pressure would give me. This got rid of all of the air bubbles and wrinkles. Then I used a trim bit on my plunge router to finish the edges. It all worked fairly well until I got to the staining.
I was so happy to be almost finished.
Pete Mazz: did you built the TL design? Mine sounded amazing already, although they were really bright at first. I've probably got about 10 hours on them, and my only complaint so far is that they seem to be tuned a little low. I expected this though, because I dont think I got very much stuffing into the middle chamber, which leaves the very front chamer (near the end of the line) over-stuffed.
Thanks for all of the suggestions.... I'm very much considering just painting it all black at this point. The money and time to reveneer is going to be substantial.
Sigh.
rob
Uneven Stain
Through the veneer or glue????
Hmmmm
Take agood look at your work.
Are there any wood grain lines on the lighter areas?
If not or they slowly disappear you have sanded down to the paper backing.
Some of the advice is good. In this order
1 Seal your applied veneer with a shellac
2 sand it with no less than 220 grit paper with a black and by hand.
3 seal it again with shellac, then hand sand it one more time
4 wipe clean
5 one light coat of shellac
6 stain to desired colour
7 apply finish thinned 1/2 with appropriate thinner
8 second coat of finish full strength
9 sand with 400 and wipe
10 coat #3
11 sand with the finest you can get
12 last coat of finnish
13 Awesome
Mark
I agree with shellac as the best to prevent blotchiness
do you not find it hard to get the wood stained reasonably dark?
as a comment to analine dies - love the colour but
they really don't hold up well in the sun and u need to be careful about wetting veneer to the point of swelling and rippling
all IMHO- (wife disagrees w the humble part)
do you not find it hard to get the wood stained reasonably dark?
as a comment to analine dies - love the colour but
they really don't hold up well in the sun and u need to be careful about wetting veneer to the point of swelling and rippling
all IMHO- (wife disagrees w the humble part)
so whats the consensus about what I should do from here? try some analine dyes... where do i get some? rip the veneer and re-do it all? paint them black and just say eff-it? bleach the stain out and start over with shellac?
I personally think its a combination sanding through and the glue soaking through. On the top (pic 3) I can definetely see that I sanded through or near-through. On the back picture though, the splotchiness can not be anything but glue. I am baffled by it since almost all of the sides look fine except for the back on one, and a side on the other, and a small spot on the top. I think that I used the glue pretty much the same on every piece, but well.... I've learned alot on this project.
The next project (center channel and surrounds) will be done with contact cement... is this easier?
Thanks for all of thelp,
rob.
Instead of the analine dyes you could try glazing over the pale areas with artists oil cover, brushed well out you should be able to feather out the pale patches, allow to dry for a week or two before varnishing.
The sure result is painting black, if you bleach it out, you will still have to control the blotching.
I would say the artists oil is a low risk process, if it looks good then you are home.
Using a sealer to control the blotching works by reducing the stain penetration, so you may not be able to get the depth of colour you seem to be aiming for.
Ripping off and reveneering, unless you use different veneer still leaves you having to control the blotching, often wiping the wood surface with turps or white spirit will show up the finished appearance, and highlilght potential blotching.
All the recieved wisdom for furniture is not to use contact cement for veneering. (equally I have read many people who say it works fine for them)
I personally use a vaccum bag system or clamps and melamine clamp cauls,and white pva glue, but I always do test pieces to establish the amount of glue I need to apply to avoid bleed through.
but I have successfully used glue film in the past which is a solid sheet of glue you cut to size and then iron the veneer down as you did before, I laid an eight seater dining table top using this and it was very effective.
I would encourage you to make the effort for a solution that you can really live with, the last time I made a "I'm sure it'll look ok" compromise I ended up sawing it up for firewood as I couldn't bare to look at it a moment longer.
- Status
- This old topic is closed. If you want to reopen this topic, contact a moderator using the "Report Post" button.
- Home
- Loudspeakers
- Multi-Way
- seeking resident woodworking/staining expert