Hi all,
I'm starting a build, and will be uploading some pictures along the way. First just a description, and a request for any specific feedback.
I'll be using the Zaph ZDT3.5 design - I like the detail he puts into his designs, and I've already made some of his simpler full-range designs and been very satisfied.
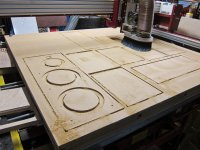
For the speakers, I'll be staying very close to Zaph's design, but because I have a 4x4 CNC router, I'll be tuning up the case a bit, recessing the terminal cups and access panels on the back, machining an aluminum cover for the amplifier compartment (more on that in a moment), and using stiffer mortised joints for all internal bracing, and rabbeted joints for the main panels. I will be veneering in bamboo, I think.
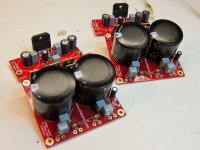
Since my current HT receiver (Pioneer VSX-815) isn't really up to 4 ohm loads, and it DOES have pre-outs, I thought this would be a good opportunity to do something I've wanted to do for a while, build a pair of active mains. To this end, I'm going simple, and using a chipamp.com dual-mono LM3886 kit, built into the bottom compartment of each speaker (not an acoustic chamber). I've made it a bit taller to give myself some working space. The 68W is well below the max for the speaker, but given my relatively small room (just barely big enough for these towers) and apartment lifestyle, I think it will be just fine. And hey, I can always bridge in another channel for $20 (or go biamped) if i ever need to add more power.
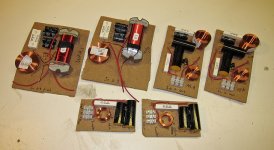
I'll be leaving the passive crossover design alone. It is tempting to try to design an active crossover and then bi or triamp the project because of the low cost of the chipamps, but I don't know nearly enough to reverse engineer Zaph's detailed work. Perhaps for a future project...
Two questions:
As I've got a CNC router (and this will be my first speaker project to utilize it), is there anything else I should be doing with the case? Any really fancy tricks that you'd just love to do, but don't bother trying to do by hand? Maybe putting in some shallow gasket channels for the removable baffle?
Electrical shielding in the amplifier compartment? I'm planning on getting the crossover boards up and out of the amplifier compartment in the base, and will probably spray the inside of that compartment with conductive shielding paint, but is there anything else I should do to shield the amp from the speakers, or vice versa?
-Sam
I'm starting a build, and will be uploading some pictures along the way. First just a description, and a request for any specific feedback.
I'll be using the Zaph ZDT3.5 design - I like the detail he puts into his designs, and I've already made some of his simpler full-range designs and been very satisfied.
For the speakers, I'll be staying very close to Zaph's design, but because I have a 4x4 CNC router, I'll be tuning up the case a bit, recessing the terminal cups and access panels on the back, machining an aluminum cover for the amplifier compartment (more on that in a moment), and using stiffer mortised joints for all internal bracing, and rabbeted joints for the main panels. I will be veneering in bamboo, I think.
Since my current HT receiver (Pioneer VSX-815) isn't really up to 4 ohm loads, and it DOES have pre-outs, I thought this would be a good opportunity to do something I've wanted to do for a while, build a pair of active mains. To this end, I'm going simple, and using a chipamp.com dual-mono LM3886 kit, built into the bottom compartment of each speaker (not an acoustic chamber). I've made it a bit taller to give myself some working space. The 68W is well below the max for the speaker, but given my relatively small room (just barely big enough for these towers) and apartment lifestyle, I think it will be just fine. And hey, I can always bridge in another channel for $20 (or go biamped) if i ever need to add more power.
I'll be leaving the passive crossover design alone. It is tempting to try to design an active crossover and then bi or triamp the project because of the low cost of the chipamps, but I don't know nearly enough to reverse engineer Zaph's detailed work. Perhaps for a future project...
Two questions:
As I've got a CNC router (and this will be my first speaker project to utilize it), is there anything else I should be doing with the case? Any really fancy tricks that you'd just love to do, but don't bother trying to do by hand? Maybe putting in some shallow gasket channels for the removable baffle?
Electrical shielding in the amplifier compartment? I'm planning on getting the crossover boards up and out of the amplifier compartment in the base, and will probably spray the inside of that compartment with conductive shielding paint, but is there anything else I should do to shield the amp from the speakers, or vice versa?
-Sam
After over a year, restarting this project! There are SOME benefits to unemployment. ")
Starting to build the cabinets now. The chipamps, power supplies and crossovers have been done for a while now, waiting for a home to live in. I did not deviate far from the original cabinet designs, saving the "fancy stuff" for another pair.
Attached are some photos showing updates.
-Sam
Starting to build the cabinets now. The chipamps, power supplies and crossovers have been done for a while now, waiting for a home to live in. I did not deviate far from the original cabinet designs, saving the "fancy stuff" for another pair.
Attached are some photos showing updates.
-Sam
Attachments
The cabinets are fully assembled now, glued with Titebond III, and I've put a 3/8" roundover on the sides and top. Will be using a 1/2" roundover on the front (even though a 3/4" roundover is recommended, my hand router is not sturdy enough to handle a 3/4" roundover bit).
I used some Bondo to fill in a few gaps, and made heavy use of my cabinet scrapers to level out parts of the cabinet and remove glue lines.
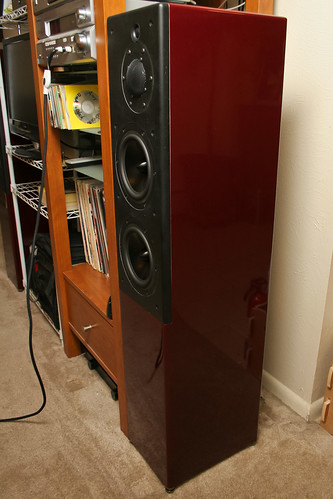
I've put a lot of thought into the finish... What I finally settled on is a sprayed single-stage, two-part urethane finish, specifically Sherwin Williams 3rd Dimension single stage. Including one pint of color, hardener, reducer, the comparable high build primer (Finish Line 410) and primer hardener, the cost of the paint was about $125. Whew! I'm spraying a very dark red (actually a Peugeot color), which is a solid color (not a metallic). I'll be spraying with my Astro HVLP gun (usually used for wood stains and stuff). It is my first time using automotive urethanes, so I've done a lot of reading.
-Sam
I used some Bondo to fill in a few gaps, and made heavy use of my cabinet scrapers to level out parts of the cabinet and remove glue lines.
I've put a lot of thought into the finish... What I finally settled on is a sprayed single-stage, two-part urethane finish, specifically Sherwin Williams 3rd Dimension single stage. Including one pint of color, hardener, reducer, the comparable high build primer (Finish Line 410) and primer hardener, the cost of the paint was about $125. Whew! I'm spraying a very dark red (actually a Peugeot color), which is a solid color (not a metallic). I'll be spraying with my Astro HVLP gun (usually used for wood stains and stuff). It is my first time using automotive urethanes, so I've done a lot of reading.
-Sam
Finally finished the speakers! Just thought I'd post some pictures for reference. Full list here: Zaph ZDT 3.5 Speakers - a set on Flickr
Completed cabinets by phidauex, on Flickr
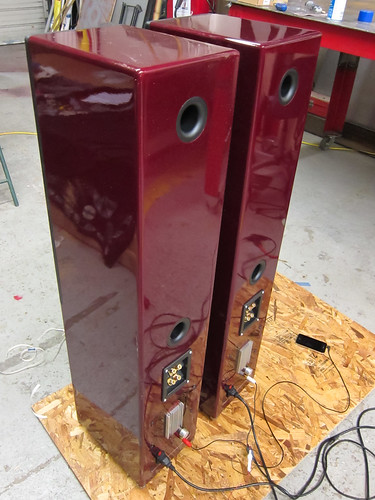
Painted cabinets by phidauex, on Flickr
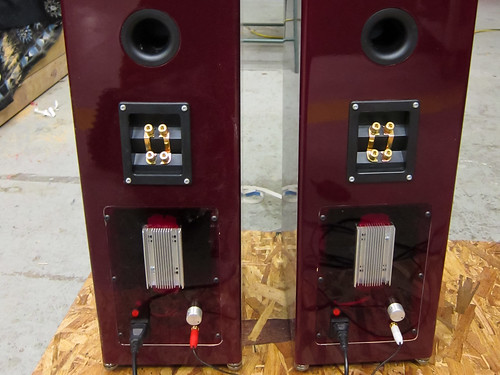
Rear of speakers by phidauex, on Flickr
The chipamps sound fantastic, and are a great match for these speakers - I can just barely hear them starting to break up a bit at the max output of the amps, which is far above any reasonable home listening level.
My biggest advice for others would be "don't fear the spray gun". It takes a bit of an investment to get started, but once you do, you'll never go back. I'm having great luck with my inexpensive Astro Euro HVLP spray gun. The quality of the finish is far beyond anything I've achieved with rattle cans.
-Sam
Completed cabinets by phidauex, on Flickr
Painted cabinets by phidauex, on Flickr
Rear of speakers by phidauex, on Flickr
The chipamps sound fantastic, and are a great match for these speakers - I can just barely hear them starting to break up a bit at the max output of the amps, which is far above any reasonable home listening level.
My biggest advice for others would be "don't fear the spray gun". It takes a bit of an investment to get started, but once you do, you'll never go back. I'm having great luck with my inexpensive Astro Euro HVLP spray gun. The quality of the finish is far beyond anything I've achieved with rattle cans.
-Sam
Miles - great sounding speakers are 40% parts quality, and 60% good design - and within parts, cost and quality are only loosely correlated. I'm sure these aren't the best sounding speakers ever built, but the Dayton Reference line are great for their price - solid, well built, well designed, good specs, etc. One thing I've always respected about Zaph's designs is that he bases them off of the real measurements of the drivers, not preconceived notions of cost and brand name. I'm very satisfied with this set of speakers, and the overall design.
As for proximity to the wall, they are about 8" from the wall right now - a little closer than I'd like, but not so close that I'm noticing any serious loading effects. In my case, moving them closer to the wall but getting a more optimal listening distance (2+ meters) was better than having them farther out from the wall, but with too-close listening distance.
-Sam
- Status
- This old topic is closed. If you want to reopen this topic, contact a moderator using the "Report Post" button.
- Home
- Loudspeakers
- Multi-Way
- ZDT3.5 build w/ chipamp active mains