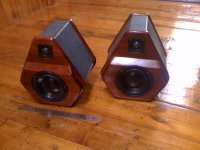
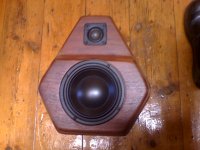
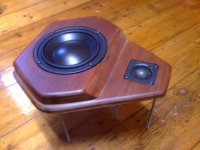
As time allows I will describe these in detail! They are a combination of natural Jarrah and stainless steel. Simple to build and gets away from the typical box shape. Any shape is possible!
I like the combination of leather and natural timbers but the finnish is up to you.
Originally these were a concept build, ie built to check the concept and find the flaws. I recently got them back from my brother who liked them but didn't want to pay for them.
Terry
I like the combination of leather and natural timbers but the finnish is up to you.
Originally these were a concept build, ie built to check the concept and find the flaws. I recently got them back from my brother who liked them but didn't want to pay for them.
Terry
Attachments
When I got these back my bro hadn't looked after them, one of the backs had faded, scratches etc so I took them apart, refinished them and am now redesigning the x-over. I thought what will now do is provide this two way as a complete build. Need a little time to put it together so you will get it as time allows.
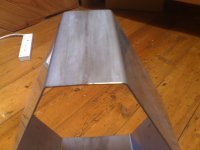
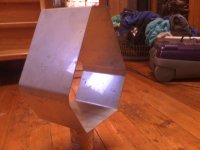
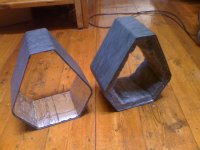
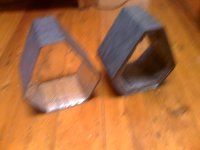
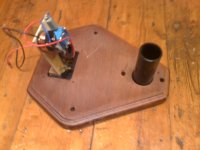
To start with, the basis of the build is to use steel as the sides top and bottom. For those with access to a bending machine it will be easy. Otherwise you will have to go to a sheet metal shop and have them done for you. These were surprisingly inexpensive. Note that the more you have made, the cheaper each enclosure becomes. This is because most of the production time is in setting the machine up for each bend. After that each bend takes seconds.
Each enclosure is made in two halves, the halves are MIG or TIG welded together then the joints are cleaned up.
When you finnish this part you should have something like this. Of course the shape is limited only by your imagination and the restraints of a bending machine.
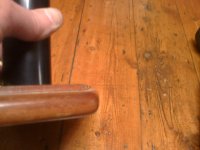
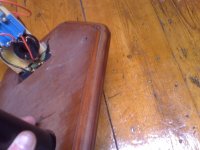
Jarrah can splinter if you use a router in the wrong direction, other than that, it is just another hard wood.
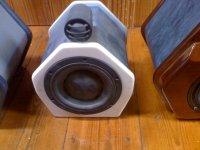
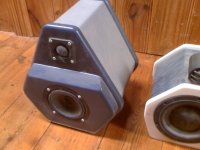
For those that may think steel will ring like a bell, it doesn't, you just need to know a few tricks. These finished speakers pass the knock test better than some MDF cabinets I've built. They are solid and they are anything but square.
Terry
To start with, the basis of the build is to use steel as the sides top and bottom. For those with access to a bending machine it will be easy. Otherwise you will have to go to a sheet metal shop and have them done for you. These were surprisingly inexpensive. Note that the more you have made, the cheaper each enclosure becomes. This is because most of the production time is in setting the machine up for each bend. After that each bend takes seconds.
Each enclosure is made in two halves, the halves are MIG or TIG welded together then the joints are cleaned up.
When you finnish this part you should have something like this. Of course the shape is limited only by your imagination and the restraints of a bending machine.
Jarrah can splinter if you use a router in the wrong direction, other than that, it is just another hard wood.
For those that may think steel will ring like a bell, it doesn't, you just need to know a few tricks. These finished speakers pass the knock test better than some MDF cabinets I've built. They are solid and they are anything but square.
Terry
Attachments


The attached is the frequency response in the x-over region. It is measured with gated sine waves via my LMS system. Primary design is via LEAP.
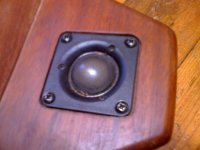
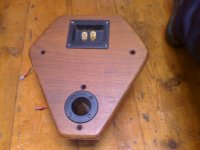
Drivers are Morel MW144 woofer and MDT40 tweeter. While these are expensive drivers I will point out something you may consider.
Using great drivers can make your x-over design a breeze and save on expensive components. Better to spend more on the driver and not have to fix problems with the x-over.
The two traces are:
0.22mH inductor on the woofer and 3.3uf cap on the tweeter (Bottom trace)
3.3uf on the tweeter. (top trace)
The MW144 is the only woofer I know of that you can get away with this and for this reason I tend to love it.
I said this was an easy build. X-over freq. is 6K. The tweeter has an easy life!
You get a single component x-over! Just look at how nice and smooth the response is throughout the x-over region.
Terry
Attachments

If you consider building this and you can build it in a normal MDF enclosure. Consider also using the Morel MDT41. It is the same tweeter in a different housing. To mount it simply cut a round hole and push fit it in. It would I think look better. Alternatively you can also use the MDT 30 or 32 or their DMS equivalents. All these drivers have the same voice coil and silk dome. The MDT 40 and 42 have neodynium magnets while the MDT 30 and 32 have ferrite magnets.
Terry
Terry
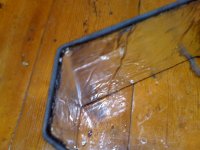
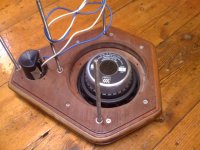
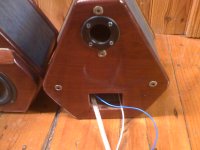
Next step is to line the inside surface of the steel. I used a common material designed for roofing. It has a pliable aluminium surface backed by a very sticky bitumus coating. Peel off the backing and apply it to the steel surface. Leave around 6mm (1/4") free around the edges. See photos.
This stops any acoustic energy from striking the steel. It works very well.
Next glue your chosen fabric to the outside steel surface and fold it around the edges. This method is what provides an airtight seal. I used man made hide, you can use whatever takes your (or the wifes) fancy. I applied the contact adhesive with an air spray gun. apply to both the steel and the back of the fabric, allow it to go off, then seat it in position.
Lastly add a layer of damping material as you would for any speaker.
Terry
Attachments
I like it even more! Very nice building method. The bitumen works very well, I know.
A wrap of (faux) croc skin around the outside would be pretty.
Bugger the faux, I'll give me mate Dundee a ring!
Terry
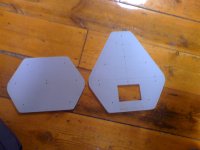
OK, now for the baffle and the back. We can make this step easy by making a template or two. The template should be made out of something other than MDF. I used a hard acrylic for long life. The more accurate these are the easier the whole job becomes. They should be a nice tight fit in the enclosures.
Once done fit a follower plate in your big router, fit a full size router bit, attach the template to the back of the piece of timber and cut a 3mm (1/8") rebate or channel. Change router bits to a 6mm (1/4") and go around again this time at near full depth. Take it in stages so as to not overload your router. You need to do this twice for each speaker.
It is best to go almost all the way through but keeping your long board together while you cut all the pieces. Next cut out your various holes and once all the heavy routing is done you can separate the pieces and clean up the edges with a trimming bit in the router. Next go around with a small rounding bit. I use my router mounted in a router bench for this stage.
For those experienced with routers do it how ever you feel like.
What, you don't have a router, just starting out, no worries mate, easy as. Cut pieces of 3mm (1/8") ply the same size as your template two for each speaker, then cut two oversize pieces out of your main timber. Attach the two by gluing. Tiny nails can hold the two together, don't drive them in all the way, remove them after the glue drys.
The front and backs are held together by 6mm (1/4") threaded rod. These are attached to the rear of the baffle by blind nuts. These need to be glued in and the threaded rods gluen in as well. They must not ever come loose. Attach to the back panel by decorative brass heads.
OK, you will all do it a little differently, see the photos for ideas. After running in the speakers tighten the rods. The cool part is that if needed at a future date you can dissasemble and refinnish the whole speaker. You may change houses and need to change the croc skin for snake skin for reasons of decor. Mate, if you can't beat them, get them to join you!
Terry ( one more write up to go.)
Attachments

Ok, final write up, just to tie up loose ends and a bit about me.
I have been designing speakers for 34 years, God, that's a long time! I have designed and built for individual clients and consulted for some very major clients. Of those that are not covered by secrecy agreements, and most are, the most successful (based on sales) would be the Jaycar JV60. These sold many thousands of sets and still hold the record as the most popular kit speaker in Australia.
One thing I liked doing was concept builds. These speakers are one such build. The general principal is to build a set without undue concern for the final finnish, rather to build a set to define final build methods and locate any flaws, acoustic, finnish, longevity or production that may crop up. The rough copy would go to the manufacturer together with the instructions.
Back to these, make them larger or smaller, it's up to you. If you go larger you need bracing, steel rods are ideal. It's just the same as building in MDF. The reason they don't ring is twofold. One is the layer of bitumus backed aluminium that prevents initial acoustic strike and second the fact that the steel shell is tightly bound on all the edges. If the edges are constrained the bell can't ring.
I have attached some more pics of different builds together with a pic of the rear so you can see the decorative nuts. Hunt around at the places that supply the furniture trade if you have problems sourcing these. Go with the solid brass ones, they look cool and give them a spray with a clear finnish so they don't eventually discolor.
If I were to do these today I would do a TMM or an MTM with the Morel MW144 (or 142, very similar) and the DMS 37 Tweeter. I had a hand in the development of the DMS 37. If you surface mount the woofer and rebate the tweeter you end up with a perfect time alignment in the critical x-over region. This time alignment was achieved when I was Morel's Aussie distributor. When they wanted to create a new tweeter they asked all the distributors what was on their wish lists. I sent my research on measuring time alignments which is why the DMS 37 came out with a slight horn, the alignment is within 0.5mm. (That's about 1/50th of an inch). This allows first order x-overs with out the complex stepped baffles.
Final word on finnish. There are thousands of laminate finnishes out there, the type used on kitchen benchtops. The guys that make the benchtops can wrap around most shapes. Think of the possibilities. There are examples of these speakers in laminates of granite and marble. The sky is the limit.
Enjoy
Terry
Attachments
Last edited:
I should add:
Sketch your shape with pen and paper and when satisisfied transfer to a large sheet of graph paper in full size. The guy doing the metal bending will prefer a 1 to 1 drawing. Secondly, you can simply add up the number of squares to obtain the surface area. Divide this into the required volume to get the depth. Like timber, stainless steel comes in widths so use standard widths.
And, tweeter connections are reversed.
Terry
Last edited:
Bugger the faux, I'll give me mate Dundee a ring!
I should have seen that coming!
Like that fact the many shapes are possible and scaling the volume should be easy. Nice work!
I should have seen that coming!
Like that fact the many shapes are possible and scaling the volume should be easy. Nice work!
Thank you.
Terry
I once made a set in hexagonal shapes, put mid woofers in two and the tweeter and amps in the third and stacked them. I was researching the difference between MTM and TMM at the time and it was the best way to keep as many of the viarables constant as I could. Sort of Lego speakers.
It is also interesting to have the speakers and the amps in identical enclosures. Looks very different.
Terry
It is also interesting to have the speakers and the amps in identical enclosures. Looks very different.
Terry
Cool looking design. I like the baffle shapes - I'm making an open baffle with a similar shape - and the offset time aligned tweeters. Kind of weird trying to balance aesthetics while avoiding equal distant edges like a circle which will give you the most diffraction effects. Anyway good stuff.
- Status
- This old topic is closed. If you want to reopen this topic, contact a moderator using the "Report Post" button.
- Home
- Loudspeakers
- Multi-Way
- Building in Stainless steel and timber!