I have been using my sony ss-mb250h two way bookshelf loudspeakers for about two and a half years. Although i got them for a really low amount of money (eur 60) i was pleased with their sound quality, clean mids and highs, low frequency is not groundshaking but fast and accurate. They accompanied my fisher ca2221 and pioneer vsx-609rds during the last two years.
A few weeks ago, i finished my jfet buffered gainclone with kind help of the forum member 'dxvideo' and after that i realized what these cheap sony bookshelfs capable of... Since i bought them, they have been used for home cinema and daily music listening so i was not expecting miracles from these babies, but with the gc, they began to sound amazing and i decided to do some modifications with the box and wiring.
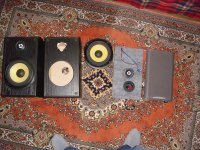
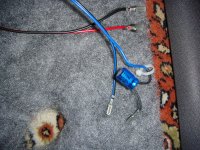
When i removed the drivers, i was disappointed with the wiring and crossover network, both of the driver cables were 0,5mm² ordinary copper wires connected with standard connection sockets inside and a "elytone" brand (probably china made) 1,8uf non-polar electrolylitic capacitor. On the other hand, thickness of walls and general workmanship is better than many more expensive cabinets around.
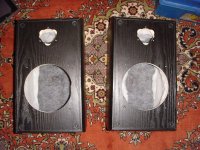
First of all i removed what's inside the cabinets, drivers, socket and the synthetic wool. There was only one piece of wool inside, placed on tha backside, but not attached to anywhere. I decided to cover all the walls with wool and attach them so they could not cause any nasty problems. With ordinary wood glue, i placed the old piece wool on its original location and covered all the other walls with a thinner fibre wool because i didn't want to reduce the volume of the boxes. After glueing, i let them dry for about 3 hours.
After the internal wool covering, i've been detailing on the wiring. The midbass cable i used is 1,5mm² oxygen free copper and 0,75mm² for the high frequency driver, again ofc.
The high-pass capacitor was a cheap electrolytic as i mentioned above. I used an EVOX PMR series (metallized polypropylene) capacitor in that position and increased the value from 1,8uF to 2,7 uF because i wanted a better high-mid frequency response. because the evox cap is bigger and heavier than the elytone, i glued it inside the box and on the front wall of the cabinet.
Instead of ordinary sockets that sony used, i soldered the wires to the terminals with a remarkable amount of solder for the best conductivity. After finishing the connections, i insulated all of them with electrical tape, twisted and fixed them together with plastic handcuffs. To reduce the resonance transition between the box and the surface beneath, i put tiny rubber pads under the cabinets.
After that i mounted everything back and now they are ready to rock!!!
First impressions; much better soundstage, tighter, deeper and more accurate bass response, more natural overall sound, high frequencies came up life-real, cymbals, china crashes are amazing. Vocals are realistic but not tiring.
The total cost of these tweaks was about eur 7, but i can gladly say that the overall performance is doubled, great sound for a pair of eur 60+7 bookshelf speaker set.
Here are some photos:
A few weeks ago, i finished my jfet buffered gainclone with kind help of the forum member 'dxvideo' and after that i realized what these cheap sony bookshelfs capable of... Since i bought them, they have been used for home cinema and daily music listening so i was not expecting miracles from these babies, but with the gc, they began to sound amazing and i decided to do some modifications with the box and wiring.
When i removed the drivers, i was disappointed with the wiring and crossover network, both of the driver cables were 0,5mm² ordinary copper wires connected with standard connection sockets inside and a "elytone" brand (probably china made) 1,8uf non-polar electrolylitic capacitor. On the other hand, thickness of walls and general workmanship is better than many more expensive cabinets around.
First of all i removed what's inside the cabinets, drivers, socket and the synthetic wool. There was only one piece of wool inside, placed on tha backside, but not attached to anywhere. I decided to cover all the walls with wool and attach them so they could not cause any nasty problems. With ordinary wood glue, i placed the old piece wool on its original location and covered all the other walls with a thinner fibre wool because i didn't want to reduce the volume of the boxes. After glueing, i let them dry for about 3 hours.
After the internal wool covering, i've been detailing on the wiring. The midbass cable i used is 1,5mm² oxygen free copper and 0,75mm² for the high frequency driver, again ofc.
The high-pass capacitor was a cheap electrolytic as i mentioned above. I used an EVOX PMR series (metallized polypropylene) capacitor in that position and increased the value from 1,8uF to 2,7 uF because i wanted a better high-mid frequency response. because the evox cap is bigger and heavier than the elytone, i glued it inside the box and on the front wall of the cabinet.
Instead of ordinary sockets that sony used, i soldered the wires to the terminals with a remarkable amount of solder for the best conductivity. After finishing the connections, i insulated all of them with electrical tape, twisted and fixed them together with plastic handcuffs. To reduce the resonance transition between the box and the surface beneath, i put tiny rubber pads under the cabinets.
After that i mounted everything back and now they are ready to rock!!!
First impressions; much better soundstage, tighter, deeper and more accurate bass response, more natural overall sound, high frequencies came up life-real, cymbals, china crashes are amazing. Vocals are realistic but not tiring.
The total cost of these tweaks was about eur 7, but i can gladly say that the overall performance is doubled, great sound for a pair of eur 60+7 bookshelf speaker set.
Here are some photos:
Attachments

Nice work Fix,
That looks like a fun project. Nice looking speakers too - I like the yellow cones! Changing the cap value, however, lowered the corner frequency. Keep an ear out for distortion, making sure the tweeter isn't being driven too hard.
Do you have access to some measurement gear? Even if you could just do some rough in-box frequency response sweeps of the individual drivers, I bet you could improve things further with a 2nd order crossover of your own design. The single component filter keeps the cost down for high-volume manufacturing, but for a couple of bucks you could do away with some of these business oriented compromises.
Jim
It looks like you did a fabulous job. I've always found replacing an electrolytic cap on the tweeter with even a cheap film cap of the same value makes a nice improvement, even on a crummy tweeter.
Whenever I do upgrades I try to do just one thing at a time, so I can try to tell what improvement it made, if any. Takes weeks, though...
Whenever I do upgrades I try to do just one thing at a time, so I can try to tell what improvement it made, if any. Takes weeks, though...
Nice work Fix,
That looks like a fun project. Nice looking speakers too - I like the yellow cones! Changing the cap value, however, lowered the corner frequency. Keep an ear out for distortion, making sure the tweeter isn't being driven too hard.
Do you have access to some measurement gear? Even if you could just do some rough in-box frequency response sweeps of the individual drivers, I bet you could improve things further with a 2nd order crossover of your own design. The single component filter keeps the cost down for high-volume manufacturing, but for a couple of bucks you could do away with some of these business oriented compromises.
Jim
Thanks, yes you're right about the cap value issue, so i tried it between several different values i had on hand; 1uF, 1,5uF 2,2uF 3,3uF and 4,7uF i got the best result with the 2,7uF. 4,7uF was driving the tweeter too hard as you said, didn't have technical problems with the 3,3uF ero mkt, the sound was just a little midband-dominated but liked the sound of evox mkp much more.
Unfortunately i don't have a chance to get to a measurement gear(i wish i had...), so i can only tweak things due to my hearing experience, if i just knew the t/s parameters and real power rating and frequency response values of the drivers may i could even design a new box and a 2nd order Xover as you said, but as they are cheap entry-level stereo speakers, there is not much detailed info about the drivers.
It looks like you did a fabulous job. I've always found replacing an electrolytic cap on the tweeter with even a cheap film cap of the same value makes a nice improvement, even on a crummy tweeter.
Whenever I do upgrades I try to do just one thing at a time, so I can try to tell what improvement it made, if any. Takes weeks, though...
Thanks, i was planning to do as you said, one by one. But i have many amplifier, preamp, speaker, etc. projects layin' ahead on my desk nowadays, so don't have much time and all i want was a little improvement on both lf and hf, and the result is better than i expected, if i have time, there could be some more additions on these cabinets with the help of you and other members.
They look really good. The mids look great too with the yellow and black contrast!
Thanks, three years ago i bought them just for they were good looking

Well they certainly look the part. Hivi units look great also and they are relatively cheap. They probably go for the cosmetic look rather then hifi performance
Maybe you're right, many people likes yellow kevlar cones, including me. They look cool but by the way they are durable, don't get damaged by a child's toy stabbing like the paper cones, resistant to moisture etc... Considering the sound quality, if i would choose between kevlar and paper, i can't make a correct decision because i listened very good and bad examples of kevlar and paper cone material and i can say that price is not always the first issue for hi-fi, sometimes, very expensive and nice-looking products of pioneer, jamo, sony, kenwood etc. can't even sound as good as the €100 pair of 'pure acoustics'. Of course i'm not including manufacterers like kef, usher, monitor audio etc. But i can say that more expensive is not the best all the time. For example last month i listened a pair of lyeco fullrange design cabinets in a friend's system, he had an expensive pair of magnat bookshelfs before and it was obvious that the yellow cone, cheap lyeco's were beating the magnats in every means.
")
Sounds like you did some good upgrades to it. I'd also recommend throwing in some extra bracing to help reduce cabinet resonances. Maybe some ribs that are glued to the insides of largest panels or a couple dowels between panels. It shouldn't take too long and will improve the bass/midrange clarity. Don't go overboard though because you don't want to significantly alter the cabinet volume.
I'm happy with the "box sound" at the moment, there is not cabinet resonance at a disturbing level but of course i can try it by doubling the amount of wool that i put in, by the way i'M thinking about connecting an inductor to limit the high frequency that gets to the midbass driver, however, there are not any parameters of drivers in my hand. Can anybody suggest something easy for this application?
After the internal wool covering, i've been detailing on the wiring. The midbass cable i used is 1,5mm² oxygen free copper and 0,75mm² for the high frequency driver, again ofc.
Nice work

I suggest You should try with thinner wire for highs.
Try to find 0,25 or 0,33mm2 wire with many (at least 100) fine thin (like hair) cores.
In my case of tweaking with that type of wire The sound became sweet, less agressive, still very detailed. More "tube sound"
I really like it!
Jernej
Do you mean you want to make an active loudspeaker?
Or just gather information of such configuration ?
I,ve heard a LM3886 set with just a 100KΩ pot ( less would be better)
before the input ( with a 1uF cap) and it sounds quite good.
Quite fair. Speakers were cheap no-brand
Guess- I asked to see the crossover


And I did !
and I was complaining about the compressed Pc source
Or just gather information of such configuration ?
I,ve heard a LM3886 set with just a 100KΩ pot ( less would be better)
before the input ( with a 1uF cap) and it sounds quite good.
Quite fair. Speakers were cheap no-brand
Guess- I asked to see the crossover
And I did !
and I was complaining about the compressed Pc source
This SS-MB250H speaker is a 6" Kevlar bass and standard sort of tweeter in a closed box. The original idea of adding wool stuffing to smooth the midrange from the bass unit, and increasing the simple 1.8uF tweeter capacitor filter a little to 2.7uF was quite reasonable.
Sony make decent cabinets with a few small wooden battens strengthening the cabinet in the right places.
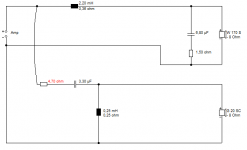
Although this is an old thread, since the original poster asked, if I was to try seriously upgrading the filter, I would start with something like this 3kHz crossover, where the red resistor is select on test for treble level. It will sound quieter and bassier.
Sony make decent cabinets with a few small wooden battens strengthening the cabinet in the right places.
Although this is an old thread, since the original poster asked, if I was to try seriously upgrading the filter, I would start with something like this 3kHz crossover, where the red resistor is select on test for treble level. It will sound quieter and bassier.
Attachments
Referring to the Sony speakers:
Take Brian's advice and get some bracing in it. Personally I'd cut out the back panel, make a new (same thickness) birch ply rear panel and glue 15mm picture framed bracing above and below the midwoofers to the new panel glue all edges and slot new panel on back with a 6-8 screws. I'd paint the panel black too. I'd also chamfer the woofer hole on the inside like this.
chamfering driver holes
Them two modification's will massively improve bass and midrange and allow your woofers to 'breath'. Much better mod than any wadding improvements, IMO.
how i understood my is http://www.troelsgravesen.dk/chamfer_files/chamfering_4.jpg and i need it to be http://www.troelsgravesen.dk/chamfer_files/chamfering_3.jpg ?
Exactly Anokic, its much better/easier with a router although have used a hand file before now, either way it's well worth doing, I believe it works better with midwoofers rather than subwoofers but I do it on both.
e.g It also works better in bass reflex than sealed, looks like the Sony speakers are sealed to me.
e.g It also works better in bass reflex than sealed, looks like the Sony speakers are sealed to me.
Last edited:
- Status
- This old topic is closed. If you want to reopen this topic, contact a moderator using the "Report Post" button.
- Home
- Loudspeakers
- Multi-Way
- Little tweaks on cheap bookshelfs...