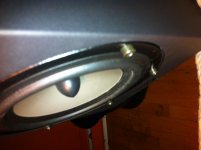
I have a pair of KEF XQ 5s, and very nice they are too (a semi-permanent loan from a friend in the industry... currently driving it with a Perreaux 2150B/SM2 combo for a bit of fun...)
However, on one unit, there is a small "ding" in the metal dome in the centre of the top driver - it came like that, and as its a loan unit, I can't just ask for another! I'd like to fix it as a favour (I'm an engineer...)
Is there a way to reliably "pull" this ding? Does its presence make any acoustic difference?
Thanks
Yeah, there's lots of ways.
My personal favourite: the hoover.
Put it to the speaker dome, switch on, switch off (after 1 or 2 sec), remove nozzle.
If you pull it off before switching it off, you can cause mechanical damage.
Other options are things like needles which can poke it back around, but I find this tricky.
Acoustically, the dink will affect the dispersion and operating frequency of the dome (more of the former than latter).
Chris
is this a tweeter or is it a woofer dustcap?
If a tweeter, don't use a vacuum, and I'd be hard pressed to tell anyone to use a vacuum even on a woofer dustcap. Sticky tape may work , but on a tweeter the metal is very thin and you may just make it worse. On a dustcap, a small pin can be used to tease it out. one thing that might work on a tweeter is to shoot it with canned air, holding the can upside down so that liquid comes out and makes it suddenly cold. I've never tried this, but it is the basis behind a lot of paintless dent repair in automobiles.
I had a tweeter where the metal dome was dented and it was measurable. I took the tweeter apart (D25AG35) and pushed the dent out form the inside. It no longer matches the other one, but looks/measures better than before. Any difference in sound was subtle.
Just looked up that unit, the metal bit in the center is a tweeter, and on top is a super tweeter. Whatever you try, you may just make it worse. That's an expensive set of speakers, and you might be better off replacing the dented unit, or writing KEF to find out what they recommend.
Ron E said:I took the tweeter apart (D25AG35) and pushed the dent out form the inside.
That is the approach that i'd take... i doubt the tweeter will ever be the same again thou -- by how much depends on how big the dent it.(once the metal foil is stressed it won't have the same strength again).
dave
planet10 said:That is the approach that i'd take... i doubt the tweeter will ever be the same again thou -- by how much depends on how big the dent it.(once the metal foil is stressed it won't have the same strength again).
 unless (it) was made of Nitinol (memory metal)
The vacuum technique had already occurred to me, but I ruled it out as being too crude and possibly dangerous. I do have a small vacuum pen used to pick up SMDs and was considering that - a vacuum cleaner would be horrendous...
The guy who leant me the speakers is the one that dinged them - he's very much a pro with excellent subtle hearing, and he can't detect any difference between the two units.
I suspect that there are wider issues with the system anyway - the SM2 has a small"issue" on one channel, but the speakers sound terrific with the rebuilt 2150B.
*Disclaimer I have never tried this with a metal dome.*
But you can take a tube, like the cardboard one from the paper towel or toilet paper roll. Place it over the tweeter and suck. This way you can control the amount of suction and duration. This works great for fabric domes i have never tried it on a metal dome.
But you can take a tube, like the cardboard one from the paper towel or toilet paper roll. Place it over the tweeter and suck. This way you can control the amount of suction and duration. This works great for fabric domes i have never tried it on a metal dome.
Nicko,
Check out this earlier thread.....
http://www.diyaudio.com/forums/showthread.php?s=&threadid=93692
Check out this earlier thread.....
http://www.diyaudio.com/forums/showthread.php?s=&threadid=93692
tweeter dent
I also had a metal (aluminum) dome tweeter with dents from a certain 3 yr-old nephew's fingers.
I disassembled the tweeter, and used the rounded end of a screw driver handle to gently form it back out from the inside. There were creases left afterwards, but it didn't seem to affect the sound. I measured with a microphone (justMLS), and couldn't notice anything unusual with it.
But then this was a $15 or $20 tweeter, so I really had nothing to lose.")
Dave R
I also had a metal (aluminum) dome tweeter with dents from a certain 3 yr-old nephew's fingers.
I disassembled the tweeter, and used the rounded end of a screw driver handle to gently form it back out from the inside. There were creases left afterwards, but it didn't seem to affect the sound. I measured with a microphone (justMLS), and couldn't notice anything unusual with it.
But then this was a $15 or $20 tweeter, so I really had nothing to lose.
Dave R
To fix dent tweeter is easy. You use rubber band and silicone hot glue via hot gun. Put small rubber band on the dent then use hot glue to glue dent and tweeter. Wait till it adhesive then slowly pull rubber band dent will pull out. After that use alcohol to remove hotglue and rubber band. No stain left at all. It works very very well
For small dents I've had good luck using a cut off syringe. You need to find a syringe whose barrel is slightly larger than the dent. Cut the syringe down to the bottom of the barrel and sand off the sharp edges. Then gently cover the dent with the syringe and quickly pull the plunger back. I've fixed a FR88EX and a Aura NT1 ("don't touch the dome!"). I had "before" measurements and the "after" measurements matched exactly. No creases either.
We just had a play date where my 5-year olds friends (he knows better) discovered the dustcaps on my paper coned fostex drivers. Both were entirely collapsed.
I ended up having to poke a small hole with a needle in each cap, and insert a bent piece of wire to hook the dome, pull them out, and gradually rework the shape.
Once I was happy with them (more or less) - I thinned some wood glue down with water, and used a small piece of white wrapping tissue paper as a patch (brush on a thin layer of glue, try not to drip, apply patch, brush over patch with glue - let dry). You can double up the tissue if needed, but one was enough for these small repairs.
I have not done measurements (they were new, and I had not gotten a solid benchmark anyway) - but the repair seems to have worked, and I don't notice any obvious flaws in the sound.
Last edited:
We just had a play date where my 5-year olds friends (he knows better) discovered the dustcaps on my paper coned fostex drivers. Both were entirely collapsed.
I ended up having to poke a small hole with a needle in each cap, and insert a bent piece of wire to hook the dome, pull them out, and gradually rework the shape.
Once I was happy with them (more or less) - I thinned some wood glue down with water, and used a small piece of white wrapping tissue paper as a patch (brush on a thin layer of glue, try not to drip, apply patch, brush over patch with glue - let dry). You can double up the tissue if needed, but one was enough for these small repairs.
I have not done measurements (they were new, and I had not gotten a solid benchmark anyway) - but the repair seems to have worked, and I don't notice any obvious flaws in the sound.
I've used this method also, it works well done carefully.
- Status
- This old topic is closed. If you want to reopen this topic, contact a moderator using the "Report Post" button.
- Home
- Loudspeakers
- Multi-Way
- Removing "ding" from speaker dome...