New place, "new" speakers. Well, sort of. It's been one and a half months since I moved into my new apartment. However I've been so busy on many other things and had so little time to put my 'new' speakers together. I managed to finish the "baffle and frame" assemblies these days.
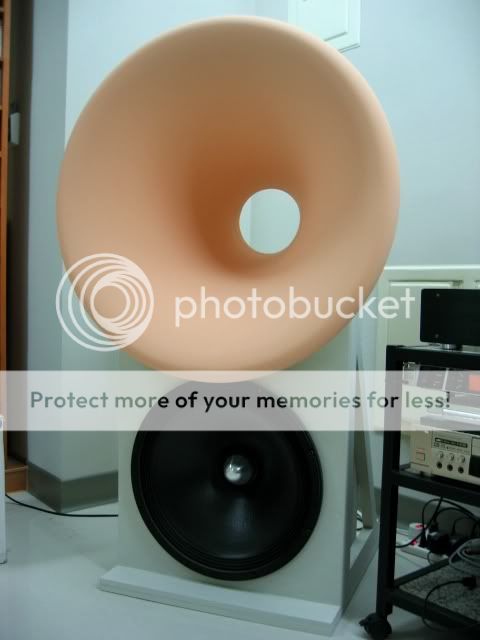
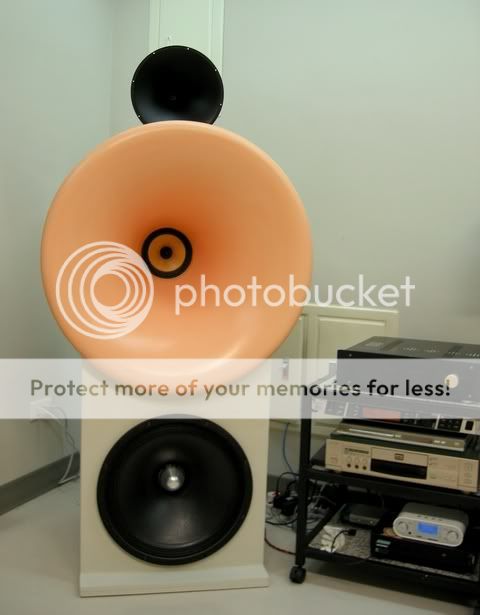
It'll be a 3way (2way active) system. Small baffle dipole bass with a single 18" woofer and Oris 150 for mid and a waveguided tweeter.
Some photos for sharing:
Oooh!! Lousy ply timbers! Full of voids! Quite the opposite of void free, this is coming with free voids. Yes, the voids are free of charge, and LOTS of them, all over! Sigh ~ I got no choice. Good quality ply doesn't exist here. These were bought from local B&Q. They provide free cutting service on any dimensions larger then 30cm. However the material quality is not so good.
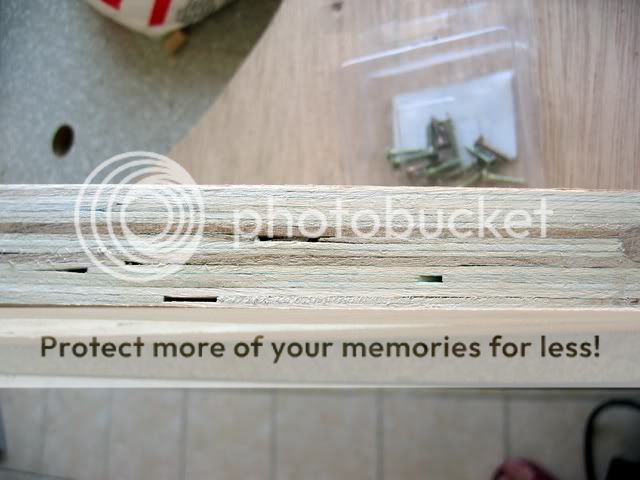
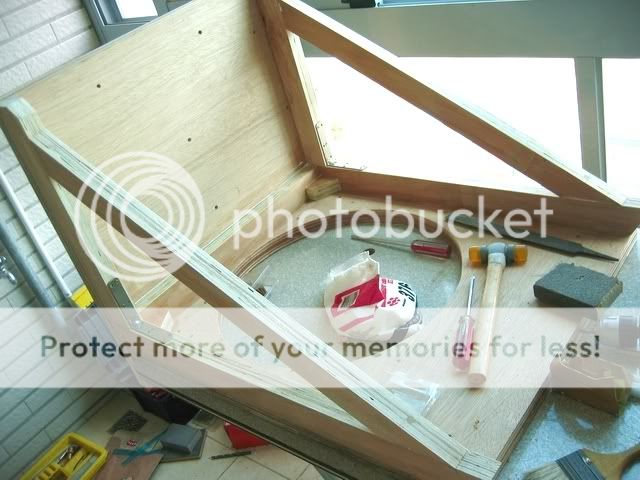
Fortunately the quality of the sheets is much better. They don't have thicker ply wood, so I use 2 layers of 15mm ply and glue them together with helps of several screws. This is the baffle and bottom plate assembly during the works:
I had to use a lot of putty for all those voids (and also the inevitable imperfections of my works):
Despite the bad quality material, the finished work is quite sturdy. Double layer ply wood is indeed very strong. Within such small size, it's very rigid with the overall 30mm thickness -- at least by the 'knuckle test'.
Painted and looks a lot better (beyond a certain distance, say, furthur than 1.5m.... ):
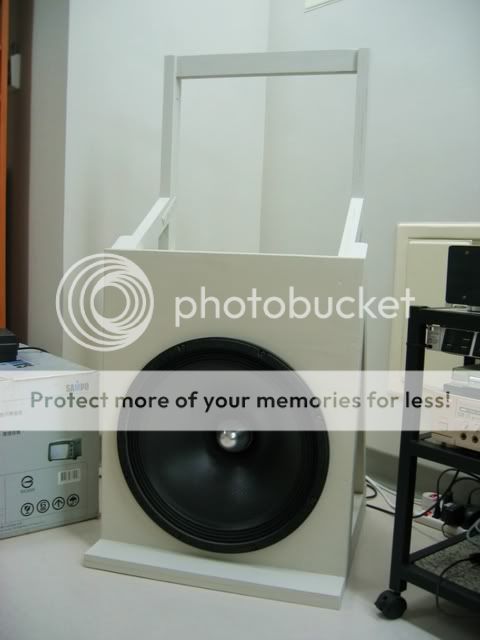
It's the ICI latex paint left from the decor, not the best for wood I know but can be used 'in house' without the annoying smell and toxication. And I can also make it the same color as the wall.
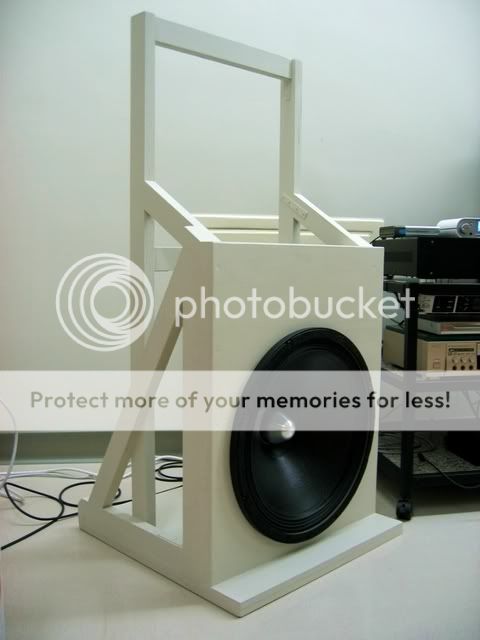
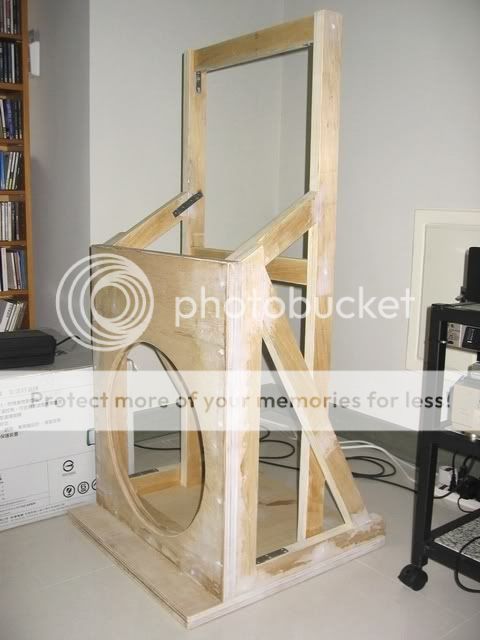
The back:
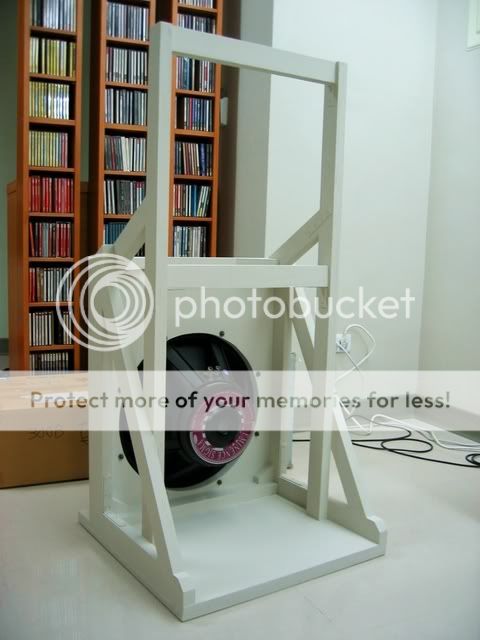
The upper part of this thing is for 'suspending' the Oris horn (not shown). Related details are not done yet.
Some more works for the horns (fiber glass reinforcement and paint) and xovers (re-adjusting the active xover and the T-bass...) will be going in a slow pace.
I can't wait to have it finished, but just so many things to do with so little time....
It'll be a 3way (2way active) system. Small baffle dipole bass with a single 18" woofer and Oris 150 for mid and a waveguided tweeter.
Some photos for sharing:
Oooh!! Lousy ply timbers! Full of voids! Quite the opposite of void free, this is coming with free voids. Yes, the voids are free of charge, and LOTS of them, all over! Sigh ~ I got no choice. Good quality ply doesn't exist here. These were bought from local B&Q. They provide free cutting service on any dimensions larger then 30cm. However the material quality is not so good.
Fortunately the quality of the sheets is much better. They don't have thicker ply wood, so I use 2 layers of 15mm ply and glue them together with helps of several screws. This is the baffle and bottom plate assembly during the works:
I had to use a lot of putty for all those voids (and also the inevitable imperfections of my works):
Despite the bad quality material, the finished work is quite sturdy. Double layer ply wood is indeed very strong. Within such small size, it's very rigid with the overall 30mm thickness -- at least by the 'knuckle test'.
Painted and looks a lot better (beyond a certain distance, say, furthur than 1.5m.... ):
It's the ICI latex paint left from the decor, not the best for wood I know but can be used 'in house' without the annoying smell and toxication. And I can also make it the same color as the wall.
The back:
The upper part of this thing is for 'suspending' the Oris horn (not shown). Related details are not done yet.
Some more works for the horns (fiber glass reinforcement and paint) and xovers (re-adjusting the active xover and the T-bass...) will be going in a slow pace.
I can't wait to have it finished, but just so many things to do with so little time....
With the wood filler and the paint, it looks quite good! And sturdy looking, too.
Keep us up to date, please. 🙂
Keep us up to date, please. 🙂
Thanks for the kind words and it's indeed sturdy enough (for me). As to the look, I should be embarraced. Those screw holes are not even filled up properly😱 I'm lazy on this and eager to have it 'finished'. (considering all those 'to do' things... )
I will, of course, update here when there's progress. 😀
I will, of course, update here when there's progress. 😀
Looks really solid! With the double layers of ply and all that battoning work it should be 🙂
That driver looks nice with your custom phase plug, nice job removing the old dustcap! I admit I thought it was an Acoustic Elegance driver at first 😱 😀 . Did you coat the cone too to lower fs, it looks more glossy?
Look forward to seeing the horn mounted!
That driver looks nice with your custom phase plug, nice job removing the old dustcap! I admit I thought it was an Acoustic Elegance driver at first 😱 😀 . Did you coat the cone too to lower fs, it looks more glossy?
Look forward to seeing the horn mounted!
Thanks🙂
Oh, how I wish I really have some AE drivers!
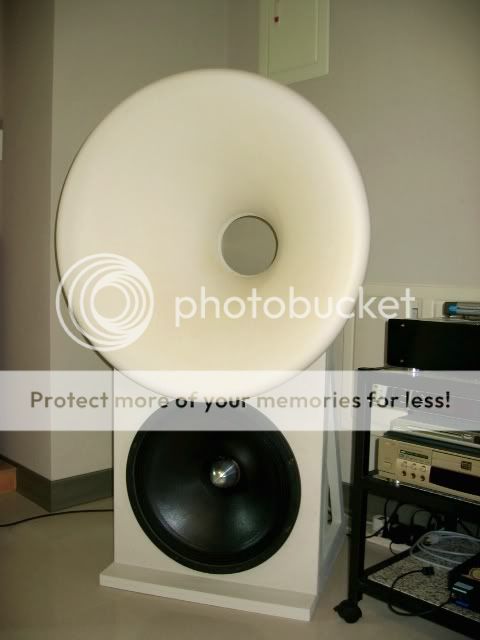
And, actually it's the low-res pictures cheating on you. There's still a ring of paper & glue remaining on the cone which I couldn't cut any furthur. Here's the close up:
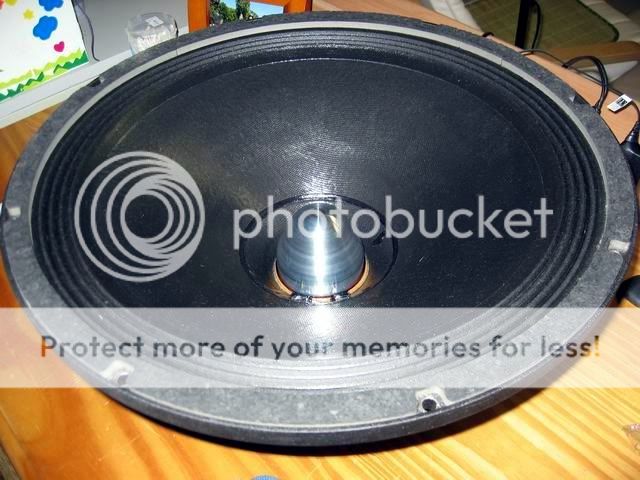
I did apply several layers of diluted PVA glue on both sides of the cone. I somewhat feel it sounds slightly better with the coating, seems tighter and cleaner. However the comparison was not objective at all. Anyway, it looks good at least.
As to lowering the fs, in my own experiences with this woofer (Eminence Sigma Pro 18), the effect of coating (adding mass) is not significant. Measured by WT3 reveals a number very close to the published parameter, which is 27Hz (or 28?).
This is the same woofer mounted on my center 'sub' open baffle:
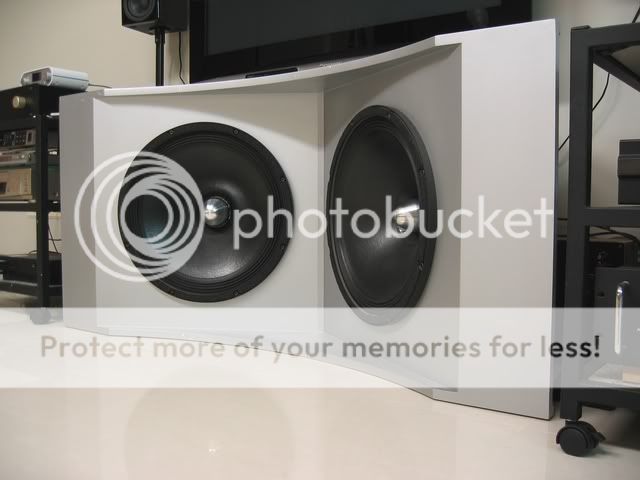
On this baffle, loaded by some more air, the system fs drop to 19-20Hz.
Oh, how I wish I really have some AE drivers!
And, actually it's the low-res pictures cheating on you. There's still a ring of paper & glue remaining on the cone which I couldn't cut any furthur. Here's the close up:
I did apply several layers of diluted PVA glue on both sides of the cone. I somewhat feel it sounds slightly better with the coating, seems tighter and cleaner. However the comparison was not objective at all. Anyway, it looks good at least.
As to lowering the fs, in my own experiences with this woofer (Eminence Sigma Pro 18), the effect of coating (adding mass) is not significant. Measured by WT3 reveals a number very close to the published parameter, which is 27Hz (or 28?).
This is the same woofer mounted on my center 'sub' open baffle:
On this baffle, loaded by some more air, the system fs drop to 19-20Hz.
7/13 Update
I believe many of you have seen this:
http://www.volvotreter.de/new_system.htm
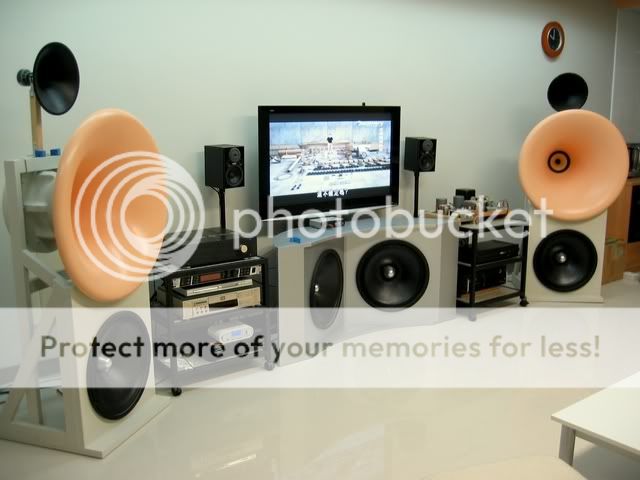
I saw that many years ago and was so impressed by the whole system. It's so admirable! I love those horns! And I also love that color scheme -- orange and gray, wow! Passion and coolness blend harmonically, how original ! (I haven't seen this elsewhere)
I stole that idea for my decor 😀
So I used that gray on the baffle already, now the orange:
Trail fit only, so no driver behind the horn. The 'suspension' is not done yet, so the horn was just sitting on the frame, thus slightly facing upward.
When I got it 'done' (at the stage shown as the picture above), it was already well after nightfall, so that's shot under the indoor 4000K fluorescent light. The wall should be light grey with a tad of brownish and it's not very precisely shown in the picture.
The following pics show the earlier stages:
Cleaned, sanded horn trial fit:
Being painted:

Both done:

Compared to the original orange and gray of Volvotretor, mine are far more lighter and weaker. My orange is not strong enough. Oh well.... It looks good on wall, but seems too light for horns...
Ok, the look things aside, many other things to do and are going slowly. That's all for now.
I believe many of you have seen this:
http://www.volvotreter.de/new_system.htm
I saw that many years ago and was so impressed by the whole system. It's so admirable! I love those horns! And I also love that color scheme -- orange and gray, wow! Passion and coolness blend harmonically, how original ! (I haven't seen this elsewhere)
I stole that idea for my decor 😀
An externally hosted image should be here but it was not working when we last tested it.
An externally hosted image should be here but it was not working when we last tested it.
So I used that gray on the baffle already, now the orange:
Trail fit only, so no driver behind the horn. The 'suspension' is not done yet, so the horn was just sitting on the frame, thus slightly facing upward.
When I got it 'done' (at the stage shown as the picture above), it was already well after nightfall, so that's shot under the indoor 4000K fluorescent light. The wall should be light grey with a tad of brownish and it's not very precisely shown in the picture.
The following pics show the earlier stages:
Cleaned, sanded horn trial fit:
Being painted:
Both done:
Compared to the original orange and gray of Volvotretor, mine are far more lighter and weaker. My orange is not strong enough. Oh well.... It looks good on wall, but seems too light for horns...
Ok, the look things aside, many other things to do and are going slowly. That's all for now.
7/20 updates
I wanted to reinforce and add damping to the horn wall. I tried fiber glass. In fact, my first thought was I need some 'frames' to hold the gluey stuff, and the gluey stuff does the damping...
So, I chose a very sparse fiber glass 'net' to be the 'frame':

And this is the first time I mess with the poly resin and hardener, a real mess! I followed the instruction for the mixture (100:1) but it turned out settling too fast. Less than one minute, it hardened itself as a solid block (and generated quite a lot of heat)😱

Retried some more, eventually I got it glued (well, sort of)...
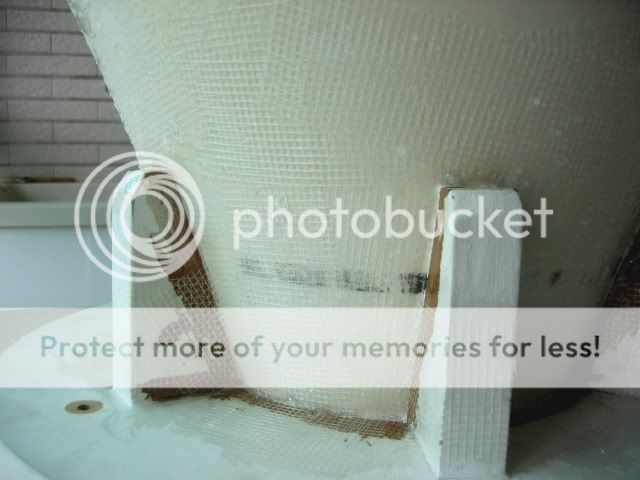

The net is just so sparse, even with several layers here and there. So it can not provide structural strengh. The damping brought by the resin does work, though. As the resin gradually hardened, it showed more and more effect. The horn wall gets more and more solid and dead (on where is applied, near the throat)
I'm planning on another material for damping, on somewhere closer to the mouth...
To be continued...
I wanted to reinforce and add damping to the horn wall. I tried fiber glass. In fact, my first thought was I need some 'frames' to hold the gluey stuff, and the gluey stuff does the damping...
So, I chose a very sparse fiber glass 'net' to be the 'frame':
And this is the first time I mess with the poly resin and hardener, a real mess! I followed the instruction for the mixture (100:1) but it turned out settling too fast. Less than one minute, it hardened itself as a solid block (and generated quite a lot of heat)😱
Retried some more, eventually I got it glued (well, sort of)...
The net is just so sparse, even with several layers here and there. So it can not provide structural strengh. The damping brought by the resin does work, though. As the resin gradually hardened, it showed more and more effect. The horn wall gets more and more solid and dead (on where is applied, near the throat)
I'm planning on another material for damping, on somewhere closer to the mouth...
To be continued...
Finally, I got them assembled
About the horns, I added some more stuff onto the external wall after the messy fiber glass net and poly resin. They are some "paper clay" mixed with PVA glue and pasted onto layers of strips of gauze. I'm not sure if you call it that way, the "paper clay" is mainly paper pulp, mixed with some glue/water and talcum powder etc. I added some more PVA glue and hope it'd be tougher. Gauze stips everywhere inside all the composite putty help on holding things together and provide some tensional strengh.... Well, that's what I hope. And some PU foam was applied inside the outer edge roll.
All these took me a lot of time. They were applied bit by bit, layer by layer, and needed time to dry etc. All I hope is better strength and damping.
Here are some pictures:
Back:
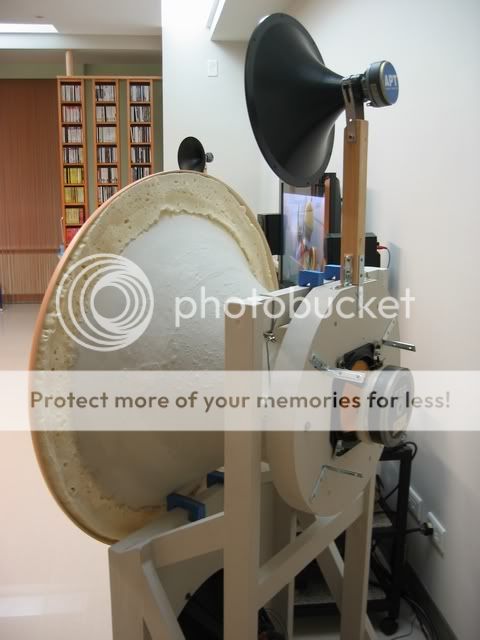
Front:
Overall view:
The efforts for treating the horns pay off. I can not feel any vibration on the horn wall during playing. The 'suspension' helps a lot, too. The horn is suspended onto the frame by steel wires. It's somewhat pitty I can not get it perfectly ballanced by the wire, so some more extra foam blocks are needed to maintain its position. Luckily the mechanical isolation is still very good. This reflects on the sound, too. Bass to midrange sounds more solid and tidy then before. (OK, that's not objective comparison at all, I admit.)
I read in the forum somewhere that the tractrix horn can not play all the way down to the cutoff, and a simple simulation by Hornresp concurs that. So I adjusted the xover point to somewhere around 240~300Hz. Luckily the woofer is playing and merging well up to here.
Oh, the pictures above show there's too much overlap between mid and high. Later I raised the tweeter WG a little to avoid that.
They are now playing very well, but of course not perfect yet. One of the major fault might be the xover point of mid-high is now too high for the c-c distance and their directivity. Although they are now good on my ears, such faulty setup seems 'politically-incorrect'. (BTW, the discussions in the WG and Horn threads get further and further beyond me. I have a hard time following them .... )
There are some other 'minor' problems to be solved: noise from my tube pre, reflections here and there... and I've not yet fine tuned the EQ. As usual, progress will be in a very slow pace.
Thanks for watching, and any comments are welcome.
About the horns, I added some more stuff onto the external wall after the messy fiber glass net and poly resin. They are some "paper clay" mixed with PVA glue and pasted onto layers of strips of gauze. I'm not sure if you call it that way, the "paper clay" is mainly paper pulp, mixed with some glue/water and talcum powder etc. I added some more PVA glue and hope it'd be tougher. Gauze stips everywhere inside all the composite putty help on holding things together and provide some tensional strengh.... Well, that's what I hope. And some PU foam was applied inside the outer edge roll.
All these took me a lot of time. They were applied bit by bit, layer by layer, and needed time to dry etc. All I hope is better strength and damping.
Here are some pictures:
Back:
Front:
Overall view:
The efforts for treating the horns pay off. I can not feel any vibration on the horn wall during playing. The 'suspension' helps a lot, too. The horn is suspended onto the frame by steel wires. It's somewhat pitty I can not get it perfectly ballanced by the wire, so some more extra foam blocks are needed to maintain its position. Luckily the mechanical isolation is still very good. This reflects on the sound, too. Bass to midrange sounds more solid and tidy then before. (OK, that's not objective comparison at all, I admit.)
I read in the forum somewhere that the tractrix horn can not play all the way down to the cutoff, and a simple simulation by Hornresp concurs that. So I adjusted the xover point to somewhere around 240~300Hz. Luckily the woofer is playing and merging well up to here.
Oh, the pictures above show there's too much overlap between mid and high. Later I raised the tweeter WG a little to avoid that.
They are now playing very well, but of course not perfect yet. One of the major fault might be the xover point of mid-high is now too high for the c-c distance and their directivity. Although they are now good on my ears, such faulty setup seems 'politically-incorrect'. (BTW, the discussions in the WG and Horn threads get further and further beyond me. I have a hard time following them .... )
There are some other 'minor' problems to be solved: noise from my tube pre, reflections here and there... and I've not yet fine tuned the EQ. As usual, progress will be in a very slow pace.
Thanks for watching, and any comments are welcome.
Can you please tell me the sizes (front diameter) and the length for both of midrange and tweeter horns ? Thanks !
Cheers and btw excellent work !
Cheers and btw excellent work !
The mid horn is Oris 150 by DB Design, 76 (or 78?) cm in diameter, or it's said to be nominal 30 inches. It's length is about 40cm. Mine has an additional 2.5cm adaptor plate at the throat. This part is slightly different from stock Oris.
Tweeter horn is actually a "wave guide" by Dayton, available from Parts Express, cheap and very good (needs some mods at its throat, though). I forget the model No. It's nominal 12" in diameter. (I remember it's slightly less than 30cm). The length is, I don't remember, very shallow for the mouth size.
The woofer is 18". Bass baffle of the main channel is 55cm wide. This should give you the hint of their proportion. And with those brand name, I think it's easy to find their actual specs. I don't really remember those exact numbers.
Has there been established a definition of "horn" that separates it from "waveguide"? Your mid horn and tweeter waveguide sure look similar in general shape to me.
Thanks🙂
And, as I've read, wave guide is more about directivity control; while horn is more about loading. Of course the line between them is thin and vague sometimes.
My mid horn is tractrix, tweeter is like a shallow conical with slightly curvy flare. The difference in directivities of them is audible when in far off axis positions. I don't and can't fix that, yet, or maybe never will, given the intrinsic characters of them...
I was thinking you made the whole horn from fiber glass, like a copy of Oris 150, and was thinking I could make one too, although I'm not familiar with working with fiber glass.
I couldn't find yet the price for the Oris 150 horns, I found something but not sure that's the correct price.
For the "wave guide" I can find something similar to that Dayton, but the midrange horn is the problem.
I found some aluminium horns with 50 cm diameter and 40 cm length, was thinking to modify them to "connect" with Fostex 206 units, but I guess there's some calculation involved, right ? I can't just use any horn ? The length is the same as with the Oris 150, but the diameter is smaller.
(The horn found is this: http://www.flashalarm.ro/images/DF 630.JPG )
What do you think ?
Thanks
I'm not sure....
Maybe you can use it as a base and add the mouth flare😀
You might find the followings interesting:
http://www.diyaudio.com/forums/multi-way/154447-how-build-large-round-front-horns-7.html#post2105758
http://www.diyaudio.com/forums/multi-way/140190-jean-michel-lecleach-horns-78.html#post2180157
My Oris 150 was bought many years ago (when I was much yonger and single). All I remember is it's very expensive, no matter what, not to mention the international shipping (a box of bath tub size!). I'm not saying it's a bad device (it sounds wonderful), just not practical for many, including myself, now.
http://www.diyaudio.com/forums/multi-way/140190-jean-michel-lecleach-horns.html
is a great thread with tons of information. A long one, though. I believe you can find answers for most of your questions there.
Good luck🙂
Hi CLS, just come across your thread and its similar to where my project is heading. I have open baffles with 15" eminence alpha's driven by rotel 130w, 8" mids driven by
300B and 1000Hz tractrix horns driven by 2A3 mono's all through a digital crossover. My next move is to add a Jabo 400Hz horn and this is where my problems may start as the 15" alpha's don't sound their best above 300Hz. May just give it a try and see how it works. Like what you're doing by the way.
300B and 1000Hz tractrix horns driven by 2A3 mono's all through a digital crossover. My next move is to add a Jabo 400Hz horn and this is where my problems may start as the 15" alpha's don't sound their best above 300Hz. May just give it a try and see how it works. Like what you're doing by the way.
So, maybe it's a good 'excuse' to upgrade to AE dipole 15 ? 😀
Or, the mid horn needs to work lower, thus the impractical size 🙁
Or, the mid horn needs to work lower, thus the impractical size 🙁
So, maybe it's a good 'excuse' to upgrade to AE dipole 15 ? 😀
Or, the mid horn needs to work lower, thus the impractical size 🙁
Hi CLS, I have been running the alpha 15's at 500Hz and they are really not that bad, I think I was being too critical without giving them a longer listen last time. Its very difficult to hear any difference when I adjust my digital crossover from 200Hz to 500Hz, but I am using a direct radiator for the mid at the moment. It may sound better or worse when I use the 400Hz Jabo horns but am still waiting for them at this time.
- Status
- Not open for further replies.
- Home
- Loudspeakers
- Multi-Way
- Dipole Bass and Oris Horn