") /sreten.
/sreten.mrkramer said:So I'm staring at my circle jig and an oval driver and thinking hmnn....
Any good methods for routing oval cutouts?
Help appreciated.
-MrKramer
If you don't have a router table make one. A moderate sized piece of your favorite sheet good drilled out for your router mounting pattern and to clear the bit will do; do what you need to to affix it to saw horses, a workmate, garbage can, etc. Less than 2x2' would do for small pieces.
Trace the driver outline on a piece of scrap 3/4" MDF. Cut the outside over-sized by no more than 1/8" with your jigsaw. Cut out the center to clear the driver surround. Affix the wood to the driver with double-sided carpet tape. Cover the driver with cardboard or something if it has an exposed magnetic gap as on a dome tweeter. Trim with a flush-trim bit in your router table to make a male pattern. Feed the work into the cutting edge.
Affix the male pattern to a larger piece of scrap that will be big enough to support the router base to make a female pattern using a guide bushing. You may need additional pieces of scrap to support the router.
You'll need to either attach both the waste piece of the female pattern and outside to a sacrificial work surface, or don't cut all the way through. You can leave a thin scrap connecting the pieces and cut it with a jig saw and then use your router + bearing guided bit (top or bottom) to remove the excess.
Make progressively deeper passes and plunge while moving if you're not using a spiral bit.
Use a guide big enough to provide clearance; for instance 7/16" with a 1/4" bit. The resulting female template will be over-sized by the bit diameter plus the difference in radiuses between bit and guide OD.
When using the female template you need to undo the offset from the bit and move inward two bit diameters, so add that to the original bushing size. Starting with a 1/4" bit and 7/16" OD bushing you'd move to a 15/16" OD bushing. Lee Valley sells a 7/16" ID, 15/16" OD brass bushing for this purpose which will let you use the same setup for female template + product and guarantee the errors due to router bushing + bit concentricity errors cancel out when you maintain the same router orientation for cutting your production parts and female template. You want to move the router clockwise around the pattern so it pulls itself into the edge.
The limits here are that the smallest radius on your recess can't be less than that of the guide bushing you use to cut the final product.
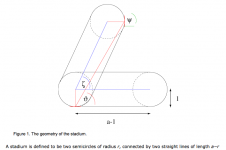
An oval and an ellipse are not the same (at least in my mind). An ellipse is how people describe it here, the distance to the two focal points is always constant. I always thing about an oval as two semicircles with straight lines between them. If it in fact is an oval you want to make it should be straightforward to route out two circles with a certain distance between them and then set up a simple guide to do the straight cuts.
Oval is a pretty broad term. Remember it came from ovum or "egg shaped".
Yes an ellipse is a type of oval. What you are describing is not an oval but for the life of me, I can't remember the name for it. I thought it was epitrochoidal but that's not it. It's the shape of a running track. I'll see if I can dig it up.
Yes an ellipse is a type of oval. What you are describing is not an oval but for the life of me, I can't remember the name for it. I thought it was epitrochoidal but that's not it. It's the shape of a running track. I'll see if I can dig it up.
easy way to do arbitrary shapes
It is pretty easy to make a guide for an arbitrary shape. This is an alternative to the method described above, you don't need a router table or flush cut bit, though it takes more material.
1) mount the driver in a 1/4" piece of mdf/hdf with enough space around the driver to accommodate the diameter of your router base. You may have to shim the driver up a bit so there is enough height to guide the router.
2) hold the router tight against the driver to use it as a guide, route all the way around.
3) now put the router inside the hole created in step 2, use it as a guide for the router base to route a new cutout in another piece of mdf/hdf. This will be the pattern for creating the cutout for the driver. Use 1/2" material so that the pattern is thicker than the router bushing depth.
4) Assuming you used a 1/4" router bit, use a 3/8" router bushing and the pattern from step 3 to route the driver cutout.
I used this technique to do flush mounting of HiVi TN25s (square with rounded corners), it worked perfectly.
Edit: maybe it is obvious, but the minimum radius of curves is the same as the router bit.
Edit 2: should be a 3/4" outside diameter router bushing.
The driver that I'm using is an old SABA green oval. The basket is actually a kind of rounded off square shape. I'm trying to rear mount it though so that the cutout just needs to conform to the cone shape which it seems I should call elliptical as it has no straight edges.
Didn't expect so many detailed responses. Thank you all.
MrKramer
Didn't expect so many detailed responses. Thank you all.
MrKramer
- Status
- This old topic is closed. If you want to reopen this topic, contact a moderator using the "Report Post" button.
- Home
- Loudspeakers
- Multi-Way
- oval cutouts