Well, I thought I'd upload the details of my current build even though I'm only about half way through it. I thought it might be of interest to those interested in building speakers with non-parallel sides. The overall project will be a 3.5 way design involving two Dayton RS225 8" woofers, a (likely) dome midrange and a B&G Neo 3 isodynamic tweeter. Details on the crossover, etc, to come.
For now, I thought I would post some insight regarding the build of the cabinet. I'm sure there will be some suggestions about how to do this better, but so far, I'm pleased with the cabinets overall. They are based on a skeleton made of 3/4" MDF ribs and baffle plus 1x2 poplar struts. The tops, bottoms and internal bracing/ribs were made using a router template of 1/4" plexiglass. The internal cuts on the ribs were made using a 1/8" masonite template. The latter template didn't work out so great, so you can see that the internal cuts on these aren't so great. But, this will be hidden inside the speaker, so I'm not losing any sleep over it. Once the ribs, tops, bottoms and baffles were cut, I used a ton of pocket holes (made using a Kreg pocket hole jig) to facilitate assembly. I also cut the struts and used pocket holes to assemble those in place.
I used Gorilla glue on the build of the skeletons. I'd never used it before, so I'll add a word of caution to those who've not tried it before. It is a bit more expensive, but has excellent holding properties in a project like this. But, MAKE SURE TO WEAR GLOVES! I got a bit of this on my hands, and not expecting any cleanup issues, continued along. At the end of the skeleton assembly, I tried to wash this gunk of glue, sawdust and dirt off my hands. No luck. I spent the next three days basically with the harshest detergents and solvents to no avail. Finally, I basically sanded the stuff off my hands using dry dishwashing detergent. The abrasive strength of this proved about right. In any event, a major pain to get off your hands, so defintely take appropriate precautions.
Attachments
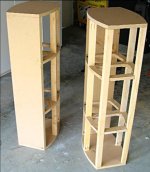
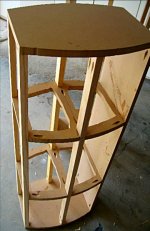
A closer view of the skeleton. Note that the template cuts aren't perfect. This was my first time using a template and router to cut MDF. Even if the results aren't perfect, I am still quite pleased at how easy the approach is, once you have a good template. Next time, I'll use 1/4" plexi for all templates. You can also see the rather liberal use of pocket holes. I didn't have to do any clamping for the project and with the pocket hole jig, this was really easy to get nice butt joints.
Attachments
After completing the skeleton frames, the next step was to clad the sides. I had originally considered using 1/8" masonite, but found the material too brittle for this radius needed. I had considered using bendy MDF, but it was hard to find and a bit expensive through Rockler. After chatting a bit with a friend who happens to be a cabinet builder (his day job), he mentioned using something called "bendy-board." This is standard luan plywood, but with the grain in each ply running the same direction. The result is plywood that is quite flexible along one axis, but of standard strength along the other. I had a 4 x 8 foot sheet ripped to 16" x 48" lengths, with the fibers oriented along the 48" dimension. After adding glue on the rib, baffle and strut edges, the 16 x 48" panels were laid atop the skeleton frame. I had scribed a center line along 48" dimension to line up along the center struts. Using a rather nice counter-sink bit that turns around to reveal a phillips head, I sunk three screws through the bendy-board into the center struts. After this, I gently bent the bendy-board over the frame and screwed the rest into the sides of the baffles and the rear struts. The result was a very nice curved panel on either side of each cabinet.
A note about this... given the radius, bendy board may crack along the panel. I carefully selected panels that did not appear to crack when I test bent them. The result was very nice curved panels with no cracking. Even so, the surface was not completely perfect, and I ended up using a few passes with my belt sander (100 grit) to smooth this down further. This may have been overkill (since I'm covering these with cherry veneer), but you want to have a smooth and radiused surface for finishing.
A note about this... given the radius, bendy board may crack along the panel. I carefully selected panels that did not appear to crack when I test bent them. The result was very nice curved panels with no cracking. Even so, the surface was not completely perfect, and I ended up using a few passes with my belt sander (100 grit) to smooth this down further. This may have been overkill (since I'm covering these with cherry veneer), but you want to have a smooth and radiused surface for finishing.
Attachments

Now, you can see that I left the bendy-board panels to overhang on all sides. I was just not that confident that I could get the sides perfect, especially since this had to radius over the skeleton frame. Instead, I left enough overage on each side to remove with a flush-trim bit on my router. Removing the excess on the top and bottom was easy... just follow the radius with the router. The flush trim bit bearing rides along the top or bottom MDF. Just be careful to not dig into that MDF during the cuts. Otherwise, this was a very simple operation.
Attachments
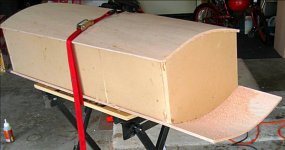
The trickier part for me (this was my first time doing this kind of stuff, esp. with a router) was trimming the sides along the baffle and rear struts. The issue is that the angle of the sides means that you cannot hold the router on top of the side panels to get a clean cut. Instead, I flipped the cabinets so that the front or back of the cabinet was up, and then "free-handed" the cuts with a long flush-cutter bit extending out from the router rather precariously. You have to hold the router at a 90 deg. angle to the face of the baffle (or the plane of the rear struts). While this didn't seem like a good idea at first, it really worked just fine. I was able to get very smooth cuts that were close to 90 degrees to the plane of the front and rear of the cabinet. Given the radius, this is obviously not 90 deg. to the plane of the side panels at the point where it meets the baffle (and rear struts), more like 70 degrees.
Here, you can see how I held the cabinets down onto a Workmate using tie straps. This operation requires extreme care and caution. That's a rather big router bit spinning at > 20k rpm! Even so, you can see how well it removes the excess bendy-board. I finished this off with careful use of a belt sander and 100 grit, which smoothed everything down and gave perfect joints.
Here, you can see how I held the cabinets down onto a Workmate using tie straps. This operation requires extreme care and caution. That's a rather big router bit spinning at > 20k rpm! Even so, you can see how well it removes the excess bendy-board. I finished this off with careful use of a belt sander and 100 grit, which smoothed everything down and gave perfect joints.
Attachments

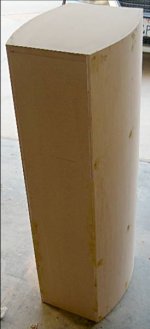
Here is the result, a couple of 40" tall cabinets with curved sides ready for veneering. A few of you will likely note a couple of issues. First off, I'm using 3/8" bendy-board for the sides. That might not be enough. Certainly, this wouldn't work on straight sided cabinets, but seems to be rather ridid due to the radius of each panel. Knocking on the side of the panels reveals more of a "ping" sound than a knocking. The cabinets are not perfectly dead when doing this, but I think that will be okay. First, I believe they are adequately braced and I plan to cross them rather low. Hopefully, this will be lower than the individual panel resonances. Also, the panels will be internally covered with sound dampening material. I will note that while this may not seem ideal, I have build speakers with Sonotube in the past. Using a similar ribbed structure, those speakers had notably more resonance than the bendy-board. Even so, those Sonotube speakers are among my favorite because they don't have the typically boxy sound. We'll see how these fare.
Of course, it is also possible to laminate multiple layers of 3/8 bendy-board to really deaden things up. I could have also used thicker baffle material, but have not been able to source 1.5" MDF. Instead, I will either go as is, or laminate solid cherry over this baffle to deaden things up. Again, I'm not sure it's going to be an issue, esp. given that the ribs break up the baffle field.
Next, I'll tell you about the veneering process and my tips and traps with regard to that endeavor.
Attachments
fredlock said:Can you show more pictures on how you bend the Plywood? Did you use clamps?
I didn't need to use clamps. I just used screws to fasten the panels to the middle strut first. Then, I bent one side down and attached with screws to the baffle, then screwed the other side down to contact the rear strut. It was amazingly simple and came out perfect. No clamps were used for any of this.
fredlock said:What kind of router bit do you use for the speaker hole mount and also the jig? Can you show me a picture? I'm also planning to build a speaker enclosure maybe in the summer.
Thanks,
Fred
Fred:
To cut speaker holes (which remains to be done at this point), I'll use a spiral cutter bit since those will be plunge cuts. I'm not sure if I'm going to purchase a circle cutting jig or just make my own. Since I want to inset the drivers in the baffle, I will first cut the inset (roughly 1/4" for the woofers) using the plunge base and its depth stop. Once those are nicely done, then I will cut out the holes by shortening the cut radius as appropriate. Obviously, the opposite approach wouldn't work! It might be easiest to do this with an adjustable jig. We'll see once I've done that.
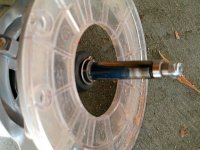
Here's a picture of the straight cutter bit I used to trim the side panels. It's a Bosch 2" x 1/2" (1/2" shank) flush cutter with an end bearing. Note how far below the base I've extended it to trim the bendy board to the planes of the baffle and rear struts. I have several flush cutter and straight cutter bits, and I've used the smaller ones for trimming veneer, as I'll explain shortly.
Attachments
Craig,
Those look familiar! Good job looking good so far.
I think you will like the curved sides when you are finished. Speaking from experience add extra materials for density to the top and bottom, double up on the front baffle.
link to my curved build
This may give you some ideas and avoid some pitfalls of curved speakers. If I can help at all shoot me an email, I'm pretty good with wood too.
I'll be watching your build with interest.
Ron
P.S. I like the pocket jig idea
Ron:
Wow, I really like your build and I'm certain those beauties probably sound amazing!
I'm trying to keep my build as simple as possible. In the past, I've used 12" sonotube with a frame connected to a front baffle. Two pairs were built for friends of mine, and happily, are still in daily use. Despite having a cardboard skin, they have no major resonance issues in the passband the "tube" is used for. Thus, they don't sound at all like boxes. These new boxes that I'm building are just a natural extension of that concept.
In the current design, I will be using a dome-mid and isoplanar tweeter, both of which will be uncoupled from the cavity of the main enclosure by virtue of sealed backs. In the "knock test," I do note some higher frequency pings, but otherwise, the bendyboard and bracing do a nice job of reducing the resonance peaks.
I had toyed with the idea of adding solid cherry on top of the current MDF baffle, and perhaps adding piano black tops and bottoms made of 3/4" MDF. But, that was primarily for asthetic reasons. At this point, to keep the build as simple as possible, I'm going to try it without and see what I think. I need to include an integrated grill (small children), so I think the design would fit better in its current iteration.
In any event, my progress on the project has been rather slow of late. I've veneered it all around with cherry veneer. At this point, I need to sand the veneer and finish. But, I'm stuck on how to best remove the veneer backing that has overlapped some edges. It may just be an issue of getting out the x-acto blade and carefully removing it.
All the best...
Craig
")
badman said:Craig:
Would love to hear them when they're done, I'm in tustin. Heard some RS drivers in a bad design, but want to hear them sound good
I'm working on some curved cabs of my own...
Badman:
Hey, you are close! Once I have them together, maybe you can check them out. I've been busy on other things, so who knows when this project will be complete. The previous design used Vifa woofers and I have no experience with the RS225's, but they seem to get reasonable reviews at PE, so I'm going to give them a shot. I may have to cross them very low, but we'll see.
Craig
- Status
- This old topic is closed. If you want to reopen this topic, contact a moderator using the "Report Post" button.
- Home
- Loudspeakers
- Multi-Way
- Curve-sided 3.5 way tower build