I bought a pair of 12" waveguides from Dr. Geddes. I did not buy the kit as this was prior to the release of the abbey kit. I was wondering if any others had bought just the waveguides.
If so, are your also fiberglass and cut square at the mouth? I ask because I am building my baffles and realizing that flush mounting these waveguides is a non-trivial task. A friend suggested one idea that just might work but I was hoping to gather more ideas on how to mount them.
I need to find pictures I took of the waveguides, as a picture is worth a thousand words. Essentially the difficulty arises, compared to a driver, in that there is no rim to mount to the baffle. There is a flat portion to glue to, but it is only in the corners of the square and there is nothing beyond the contour where the square tangents the mouth.
This is not an impossible task, but it isn't trivial either. I am looking to do a good job and would like to learn others' ideas to consider.
I got a pair of the 15" waveguides of that type that were made some time ago. Here's how I implemented them:
Side shot of a 'guide:
Foam plug (top wasn't rounded at this point)
The first thing I did was trim them down to a circle (~17" if I remember right)
Then I routed a lip into the box and attached the wavguides via liquid nails
Then I made a mounting plate for the compression driver's mounting plate to attach to (yours already have this):
Then I reinforced the back of the waveguide with fiberglass (resin + matte + mdf ribs) and glassed on the mounting plate:
Then I sealed up around the mounting plate using bondo glass:
Then on the front I plastered bondo on the area where the waveguide meets the baffle and sanded:
I then bondoed and sanded the throat area (maybe not relevant to your question but included for completeness)
After assembling the rest of the box I covered it with spray-on bedliner. The transition at the mouth is seamless.
Finally, I rounded and attached the foam plugs with spray adhesive:
On the whole the process was pretty straightforward- but a lot of that has to do with the coarse bedliner hiding some imperfections. If you were painting them you might have to be more careful about matching the hardness of the filler, glass, and wood and you'd definately have to sand it finer and do passes through with filler (and then primer).
Side shot of a 'guide:
An externally hosted image should be here but it was not working when we last tested it.
Foam plug (top wasn't rounded at this point)
An externally hosted image should be here but it was not working when we last tested it.
An externally hosted image should be here but it was not working when we last tested it.
The first thing I did was trim them down to a circle (~17" if I remember right)
An externally hosted image should be here but it was not working when we last tested it.
An externally hosted image should be here but it was not working when we last tested it.
Then I routed a lip into the box and attached the wavguides via liquid nails
An externally hosted image should be here but it was not working when we last tested it.
An externally hosted image should be here but it was not working when we last tested it.
Then I made a mounting plate for the compression driver's mounting plate to attach to (yours already have this):
An externally hosted image should be here but it was not working when we last tested it.
Then I reinforced the back of the waveguide with fiberglass (resin + matte + mdf ribs) and glassed on the mounting plate:
An externally hosted image should be here but it was not working when we last tested it.
An externally hosted image should be here but it was not working when we last tested it.
Then I sealed up around the mounting plate using bondo glass:
An externally hosted image should be here but it was not working when we last tested it.
An externally hosted image should be here but it was not working when we last tested it.
Then on the front I plastered bondo on the area where the waveguide meets the baffle and sanded:
An externally hosted image should be here but it was not working when we last tested it.
An externally hosted image should be here but it was not working when we last tested it.
I then bondoed and sanded the throat area (maybe not relevant to your question but included for completeness)
An externally hosted image should be here but it was not working when we last tested it.
An externally hosted image should be here but it was not working when we last tested it.
After assembling the rest of the box I covered it with spray-on bedliner. The transition at the mouth is seamless.
An externally hosted image should be here but it was not working when we last tested it.
An externally hosted image should be here but it was not working when we last tested it.
An externally hosted image should be here but it was not working when we last tested it.
Finally, I rounded and attached the foam plugs with spray adhesive:
An externally hosted image should be here but it was not working when we last tested it.
On the whole the process was pretty straightforward- but a lot of that has to do with the coarse bedliner hiding some imperfections. If you were painting them you might have to be more careful about matching the hardness of the filler, glass, and wood and you'd definately have to sand it finer and do passes through with filler (and then primer).
Another net friend of mine suggested a "cartridge roll".
like these
http://www.sa-motorsports.com/cat/p14.aspx#cartridgeroll
Reminds me of a bits I have for my dremel. I could cut some of the bulk off before hand to save lots of grinding.
The only gotcha I see is that, unlike your where you had excess "flat part" beyond the contour all the way around, I do not. In a couple places I am in the negative, as in if I place the guide face down on a flat surface there are places that are near 1/8" off the surface. I imagine I am going to have to fake it with bondo.
Just a note: these are the older fiberglass versions. The new ones may be more reusable- I don't know. I bought mine secondhand for a lot less than what Earl charges now, but they needed a lot more work.
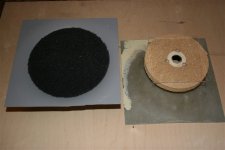
I pulled off a fiberglass negative in case I want to make some for use in another cabinet later:
I pulled off a fiberglass negative in case I want to make some for use in another cabinet later:
An externally hosted image should be here but it was not working when we last tested it.
One idea I thought of, but probably won't end up trying, is to build a rim for the waveguide so it can be remounted. Using plywood or mdf, build a circular rim, like a frame. Before permanently gluing the WG to the frame, mount bolts through the frame extruding out the back. These bolts can then be secured to the baffle from the inside. Ends up being too much work. I want results sooner.
The only real reason why I'd want to reuse the WG's is to try out OB versus a closed box. Guess I'll have to use my DDS WG's for that.
The only real reason why I'd want to reuse the WG's is to try out OB versus a closed box. Guess I'll have to use my DDS WG's for that.
If that's the case, why mount them to a baffle? Just set them on top of your closed / open-baffle woofer.
The remountable method seems doable.
Cut a plywood ring with maybe .75 width. Insert some T-nuts and then epoxy it to the back of the waveguide.
Not sure if you can use a router bit to do this but you could then trim the waveguide flange flush against your plywood ring.
Now you can cut a rebate into your baffle, drop in the waveguide and fasten from the inside of the baffle.
Attachments

Well got one WG countersunk into the baffle. Started to make the rim re-mountable idea but it turned out to bring up some headaches that weren't easy to overcome.
I cut 11" hole, dropped the WG into the hole. Drew an outline of the square mouth. Clamped some excessive MDF as a guide to the baffle. Used a template cutting bit to countersink the area.
Then the fun began. Took orange chalk and coated the back of the WG and knocked the excessive off. Pushed the WG into the hole. Noted where the chalk made a mark. Took my dremel with a sander roll thingy and sanded down. Repeat many many many times. Ultimately making a contour matching that of the WG.
Since I didn't cut the corners of the square mouth off, I have more area to adhere to. Now I get to do the whole thing over for the other. Fun stuff. Only took the last 6 hours.
http://www.parts-express.com/pe/showdetl.cfm?Partnumber=270-312
12" PE Waveguides are back in stock.
They're cheep and they mount like drivers do.....

12" PE Waveguides are back in stock.
They're cheep and they mount like drivers do.....
I have a pair of those that I bought out of curiousity. They are cheap, in more ways than one. It isn't hard to dampen them some, but the critical throat is pretty sloppy.
I am sure you can make it work, but when paired with a pair of BMS 4540s I had the throat transition was sharp there was also a bit of a gap iirc. The mouth terminates early. The profile itself is more exponential I think. All in all a good deal though.
Probably wouldn't take much more work to make them usable then these waveguides. But, its the profile and the throat that hopefully makes Geddes WGs worth it.
- Status
- This old topic is closed. If you want to reopen this topic, contact a moderator using the "Report Post" button.
- Home
- Loudspeakers
- Multi-Way
- Question on mounting Geddes' Waveguides.