I fired up my new bass cabinets yesterday, but with no stuffing yet, and the crossbrace not yet glued in. They're designed to handle frequencies up to 200 Hz using a 10" Scan Speak, and just for interest I tried them running full range with the tweeter of my AE1s handling 3kHz upwards. Surprisingly they don't sound too bad, although the midrange is not that great.
Before I glue the cross brace in and add the stuffing I'd like to do some measurements on the cabinet vibration to check on the effectiveness of the cross brace (see previous post "cross brace not working") and to check for any other problem areas. I don't want to spend much money here, so I was thinking of just getting a stick on guitar pickup (about AUD$25) to act as a cheap accelerometer, and use my multimeter to measure the voltage produced.
Does anyone have any other suggestions for easy and cheap ways of measuring cabinet vibration?
Mick
Thanks for the suggestion Mike. Unfortunately Digi-key is not in Australia, and while I could import this will probably double the cost. Also, this unit doesn't look like it could be easily attached and detached, and needs and external power supply etc...
Bottom line - a bit too difficult.
Any other simple suggestions welcome
Mick
Bottom line - a bit too difficult.
Any other simple suggestions welcome
Mick
Thanks for the further suggestions.
I really was hoping for something fairly simple and cheap, just to get some kind of quantitative measurements rather than "that one feels like its vibrating more than the other one". Going for a proper accelerometer and scope is a bit more involved that I'm prepared to go in for at the moment. Maybe if I have to order something from Digikey in the future I'll get the accelerometer then.
Jean - I used the 25W- 8565-01 in a 50 litre nominal enclosure (less a bit of litre or two for bracing etc.) in a sealed arrangement. Without stuffing this will give a Q of around 0.8, but once I add stuffing this should lower the Q a bit.
I'll give more details once everything is finished, including the active XO etc, which should be later next week.
Mick
Sy
You've given me an idea based on the stethoscope suggestion. I already have a tandy (radio shack) sound meter which has the mic capsule at the end of an extension tube. If I can get a funnel with some kind of foam seal around the rim, and hook this up to the capsule via a short piece of flexible tube, I will have a primitive stethoscope which will give quantitative readings in dB!
The funnel can be lightly pressed against the vibrating surface and easily moved from one surface to another.
Mick
You've given me an idea based on the stethoscope suggestion.
I already have a tandy (radio shack) sound meter which has the mic capsule at the end of an extension tube. If I can get a funnel with some kind of foam seal around the rim, and hook this up to the capsule via a short piece of flexible tube, I will have a primitive stethoscope which will give quantitative readings in dB!The funnel can be lightly pressed against the vibrating surface and easily moved from one surface to another.
Mick
I tried the funnel idea, but unfortunately it didn't work. The funnel seemed to be picking up mostly sound and not much vibration. If I had a reading of 100 dB with the funnel on the cabinet, and then took the funnel off, then the reading might still be 98 dB. These sound like really high readings, but remember that the funnel is acting like a horn.
I really want that accelerometer to play with but just can't justify it at the moment just for "research". I want to get the braces glued in and stuffing added so I can get listening.
Preliminary nearfield measurements with the sound meter showed a -3dB point of around 40 HZ, just as the formulas predict. Theory really does work sometimes....
Mick
The funnel seemed to be picking up mostly sound and not much vibration. If I had a reading of 100 dB with the funnel on the cabinet, and then took the funnel off, then the reading might still be 98 dB. These sound like really high readings, but remember that the funnel is acting like a horn.I really want that accelerometer to play with but just can't justify it at the moment just for "research". I want to get the braces glued in and stuffing added so I can get listening.
Preliminary nearfield measurements with the sound meter showed a -3dB point of around 40 HZ, just as the formulas predict. Theory really does work sometimes....
Mick
A fairly easy and cheap accelerometer can be made by using a piezo disk as found in those “music making” postcards. You need to connect a fet buffer as source follower close to it. A BF245 will do the trick. A G-S resistance between 10M an 100M and a source resistance of 10K and a 9V battery, e voila. Glue the disk to a fiber ring from the toolbox of your local plumber and stick it with double sided adhesive tape to the place to be measured. Hook it up to your soundcard and some FFT software will do the rest.
These piezo’s measure acceleration from very low frequencies up to fs (usually 3 KHz).
Cheers
These piezo’s measure acceleration from very low frequencies up to fs (usually 3 KHz).
Cheers
Perhaps stupid , but wouldn't it be possible to put fine grains of sand on the cabinet (with the speaker lying down) and observe how much and where the graind would move the most ? Where the grain would move the most would be where you should place the bracing since that would indicate a resonance node.
Just my silly thoughts
, but wouldn't it be possible to put fine grains of sand on the cabinet (with the speaker lying down) and observe how much and where the graind would move the most ? Where the grain would move the most would be where you should place the bracing since that would indicate a resonance node.Just my silly thoughts
You can also use a phono cartridge.
jonathan carr
Hi Jonathan, this one could get quite expensive if we'd take one of your's !
An alternative to an accelerometer is a stroboscope, triggered by the driving signal, which makes the vibrations visible.
Regards
Charles
Charles: No, you don't need anything fancy. In fact, I would suggest an MM or high-output MC with a fairly flat frequency response. Just don't get it too close to the speaker drivers
The tonearm can be cheap as well, since the cartridge is not required to move very much (apart being able to cue the cartridge onto the point on the cabinet that you want to measure).
Really, a cartridge works quite well for measuring cabinet vibrations - you should try it.
jonathan carr
The tonearm can be cheap as well, since the cartridge is not required to move very much (apart being able to cue the cartridge onto the point on the cabinet that you want to measure).
Really, a cartridge works quite well for measuring cabinet vibrations - you should try it.
jonathan carr
Thanks for all the further suggestions.
Re the sand idea - I've seen an article done about using this technique for assessing the nodal characteristics of violins. I think that this technique would be good for seeing where the nodes are, however getting quantitative measurements could be difficult.
Pjotr - sounds good, if you have more of an understanding of electronics than I do What FFT software do you know of that is suitable (preferably freeware).
Charles - I don't have easy access to a strobe, but I'm still interested. Can you explain a bit more how this works. Do you need some kind of reflective surface on the vibrating surface?
Jcarr - how do you arrange the tonearm? I assume that the measured surface needs to be horizontal, and you have a tonearm attached to the edge of the cabinet using bluetak. Unfortunately I sold my turntable a while ago, but I may be able to buy a cheap second-hand one.
Mick
Re the sand idea - I've seen an article done about using this technique for assessing the nodal characteristics of violins. I think that this technique would be good for seeing where the nodes are, however getting quantitative measurements could be difficult.
A fairly easy and cheap accelerometer can be made by using a piezo disk as found in those “music making” postcards.
Pjotr - sounds good, if you have more of an understanding of electronics than I do
What FFT software do you know of that is suitable (preferably freeware).An alternative to an accelerometer is a stroboscope, triggered by the driving signal, which makes the vibrations visible.
Charles - I don't have easy access to a strobe, but I'm still interested. Can you explain a bit more how this works. Do you need some kind of reflective surface on the vibrating surface?
Really, a cartridge works quite well for measuring cabinet vibrations - you should try it.
Jcarr - how do you arrange the tonearm? I assume that the measured surface needs to be horizontal, and you have a tonearm attached to the edge of the cabinet using bluetak. Unfortunately I sold my turntable a while ago, but I may be able to buy a cheap second-hand one.
Mick
In the cab, on the cab, from the cab
I have done a lot of work with the 25 dollar contact mics which are used as guitar pickups for acoustic guitars. I use them to measure the resonance of wood for designing solid body electrics.
I'm not sure that in this case the contact mic, piezo or otherwise, will measure what you need to measure. Certainly it measures sound traveling inside the wood - but I'm not sure that sound gets transmittted to the air from the cab wall since the wall would have to vibrate in such a way as to move air and that's not what the contact mic will measure. I'm still a bit confused about this - in the wood vs being transmitted to the air... but lets assume for a minute that what you really want to measure is vibration that makes it into the air.
I might suggest measuring how the cab moves the air close to it by using a regular microphone and a spectrum analyzer in your pc. The issue here (and in the other case) would be to subtract out the sound in the environment produced from the front of the speaker. I might do this by measuring a sweep at the front of the driver, plotting it as a gain normalized reference, and then comparing a similarly normalized curve measuring the box from a distance of like 1 mm. If you did this outdoors (anechoic), you would see that the two curves were different - and the high spots on the box measurement would be the places you had resonance problems in the box which were being transmitted to the air.
Seems like a pain but all you need is a mic, and shareware. I've never done this, but it seems like it would get you the result you are looking for.
TheoM - thanks for your suggestions. From graphs out of the loudspeaker cookbook, it looks like cabinet vibration levels are 60 - 70dB down from the acoustics levels, so unfortunately while your microphone idea sounds appealing, it might be difficult to separate the cabinet vibration noise from the sound coming directly from the driver. ie the same problem I had with my funnel.
With cabinet vibrations, the type of vibration obviously will affect the sound being generated. You could have vibration perpendicular to the surface, which will generate sound, or parallel to the surface, which won't. You can also have surface waves (ie like ocean waves) which will generate sound too. If the cabinet is vibrating in a higher order mode, then one side of the cabinet may be going in while the other may be going out. This may produce sound that cancels itself out, depending on where you are located. So measurement location would be important here.
I think overall that the accelerometer or guitar pickup would be a good way to measure, even though it may not tell the whole story.
Mick
Hi Mick,
The FFT software I use is Audiotester. It is fairly simple to use and contains a decent signal generator. The free trial version is full functioning but is limited to 20 min. runs. You can also make waterfall plots with it (3D FFT’s). This is very handy when investigating cabinet resonances. It gives you an idea of the decay time of the resonances and not only of the freq. peaks. It is the cheapest program I’ve found that does the job quite well. Here a tread of a discussion about freeware and shareware FFT programs.
------------------------------------
Some time ago I did investigate optimal damping between the LS box and the wooden floor. For that I needed also an accelerometer to see how much vibration went to the floor.
I experimented with low-cost piezo guitar pick-ups from Ibanez. They worked but the frequency response was not low enough, these ended somewhere around 50 Hz. Much depends on the input impedance of the amplifier. The higher it is the lower the freq. response will go. But I got problems with hum.
Also a cheap omni-directional electret microphone capsule worked well when glued to a small metal disk, upside down so the hole to the membrane is closed. But they were a bit too noisy and did not go below 20 Hz.
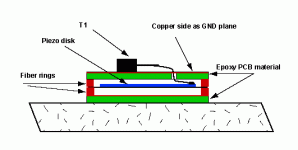
So I made my own accelerometer with a low-cost 20mm round piezo disk. Attached a sketch how I did it. The disk is mounted between fiber rings. The rings were mounted between 2 disks made of bare epoxy PCB material. All was glued together with 5 min. epoxy glue. On top of the top plate is the fet buffer mounted. This was hardwired and glued with 5 min. epoxy on top. The buffer was finally shielded with 50 um copper foil connected to the ground. The ones I made went far below 1 Hz and had a fairly high output.
Many electronic part shops sell these disk bare fore around 1$ or hidden in piezo-buzzers. Also a disk from an old Motorola piezo tweeter is useful and the already mentioned piezo’s from those music postcards.
The FFT software I use is Audiotester. It is fairly simple to use and contains a decent signal generator. The free trial version is full functioning but is limited to 20 min. runs. You can also make waterfall plots with it (3D FFT’s). This is very handy when investigating cabinet resonances. It gives you an idea of the decay time of the resonances and not only of the freq. peaks. It is the cheapest program I’ve found that does the job quite well. Here a tread of a discussion about freeware and shareware FFT programs.
------------------------------------
Some time ago I did investigate optimal damping between the LS box and the wooden floor. For that I needed also an accelerometer to see how much vibration went to the floor.
I experimented with low-cost piezo guitar pick-ups from Ibanez. They worked but the frequency response was not low enough, these ended somewhere around 50 Hz. Much depends on the input impedance of the amplifier. The higher it is the lower the freq. response will go. But I got problems with hum.
Also a cheap omni-directional electret microphone capsule worked well when glued to a small metal disk, upside down so the hole to the membrane is closed. But they were a bit too noisy and did not go below 20 Hz.
So I made my own accelerometer with a low-cost 20mm round piezo disk. Attached a sketch how I did it. The disk is mounted between fiber rings. The rings were mounted between 2 disks made of bare epoxy PCB material. All was glued together with 5 min. epoxy glue. On top of the top plate is the fet buffer mounted. This was hardwired and glued with 5 min. epoxy on top. The buffer was finally shielded with 50 um copper foil connected to the ground. The ones I made went far below 1 Hz and had a fairly high output.
Many electronic part shops sell these disk bare fore around 1$ or hidden in piezo-buzzers. Also a disk from an old Motorola piezo tweeter is useful and the already mentioned piezo’s from those music postcards.
Attachments
- Status
- This old topic is closed. If you want to reopen this topic, contact a moderator using the "Report Post" button.
- Home
- Loudspeakers
- Multi-Way
- Testing cabinet vibrations