sploo said:
Unless the tweeters are very tight in the existing rebates, you should be OK.
You could sand the inside edge of the rebate - very carefully, you don't want to deform it. As you say, going light on the paint will work. You can gently sand the paint too (as long as you don't cut through).
Oh wait, which edge are we talking about?

If you mean the edge in blue, it wouldn't take much to raise the tweeter from flush, so that it projected (very slightly) from the front of the baffle. If you mean the edge in yellow, there's a good deal of room there - it's not sloppy, but it is far from snug. I'm sure it could handle at least a coat or two of paint and still admit the tweeter.
Thanks again for all the hand-holding.
I think you're fine then - the edge in yellow is the problem one (or not as you've got a bit of room).
To be honest, you could get away with not painting the blue surface. You could argue there would be a moisture issue with not sealing the MDF, but then it's very hard to completely seal every surface (inside and out). You won't see it anyway, of course.
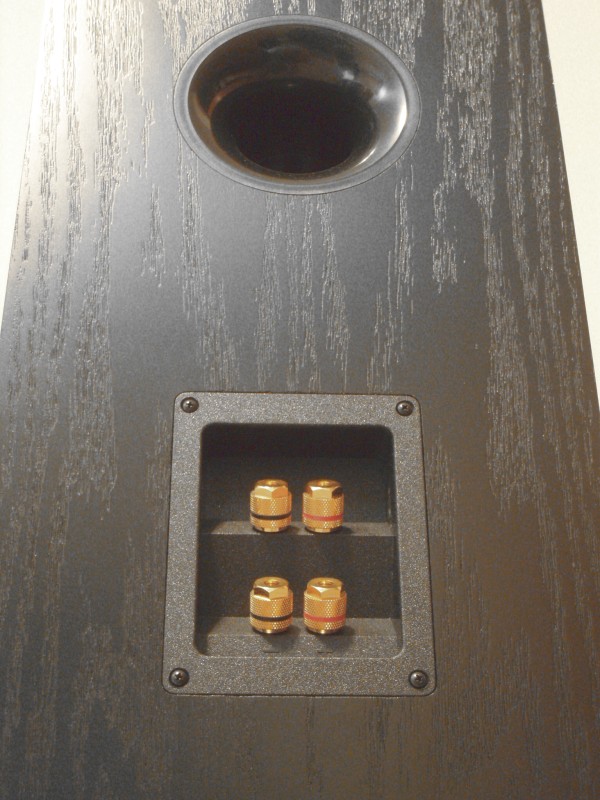
You'd normally want to put some sealing gasket between the drivers and cabinet, so you have to allow for that. However, the SR-71 is a ported design (not sealed) so getting a really good seal on the drivers is probably less important.
To be honest, you could get away with not painting the blue surface. You could argue there would be a moisture issue with not sealing the MDF, but then it's very hard to completely seal every surface (inside and out). You won't see it anyway, of course.
You'd normally want to put some sealing gasket between the drivers and cabinet, so you have to allow for that. However, the SR-71 is a ported design (not sealed) so getting a really good seal on the drivers is probably less important.
Just go light
Just go light on the blue surface and you'll be fine. A paper thickness or two off of perfect will have any diffraction artifact dominated by components well above the directional frequency of the tweeter, in other words, it's not a problem. The paint won't be that thick.
If you're painting, consider appliance epoxy. PITA but incredibly durable and can be quite attractive.
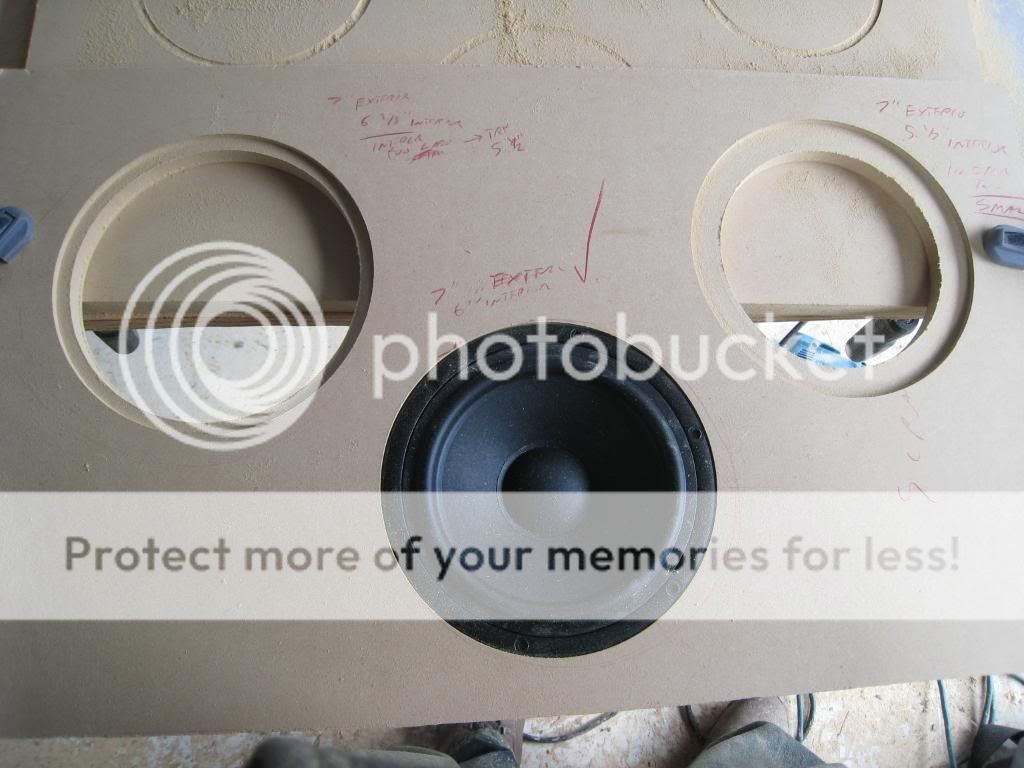
Jasper Jig is great but it has it’s own disadvantages. Most of the time, problems with diameters arise with European drivers. 94mm driver doesn’t have exact diameter on the Jasper jig.
I always cut a trial hole on the piece of scrap. The other problem is that driver basket may vary just a bit. Last speakers I’ve made with Usher 8945p, I cut the holes 6 15/16instead of 7 for a nice tight fit.
If you cutting veneered panel, I recommend “spiral down cutting carbide bit”. Less chances to tear veneer on the edge. For just MDF, straight 2 flute carbide tipped ¼” bit will be fine.
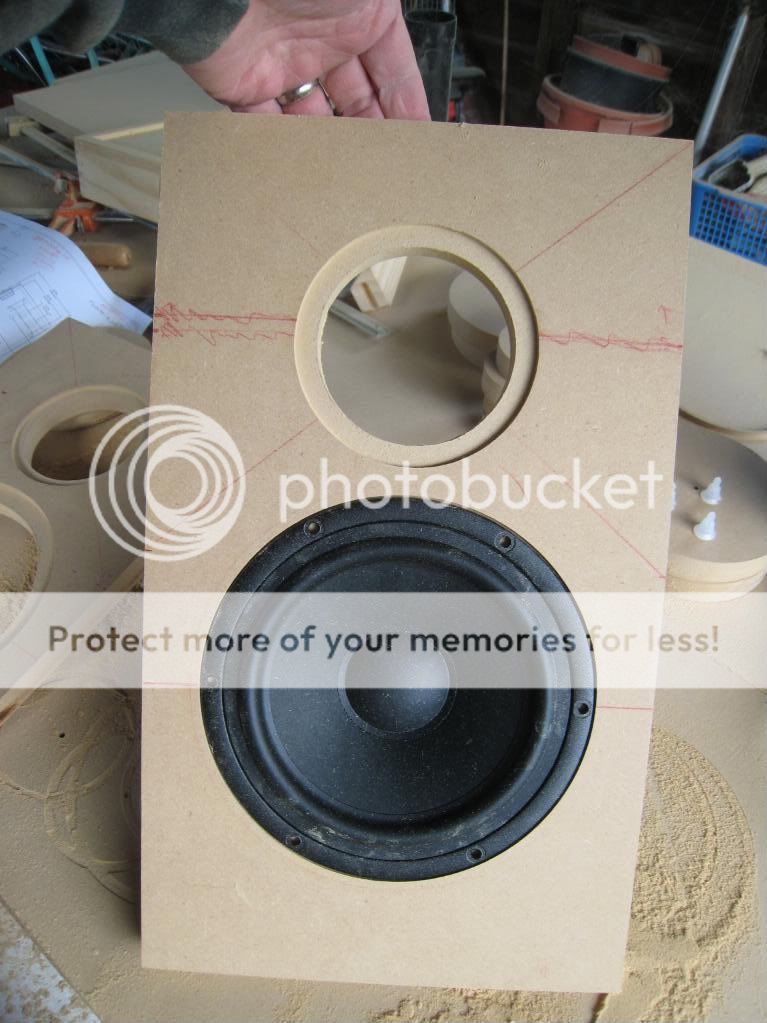
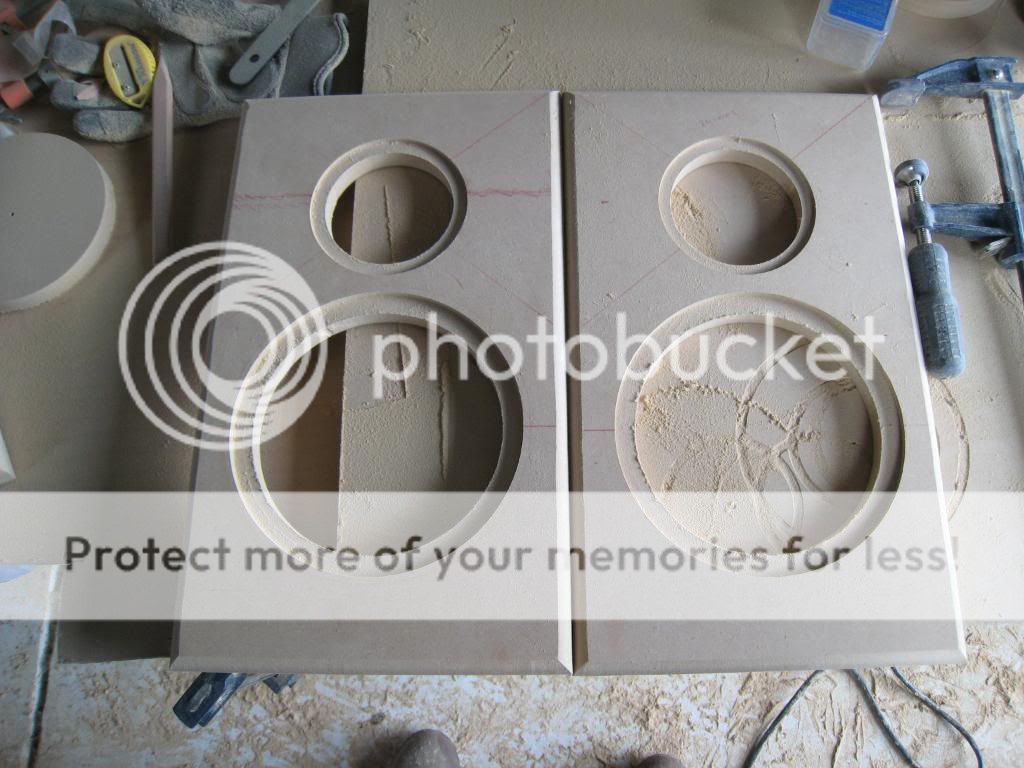
Woofers Routed, plus question about ports
After 3 tries, finally figured out the right settings for the woofer route:
Finally did it, and it worked fine.
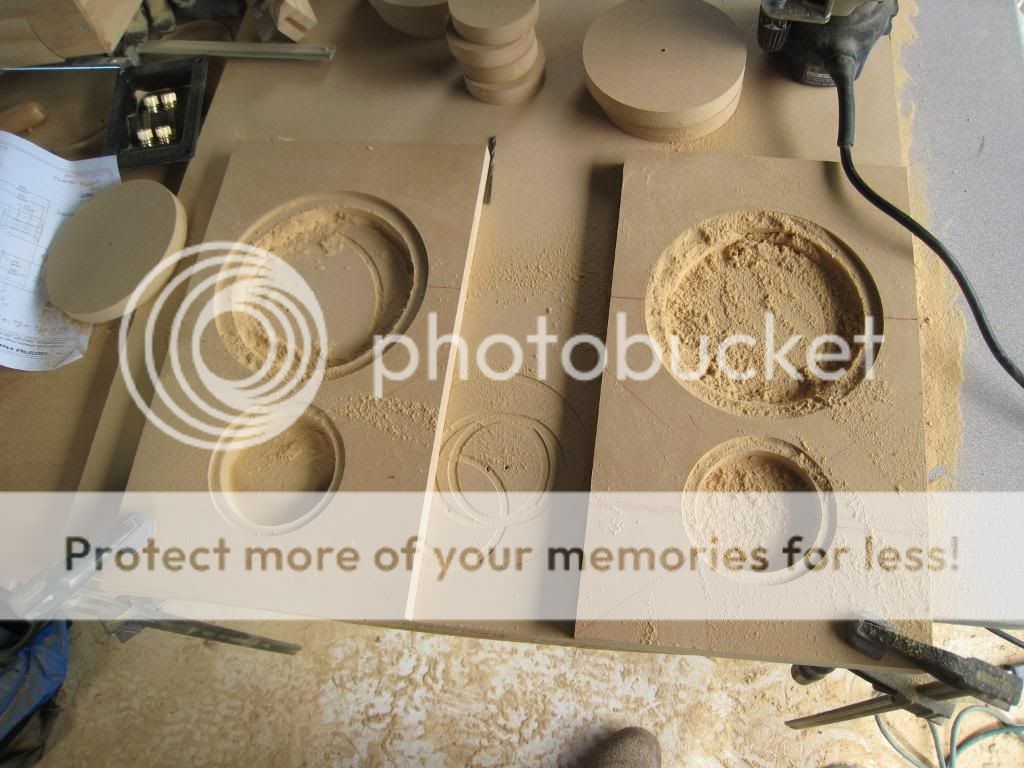
I also did some test runs at the settings for the port route, and as usual it took me three tries (not shown).
But I have a question. The ports that came in the Madisound kit (I'm working from their no-enclosures kit) have two different ends. I received two pairs of these (two of each size):

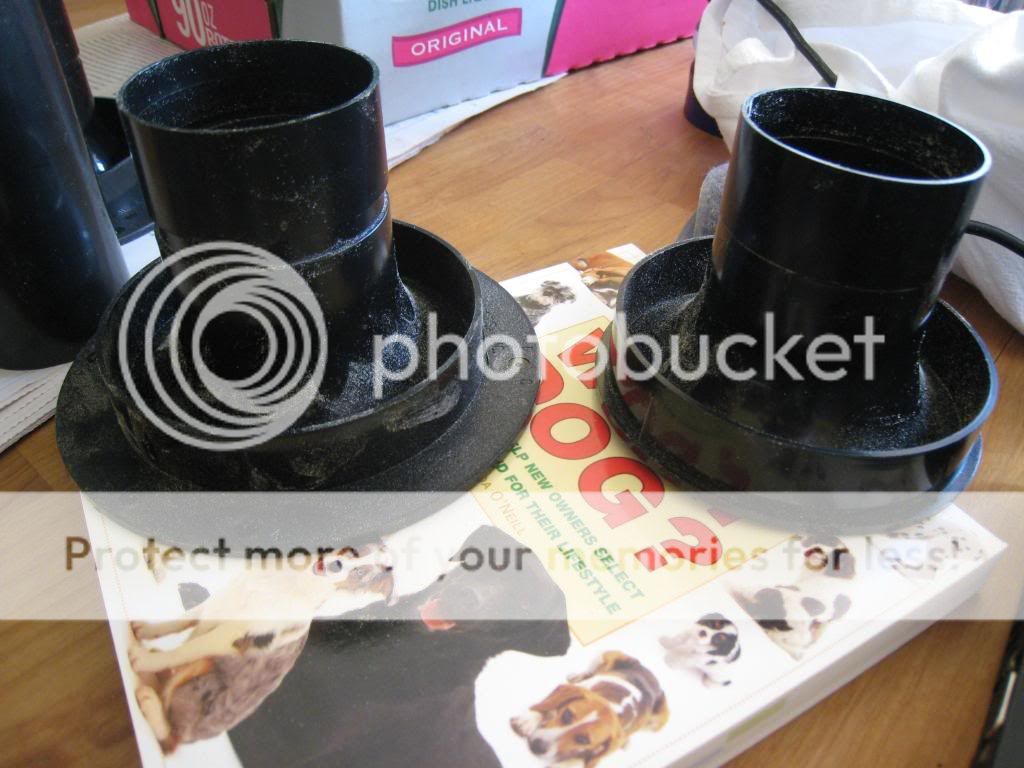
I had assumed from the Zaph website that the smaller one went outside, as shown on his site:
This is clearly the smaller of the two I have.
But then I looked at the interior and saw what looks like the same port:

So now I'm not sure what was intended. Which end goes on the inside, and which on the outside? Anyone know for sure?
After 3 tries, finally figured out the right settings for the woofer route:
Finally did it, and it worked fine.
I also did some test runs at the settings for the port route, and as usual it took me three tries (not shown).
But I have a question. The ports that came in the Madisound kit (I'm working from their no-enclosures kit) have two different ends. I received two pairs of these (two of each size):
I had assumed from the Zaph website that the smaller one went outside, as shown on his site:
This is clearly the smaller of the two I have.
But then I looked at the interior and saw what looks like the same port:
So now I'm not sure what was intended. Which end goes on the inside, and which on the outside? Anyone know for sure?
Stew looks to me that the kit in Johns pictures have two small ends. I know if I were faced with tht dilema Id call the supplier to see what gives. If that failed Id break out the dremmel to cut the large one down. Having one inside the cabinet does have one advantage if you do choose to cut the large one down it will be hidden. Just a thought. I see you havent drilled out your baffle bolt holes yet. Have you completed the enclosures yet?
Update: stew after looking at the madisound site their picture of that kit includes two small port ends and you recieved one small one large.
Update: stew after looking at the madisound site their picture of that kit includes two small port ends and you recieved one small one large.
Madisound said to me in email:
I'll need to experiment again as I had done my test holes with the smaller in mind. No big deal.
I have the cabinet top, bottom, and sides glued together, but the front and backs are still separate. I had planned to finish the fronts up (1/2" roundover on the edges), but not install them until the rest of the cabinet was 100%. I guess I was thinking I'd glue the backs on, sand, then veneer the outside surfaces before cutting holes in the rear for the port & terminals.
After that I figured I'd prep the inside (foam, stuffing, and crossover), then paint the fronts black (Rustoleum? Bedliner?). Once the fronts were totally ready I'd was thinking I'd just glue them on. I've been assuming I could get the crossovers through the woofer hole if I had to repair them, but I haven't checked that assumption yet.
But I'm not sure what you're talking about when you say "baffle bolt holes". What do you mean? Is there a better way to proceed with attaching the fronts?
Larger= outside
Smaller= inside
Josh for Madisound
I'll need to experiment again as I had done my test holes with the smaller in mind. No big deal.
I see you havent drilled out your baffle bolt holes yet. Have you completed the enclosures yet?
I have the cabinet top, bottom, and sides glued together, but the front and backs are still separate. I had planned to finish the fronts up (1/2" roundover on the edges), but not install them until the rest of the cabinet was 100%. I guess I was thinking I'd glue the backs on, sand, then veneer the outside surfaces before cutting holes in the rear for the port & terminals.
After that I figured I'd prep the inside (foam, stuffing, and crossover), then paint the fronts black (Rustoleum? Bedliner?). Once the fronts were totally ready I'd was thinking I'd just glue them on. I've been assuming I could get the crossovers through the woofer hole if I had to repair them, but I haven't checked that assumption yet.
But I'm not sure what you're talking about when you say "baffle bolt holes". What do you mean? Is there a better way to proceed with attaching the fronts?
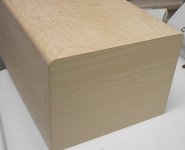
Roundover on front done
Roundovers mostly went well, after a practice run:
Although I did make one mistake that's likely going to be visible.

Is it just me, or is it hard to keep everything level when you're far out on a corner like this? Is there some trick to doing this? I've been directly working on clamped wood - is there more to this? A better way to work?
I would have chamfered during the same session, but I mistakenly bought a chamfer bit with a 1/2" shank at Home Depot which I'll need to return. (My router takes 1/4" bits).
I tried Home Depot & Parr Lumber, but neither sells veneer, so I ordered some online, along with a veneer roller. In the meantime I'll likely glue the backs on, and start sanding in preparation for finishing.
And again, I'd like to know how people think I should attach the front baffle. Should I bolt it on? Glue it on? What's typical?
Roundovers mostly went well, after a practice run:
Although I did make one mistake that's likely going to be visible.
Is it just me, or is it hard to keep everything level when you're far out on a corner like this? Is there some trick to doing this? I've been directly working on clamped wood - is there more to this? A better way to work?
I would have chamfered during the same session, but I mistakenly bought a chamfer bit with a 1/2" shank at Home Depot which I'll need to return. (My router takes 1/4" bits).
I tried Home Depot & Parr Lumber, but neither sells veneer, so I ordered some online, along with a veneer roller. In the meantime I'll likely glue the backs on, and start sanding in preparation for finishing.
And again, I'd like to know how people think I should attach the front baffle. Should I bolt it on? Glue it on? What's typical?
Re: Roundover on front done
Hi,
Are you going to veneer the baffle? If so, those round overs are going to be a problem. Depending on the type and thickness of the veneer, it can be a problem turning a tight radius like that without cracking. Also, the round over should have been on just 2 edges. It's next to impossible to veneer round overs that go both ways - I've seen attempts, they weren't pretty.
Since you driver mount from the front, there's no reason to make the baffle removable, so just glue it on.
StewLG said:Roundovers mostly went well, after a practice run:
I tried Home Depot & Parr Lumber, but neither sells veneer, so I ordered some online, along with a veneer roller. In the meantime I'll likely glue the backs on, and start sanding in preparation for finishing.
And again, I'd like to know how people think I should attach the front baffle. Should I bolt it on? Glue it on? What's typical?
Hi,
Are you going to veneer the baffle? If so, those round overs are going to be a problem. Depending on the type and thickness of the veneer, it can be a problem turning a tight radius like that without cracking. Also, the round over should have been on just 2 edges. It's next to impossible to veneer round overs that go both ways - I've seen attempts, they weren't pretty.
Since you driver mount from the front, there's no reason to make the baffle removable, so just glue it on.
Attachments
Re: Re: Roundover on front done
No, I'm not going to veneer the baffle. The designer is firm about needed a roundover and I'm trying to hew as closely as I can to his directions. I think I have seen some finished DIY works that feature veneering over roundovers, but I figured it was beyond my abilties for a first attempt. I can't remember if they featured two edges or just one.
Therefore, I'm expecting to paint the front black, but I'm not sure of which exact black, the finish, etc. I want to veneer all other surfaces besides the front, which is why I'm waiting until I've veneered to cut the back holes for the port and speaker terminals.
I also checked and I can get the crossover through the woofer hole, should that be necessary.
But OK, good - I can glue the front as I expected. Great.
While I wait for the veneer to arrive I'll glue the backs on and start sanding.
MJL21193 said:
Hi,
Are you going to veneer the baffle? If so, those round overs are going to be a problem. Depending on the type and thickness of the veneer, it can be a problem turning a tight radius like that without cracking. Also, the round over should have been on just 2 edges. It's next to impossible to veneer round overs that go both ways - I've seen attempts, they weren't pretty.
No, I'm not going to veneer the baffle. The designer is firm about needed a roundover and I'm trying to hew as closely as I can to his directions. I think I have seen some finished DIY works that feature veneering over roundovers, but I figured it was beyond my abilties for a first attempt. I can't remember if they featured two edges or just one.
Therefore, I'm expecting to paint the front black, but I'm not sure of which exact black, the finish, etc. I want to veneer all other surfaces besides the front, which is why I'm waiting until I've veneered to cut the back holes for the port and speaker terminals.
Since you driver mount from the front, there's no reason to make the baffle removable, so just glue it on.
I also checked and I can get the crossover through the woofer hole, should that be necessary.
But OK, good - I can glue the front as I expected. Great.
While I wait for the veneer to arrive I'll glue the backs on and start sanding.
Re: Roundover on front done
As camaudio has noted, you can use a scrap piece of wood to support the router.
The best way though is to have the router mounted upside down in a router table (with the bit poking through the table surface). You can then slide the box across the table surface, thus giving it full support all the time.
You can buy small (or large) router tables, but it's one of those things that's best to make yourself (as you can make one that suits your needs).
For temporary jobs, you could probably just take a 4'x2' sheet of MDF, cut a 1" to 2" circular hole in the middle, drill a few countersunk holes for bolts, then bolt the router to the underside of the sheet. The sheet would then sit on a workbench, with the router between the workbench's adjustable jaws. Not ideal, but it'd work OK.
StewLG said:Is it just me, or is it hard to keep everything level when you're far out on a corner like this? Is there some trick to doing this? I've been directly working on clamped wood - is there more to this? A better way to work?
As camaudio has noted, you can use a scrap piece of wood to support the router.
The best way though is to have the router mounted upside down in a router table (with the bit poking through the table surface). You can then slide the box across the table surface, thus giving it full support all the time.
You can buy small (or large) router tables, but it's one of those things that's best to make yourself (as you can make one that suits your needs).
For temporary jobs, you could probably just take a 4'x2' sheet of MDF, cut a 1" to 2" circular hole in the middle, drill a few countersunk holes for bolts, then bolt the router to the underside of the sheet. The sheet would then sit on a workbench, with the router between the workbench's adjustable jaws. Not ideal, but it'd work OK.
stew just a FYI site on veneering.
http://www.joewoodworker.com/veneering/glues.htm
http://www.joewoodworker.com/veneering/glues.htm
Re: Re: Roundover on front done

and you can put the router/board on a trash can and have a little dust collectionsploo said:
As camaudio has noted, you can use a scrap piece of wood to support the router.
The best way though is to have the router mounted upside down in a router table (with the bit poking through the table surface). You can then slide the box across the table surface, thus giving it full support all the time.
You can buy small (or large) router tables, but it's one of those things that's best to make yourself (as you can make one that suits your needs).
For temporary jobs, you could probably just take a 4'x2' sheet of MDF, cut a 1" to 2" circular hole in the middle, drill a few countersunk holes for bolts, then bolt the router to the underside of the sheet. The sheet would then sit on a workbench, with the router between the workbench's adjustable jaws. Not ideal, but it'd work OK.
Re: Re: Re: Roundover on front done
*LOL* Great idea. I never thought of that.
Of course, most (all) of the dust is going to be coming from the top, but it is a good idea for a stand - even if suggested tongue-in-cheek.
This is a better way to do it: http://spikyfish.com/DustExtraction/
camaudio said:
and you can put the router/board on a trash can and have a little dust collection
*LOL* Great idea. I never thought of that.
Of course, most (all) of the dust is going to be coming from the top, but it is a good idea for a stand - even if suggested tongue-in-cheek.
This is a better way to do it: http://spikyfish.com/DustExtraction/
StewLG ,
this may be far fetched, but do you think you could cut and ship me 2 baffles? I will pay of course. I bought this kit some month ago but had no time to deal with it, i do have a table saw though. Madisound is also sold out of the front baffles.
I will be butt jointing the whole box, so only the tweeter and woofer cutout is needed. thanks let me know! I'm in California
You want my broken work?
Wow. You've seen the cruddy job I've done with my front baffles, and you want me to make you some? I'm sure just about anyone local to you with some actual woodworking experience and the proper tools could do a better job than me. I'll take it as a sign of your desperation, and not as a compliment.
One problem is that while I'm working with 3/4" MDF for my front baffle, the Madisound enclosure you have expects a 1" baffle with a rabet so it sits inset in the cabinet (check the plans to see what I'm talking about). This means I'd have to get some 1" MDF (which I don't have) and a rabet bit (which I don't have). So that would cost me, and therefore I'd have to charge you.
If you were willing to increase (I think?) the internal volume a tiny bit (a decision I am NOT qualified to advise you on, or even understand at this point - others please shout me down if this is completely verboten), I could make you a front panel just like mine, 3/4" MDF with no rebate. I'd also want an understanding that what you'd get would be acceptable at best, wonky-but-functional at worst.
And even then, I'd have to charge you like, oh, $70+, which may well be highway robbery, but I do charge quite a bit more than that for my time in my day job.
Tell you what. At the end of my project (finished, broken in, vanity photo-shoot complete, soundstage discussed at pompous length like a fine cabernet), let's talk again, and if you still need my pathetic help, at my absurd cost, for my defective work, maybe we can work something out, yeah?
jin5 said:StewLG ,
this may be far fetched, but do you think you could cut and ship me 2 baffles? I will pay of course. I bought this kit some month ago but had no time to deal with it, i do have a table saw though. Madisound is also sold out of the front baffles.
I will be butt jointing the whole box, so only the tweeter and woofer cutout is needed. thanks let me know! I'm in California
jin, what are you looking for, i could maybe run them on my CNC
camaudio said:
jin, what are you looking for, i could maybe run them on my CNC
Yay, Camaudio!
If either of you need dimensions that worked for me for the cutouts, I have those noted on scrap trials and would be happy to provide them.
- Status
- This old topic is closed. If you want to reopen this topic, contact a moderator using the "Report Post" button.
- Home
- Loudspeakers
- Multi-Way
- PDX Zaph SR-71 Build Thread