Audax HD3P reinflation details
First, preparation. If you need to remove the drivers from the speaker cabinets, you’ll probably have to use the oversize screw method that others have described. I used a ¾ inch long machine screw that was just under ¼ inch diameter. Try to grip one or two screw threads into one of the flange screw holes without boring into the baffle board. Then use a regular claw hammer to slowly and gently pry up the screw/tweeter. Use something to protect the front of the cabinet from scratches, a piece of cardboard will work. Be careful to save the gasket from damage, you may need to loosen it from the speaker flange with a knife as you go. I did damage one, but used some flexible non-hardening contact cement to put the pieces back in place on the baffle board. Also, we are not cutting any wires. With enough slack in the wires, the tweeter can be placed on top of the speaker cabinet, or on a bar stool placed in front of the speaker cabinet. Use a razor blade or hobby knife to remove the part of the label sticker from the center back of the driver to expose and remove the flathead fill screw. At this point, also notice four Phillips screws on the back of the case and check for tightness, just hand tighten. Mine were a little loose. Maybe there is a seal in there that could leak? I don’t really know.
Next, freezing. We are going to freeze the tweeters so that when they return to room temperature this will apply some extra internal pressure inside the dome. Get a bucket of ice (no water). I used a plastic bucket like you would take to the beach for sand. Fill it with ice and then cover with plastic wrap. Put a tweeter in a plastic sandwich bag, unsealed, on top of the ice. Fill another sandwich bag with ice, seal it, and put it on top of the tweeter. Do both speakers simultaneously, two buckets and barstools if you need. Wait half an hour.
Lastly, the vacuum. Get a helper, it’s not hard, but it takes four hands. Replace the fill screw by only one or two threads. It should still wiggle a little to let you know it is not blocking air passage. Sit on the barstool. Hold the end of a vacuum cleaner hose in one hand and make a circular sealing gasket with your thumb and index finger (no need to be perfect). Place the tweeter with diaphragm dome down on the seal you just made with your hand, and now let your assistant hold the tweeter in place on that hand. Have already prepared, a dab of non-hardening pipe thread sealant and a very small paintbrush ready to go. Have your assistant turn on the vacuum. You are going to feel the vacuum change as you make various position adjustments with your sealing hand. I had no problem making what felt like was almost full vacuum without any harm, but keep reading for more on that. With your free hand place a small amount of sealer under the screw head with the paintbrush. Now tighten the screw, and turn off the vacuum. Turn the tweeter over, and you’ve got a brand-new inflated tweeter, just like magic.
At this point, you are done. Enjoy the music. Return the bar stool to the bar you stole it from and have a pint. Keep reading only if you want further techno-geek details and numbers.
I can’t tell you exactly how much pressure the dome needs, but I have heard 1 or 2 psi. And I can’t tell you how much pressure freezing adds, but I can give you a ballpark with this pressure calculator here: Martin Schmaltz' pressure calculator. Accordingly, from 32 to 72 degrees F raises a football from zero to 1.2 psi.
If you are worried about exploding your dome from too much vacuum, don't worry too much, here is what I know. I used a small wet/dry shop vac, looks like about one gallon, 5.75 amp. It felt like a strong vacuum to my hand, so I tested it with some ordinary kitchen plastic wrap. I sucked it way down in the hose, but it didn’t break. Then I tested it with a vacuum gauge from a brake bleeder that was laying around in my garage, and wouldn’t go to zero, so I can’t vouch for accuracy. But adjusting for that, I measured the vacuum cleaner at about 4.5 inHg vacuum, which translates to roughly 2.25 psi inside the tweeter dome (1 inch Mercury (32 degrees F) = 0.4912 psi). So possibly I have two and a quarter psi for the vacuum cleaner and one and a quarter psi from the freezing, for a total of three and a half psi in my tweeters now, maybe more than I need? But probably less than that, considering that fingers don’t make a perfect vacuum seal, and I don’t know my actual starting temperature after pulling the tweeters out of the ice, and I am at 1500 feet elevation, ?? barometric pressure, blah blah etc. etc. All I can say is they look right, and they sound fine. I also tested a six speed cannister vacuum. The results were from about 3 to 7 inHg from low to high setting, or 1.5 to 3.5 psi on the other side, so still not crazy high psi if you are worried about damage maybe.
By the way, some say Nitrogen was used for inflation, others say only air. My view is air is already 78% Nitrogen, 21% Oxygen, maybe some water vapor and just .04% CO2 (why the worry about global warming from CO2?). And there is air all over the outside of the dome diaphragm and driver, so don't worry about it.
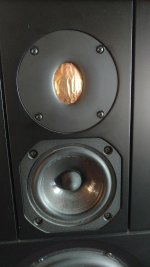
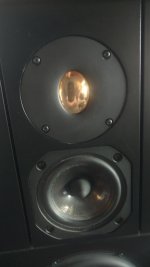
Finally, you may be able to reinflate your tweeters with only a vacuum, or only freezing, but I didn’t experiment, and I only tried the vacuum plus freezing method. If anyone wants to try only one or the other or compare to both, it would be interesting to know the results. I know these tweeters are getting old, and fewer and fewer fans, but there probably are still a few. For full disclosure, my research reveals there are some commercial solutions still available for these Audax HD3P’s, such as the Moca Audio in France inflation valve modification, and the Willys Hifi in England replacement kit using Scanspeak D2905/950000 drivers and a new crossover. But this is a DIY site, hence my post. Before and after photos below. Best of luck.
I also just reinflated my gold dome Audax HD3P tweeters using the vacuum cleaner / freezer method, and I must say, it worked beautifully. I’m thrilled. These 20-year-old tweeters look brand new again and never sounded better. And they have been holding air for over a week now and I am confident they will last a long time. This is an easy, free, maybe permanent fix, using simple tools, and it can be done without cutting or de-soldering the speaker wires. And if it does air down in the future, the fix can be repeated. I’ll go into detail, but proceed with caution, no guarantees, this is just what worked for me. Three steps.I have just reinflated a pair of these tweeters using a vacuum cleaner ( what a brilliant idea !! ) I sealed them in a container and put them in the freezer for about 10 mins prior and this really helped. .....
First, preparation. If you need to remove the drivers from the speaker cabinets, you’ll probably have to use the oversize screw method that others have described. I used a ¾ inch long machine screw that was just under ¼ inch diameter. Try to grip one or two screw threads into one of the flange screw holes without boring into the baffle board. Then use a regular claw hammer to slowly and gently pry up the screw/tweeter. Use something to protect the front of the cabinet from scratches, a piece of cardboard will work. Be careful to save the gasket from damage, you may need to loosen it from the speaker flange with a knife as you go. I did damage one, but used some flexible non-hardening contact cement to put the pieces back in place on the baffle board. Also, we are not cutting any wires. With enough slack in the wires, the tweeter can be placed on top of the speaker cabinet, or on a bar stool placed in front of the speaker cabinet. Use a razor blade or hobby knife to remove the part of the label sticker from the center back of the driver to expose and remove the flathead fill screw. At this point, also notice four Phillips screws on the back of the case and check for tightness, just hand tighten. Mine were a little loose. Maybe there is a seal in there that could leak? I don’t really know.
Next, freezing. We are going to freeze the tweeters so that when they return to room temperature this will apply some extra internal pressure inside the dome. Get a bucket of ice (no water). I used a plastic bucket like you would take to the beach for sand. Fill it with ice and then cover with plastic wrap. Put a tweeter in a plastic sandwich bag, unsealed, on top of the ice. Fill another sandwich bag with ice, seal it, and put it on top of the tweeter. Do both speakers simultaneously, two buckets and barstools if you need. Wait half an hour.
Lastly, the vacuum. Get a helper, it’s not hard, but it takes four hands. Replace the fill screw by only one or two threads. It should still wiggle a little to let you know it is not blocking air passage. Sit on the barstool. Hold the end of a vacuum cleaner hose in one hand and make a circular sealing gasket with your thumb and index finger (no need to be perfect). Place the tweeter with diaphragm dome down on the seal you just made with your hand, and now let your assistant hold the tweeter in place on that hand. Have already prepared, a dab of non-hardening pipe thread sealant and a very small paintbrush ready to go. Have your assistant turn on the vacuum. You are going to feel the vacuum change as you make various position adjustments with your sealing hand. I had no problem making what felt like was almost full vacuum without any harm, but keep reading for more on that. With your free hand place a small amount of sealer under the screw head with the paintbrush. Now tighten the screw, and turn off the vacuum. Turn the tweeter over, and you’ve got a brand-new inflated tweeter, just like magic.
At this point, you are done. Enjoy the music. Return the bar stool to the bar you stole it from and have a pint. Keep reading only if you want further techno-geek details and numbers.
I can’t tell you exactly how much pressure the dome needs, but I have heard 1 or 2 psi. And I can’t tell you how much pressure freezing adds, but I can give you a ballpark with this pressure calculator here: Martin Schmaltz' pressure calculator. Accordingly, from 32 to 72 degrees F raises a football from zero to 1.2 psi.
If you are worried about exploding your dome from too much vacuum, don't worry too much, here is what I know. I used a small wet/dry shop vac, looks like about one gallon, 5.75 amp. It felt like a strong vacuum to my hand, so I tested it with some ordinary kitchen plastic wrap. I sucked it way down in the hose, but it didn’t break. Then I tested it with a vacuum gauge from a brake bleeder that was laying around in my garage, and wouldn’t go to zero, so I can’t vouch for accuracy. But adjusting for that, I measured the vacuum cleaner at about 4.5 inHg vacuum, which translates to roughly 2.25 psi inside the tweeter dome (1 inch Mercury (32 degrees F) = 0.4912 psi). So possibly I have two and a quarter psi for the vacuum cleaner and one and a quarter psi from the freezing, for a total of three and a half psi in my tweeters now, maybe more than I need? But probably less than that, considering that fingers don’t make a perfect vacuum seal, and I don’t know my actual starting temperature after pulling the tweeters out of the ice, and I am at 1500 feet elevation, ?? barometric pressure, blah blah etc. etc. All I can say is they look right, and they sound fine. I also tested a six speed cannister vacuum. The results were from about 3 to 7 inHg from low to high setting, or 1.5 to 3.5 psi on the other side, so still not crazy high psi if you are worried about damage maybe.
By the way, some say Nitrogen was used for inflation, others say only air. My view is air is already 78% Nitrogen, 21% Oxygen, maybe some water vapor and just .04% CO2 (why the worry about global warming from CO2?). And there is air all over the outside of the dome diaphragm and driver, so don't worry about it.
Finally, you may be able to reinflate your tweeters with only a vacuum, or only freezing, but I didn’t experiment, and I only tried the vacuum plus freezing method. If anyone wants to try only one or the other or compare to both, it would be interesting to know the results. I know these tweeters are getting old, and fewer and fewer fans, but there probably are still a few. For full disclosure, my research reveals there are some commercial solutions still available for these Audax HD3P’s, such as the Moca Audio in France inflation valve modification, and the Willys Hifi in England replacement kit using Scanspeak D2905/950000 drivers and a new crossover. But this is a DIY site, hence my post. Before and after photos below. Best of luck.
Attachments
I personally reinflate my tweeters HD3P using a vacuum cleaner (!)
I know it seems strange but it works. (I think a similar process were used on the manufacturing)
The principle is to apply a vacuum on the front side so that atmospheric pressure fills the cavity of the speaker when the cap is withdrawn to the rear.
I made a simple box with two openings for the front and a connection for the vacuum hose,
To reinflate the LS you simply place them on the two openings of the box, diaphragm down, rear screw removed, you gradually turn the vacuum on until the maximum speed, and you retighten the two screws with a dough to seal.
Advantages of the method:
- The pressure of speakers is not too high, equal to the depression of the vacuum, always less than 1 atm
- The pressure is the same in the two tweeters.
Hope it helps
FP
So, what m-rider said seven years ago still holds true and it still is a briliant idea. Skip the freezing and go only for the vacuum(e) method
is my advice. Don´t think they used that in the manufacturing process.
So, what m-rider said seven years ago still holds true and it still is a brilliant idea. Skip the freezing and go only for the vacuum(e) method
is my advice. Don´t think they used that in the manufacturing process.
Leedh Bo, you are probably right. I actually did try to use only vacuum the first time, but I used a rechargeable battery powered vacuum that had some sort of safety feature where whenever vacuum was blocked, it would shut off. So the vacuum kept shutting off just as I was tightening the screw. I could see the dome was inflated, but not 100%. It was really frustrating. So the next time I went all out with the mini shop vac and the freezing. The moral is try, try again, but maybe in small steps.
Well here I come with a warning to anyone who has found a dear pair of HD3p for sale. Please do make sure that the gold coating on the front electrode is still there. If previous owners have tried to clean the gold surface they may not have been aware that they possibly have polished away the fragile gold plating on that surface. Why, simply because the gold finish still seems to be there, even if it is slightly darker and that is due to the fact that the electrode on the backside, that is also gold, is shining through the membrane. The effect of that is lower or nearly none output at all, sad but true. So be aware folks!
- Status
- This old topic is closed. If you want to reopen this topic, contact a moderator using the "Report Post" button.