Well the interest in this thread is overwhelming but I will persevere.
With all parts cut it is time to begin doing some of the decorative work.
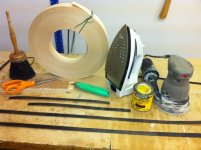
Picture 25: shows the tools of destruction necessary for the trim details. THe roll you see in the picture is heat set 1 1/4" birch veneer edging. I cut the edging into 17/32" strips, enough to cover all the exposed plywood edges and stained most of them black using an oil based stain. After waiting a full day for the stain to dry I sealed the strips with white shellack so I wouldn't transfer the stain to the wood I don't want stained as I worked with the edging. The edging is ironed on, literally, then trimmed using a box cutter and block of wood. THe carefully sanded.
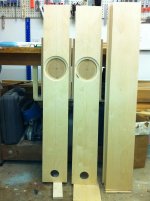
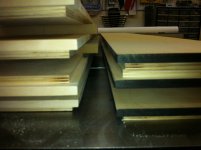
Picture 26: This is the end result. I think once the cabinets are assembled the contrast between the natural birch and black stained birch will be pleasing to the eye. Assembly coming soon where I enthrall all you viewers with my special technique for not getting glue where I don't want it. Riveting....
With all parts cut it is time to begin doing some of the decorative work.
Picture 25: shows the tools of destruction necessary for the trim details. THe roll you see in the picture is heat set 1 1/4" birch veneer edging. I cut the edging into 17/32" strips, enough to cover all the exposed plywood edges and stained most of them black using an oil based stain. After waiting a full day for the stain to dry I sealed the strips with white shellack so I wouldn't transfer the stain to the wood I don't want stained as I worked with the edging. The edging is ironed on, literally, then trimmed using a box cutter and block of wood. THe carefully sanded.
Picture 26: This is the end result. I think once the cabinets are assembled the contrast between the natural birch and black stained birch will be pleasing to the eye. Assembly coming soon where I enthrall all you viewers with my special technique for not getting glue where I don't want it. Riveting....
Today saw a little action in the shop...
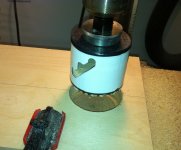
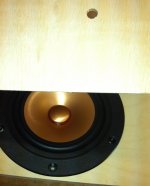
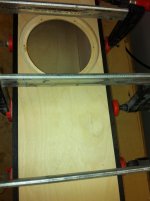
Picture 27: The Alpair 10.2 is nestled in it's cutout ready to have the mounting holes drilled. The panel with the 3/8" hole is the drilling guard.
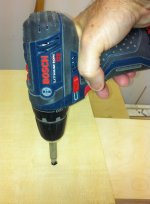
Picture 28: The drilling of the mounting hole. Using a cabinet hinge self centering bit takes the guess work out of getting the holes perfectly centered in each mounting hole in the Alpair's frame. The speaker is proper protected from my clumsy self. It probably would have been wise to clamp the guard.
Picture 27: The Alpair 10.2 is nestled in it's cutout ready to have the mounting holes drilled. The panel with the 3/8" hole is the drilling guard.
Picture 28: The drilling of the mounting hole. Using a cabinet hinge self centering bit takes the guess work out of getting the holes perfectly centered in each mounting hole in the Alpair's frame. The speaker is proper protected from my clumsy self. It probably would have been wise to clamp the guard.
Attachments
Time to begin the glue up. First everything gets a through sanding with 220 grit paper. As I am in no hurry I have chosen to glue the front to the sides first. Then, after that has dried, the back to the sides. That way I can concentrate on making the joinery perfect for each face of the cabinet. Doing two faces at once requires a lot of moving and hurried clamping which takes some of the fun out of the process for me. The design lends itself to working this way. Another advantage of this design is that the rabbets give you plenty of glue surface without the risk of glue squeeze out screwing up the finish later. Additionally by putting the end pieces (top and bottom of the cabinet) in place while glueing the cabinet is self squaring. All this make for an easy stress free glue up. All one needs is patience not to take the clamps off too soon.
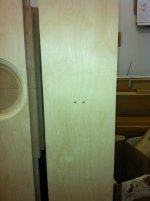
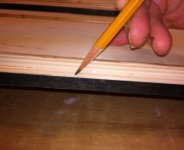
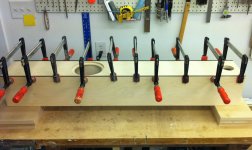
Picture 29: The black strip is the decorative strip of birch edging. THe pencil indicates where I did not put glue to avoid glue squeeze out. I use an aliphatic resin waterproof glue made by titebond. It is stronger than the wood itself, have a nice tack to it and gives you adequate work time. Unlike the newer polyurethane glues (like gorilla glue) it is easy to control squeeze out.
Picture 30: This is the front of the cabinet (I guess that's obvious) with clamps in place. Notice not a drop of glue marring what will be the finished surface.
Picture 31: I like to use plenty of clamps.
Attachments
Picture 31: I like to use plenty of clamps.
Kind of an uderstatement...

Well I have been quiet because I am in the finishing phase. I am using a product new to me, Deft Brushing Lacquer. Though the smell is unhealthy in the least, but it is going to make a very nice finish I can tell already. Even though I have an HVLP spray system I just didn't feel like setting up the shop for a spray session. In the end that was a good decision as it has been raining/storming like crazy here and the humidity is very high. That is an invitation for blushing when spraying lacquer. Brushing lacquers are IMHO very forgiving. As an example, the can says to stir not shake the product, I shake as it mixed better. I am using a foam roller instead of a brush also. You can't tell the end result from a sprayed finish! Between coats I lightly sand with 500 grit abralon, used for auto finishes. Before the next coat I use a tack cloth, which I believe, makes all the difference. Each surface will get six coats. I have five on the backs now and am please as punch.
One quick construction note. I have not installed the vents ant the top and bottom panels are not glued in place. This way I can easily test and adjust both the vent length and the amount and placement of the stuffing.
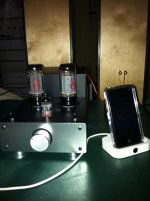
The Alpair 10.2s are being broken in on a table in their shipping boxes using a small wattage tube amp (Elekit 879s). I have put together a spread sheet to keep track of time and volume levels so I will know when they are officially broken in. I have to say as soon as I pushed play, though very low, Mozart has never sounded so good in this house. I have progressed from 5 clicks on the volume control to 12 clicks as of this morning. 12 Clicks is about an 1/8 of the volume range. The music is impressive, I am giddy at the prospect of hearing these Alpair 10.2s in the cabinets Jim has designed.
Thanks Mark and Jim! Mark you are a true artist! Also thanks Dave Dlugos for your encouragement. We will be getting together in the future on the project I talked with you about. Pictures when they are done.
One quick construction note. I have not installed the vents ant the top and bottom panels are not glued in place. This way I can easily test and adjust both the vent length and the amount and placement of the stuffing.
The Alpair 10.2s are being broken in on a table in their shipping boxes using a small wattage tube amp (Elekit 879s). I have put together a spread sheet to keep track of time and volume levels so I will know when they are officially broken in. I have to say as soon as I pushed play, though very low, Mozart has never sounded so good in this house. I have progressed from 5 clicks on the volume control to 12 clicks as of this morning. 12 Clicks is about an 1/8 of the volume range. The music is impressive, I am giddy at the prospect of hearing these Alpair 10.2s in the cabinets Jim has designed.
Thanks Mark and Jim! Mark you are a true artist! Also thanks Dave Dlugos for your encouragement. We will be getting together in the future on the project I talked with you about. Pictures when they are done.
Finished
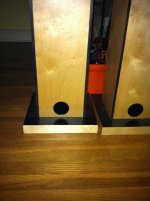
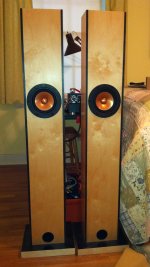
Six coats of lacquer. Acoustastuff in place, binding posts in place, speakers screwed in place, and connecting wire soldered to connection tabs and binding posts. Into approximately 118 hours of breaking in. They sound pretty nice.
Six coats of lacquer. Acoustastuff in place, binding posts in place, speakers screwed in place, and connecting wire soldered to connection tabs and binding posts. Into approximately 118 hours of breaking in. They sound pretty nice.
Attachments
Finished
Into approximately 118 hours of breaking in. They sound pretty nice.
Congratulations on completing your build! Good looking pair you have.
Please share some more listening impressions as you slowly tranistion into real listening vs breaking in.
-Zia
Update: I am up to about 205 hours of breakin. Each morning I move the volume knob up a click. At this point I am at half way; 20 clicks. The amplifier is an Elekit 879S, utilizing two ELH6L6, which produces about 8.5 watts per channel. I connected the Alpairs to the 8 ohm output, hope that was the right decision. The first 100 hours were classical genre only. Mozart, Bach, Vivaldi, Handel, Hayden, Brahms, Mendelssohn, you get the idea. After 100 hours I added some world music, including some Tabla music (a very dynamic drum) and Brazilian indigenous music. Then just a couple of days ago I added light rock and folk to the mix which included the Beatles, Dylan, Joni Mitchell, Iris Dement, Dido, etc. It's been hard to choose the music.
I grew up in a musical household. My mother was and is still a concert pianist (85), my grandmother was a concert pianist. I have been listening to classical music since the womb. I was considered a prodigy as a child and played blues here in Memphis in bars (not legally, but things can be loose here) at the age of 14. I majored in music in college, went on to do studio work and played in several bands in my youth. My point is I have a really good ear and know it. Soooo let me say this, the speaker/cabinet combination is quite remarkable. It is taking a lot of discipline not to turn the volume up! This driver has it all, really. The bass is there, clean yet really there, not muddy, accurate. You can feel it! Mids are clean and precise and the high end too is clear. It seems a shame to even break the sound down into categories as these speakers, for want of a better word, are pure. I am in love. You just gotta try these folks.
I am eagerly awaiting the new Alpair 12s.
Well done natural
Fantastic job mate. As a soon to be Alpair 10.2 owner I found this very inspiring. It is good to have a few reminders about proper woodwork skills also, although I do now have to buy more clamps!
I have to ask, what made you choose this cab design over something like the Pencil. They are both MLTL and look about the same size. Does this design have a particular sound/advantage?
Well done again.
Dean
- Status
- This old topic is closed. If you want to reopen this topic, contact a moderator using the "Report Post" button.
- Home
- Loudspeakers
- Full Range
- Come join me in my shop for a Griffin build