by the way bruwed, thanks for the above post, it was the most useful one i have managed to find on this subject.
sorry, but i'm new at this (although i do have some electronics experience) so i'm still unsure about a couple of things:
how do i tell what voltage and startup requirements i need, and how do i find a lamp with the same specs? all the lamps i have found on the net in the uk tend to be from aquatics or 'herbal' growing companies and they don't list specs, just classify them by wattage. could this be because all ballasts used by these folks are the same type?
i have even seen electronic ballasts that the vendor claims will run ANY mh lamp of the right wattage.
all the literature i have found seems to say that any ballast will run any lamp as long as the wattage and strike method are the same- they never mention the voltage.
i don't mean to contradict you- what you say about voltage makes perfect sense- i just don't know how to go about buying the right lamp if the vendors don't supply this info.
the only thing i can think of is that if a certain gas needs a certain strike method, buying a lamp that matches the strike method automatically means the voltage is correct too?
when you want to replace a lamp that you have already modified, how easy is it to pick out the muffler cement? i like this idea because i had been trying to work out how i'd attatch the lamp, yet make it removable when another replacement was necessary.
by the way, if anyone from the uk is reading this and wants to try something similar, muffler cement is called 'exhaust putty' here.
i would really like to use the original ballast if at all possible, but if not i believe i have found out how to trick the pj into thinking the bulb's ok (i have the service manual") )
)
bruwed has done most of the work- (and appears to be the only person who has had the courage to remove the arc tube from a mh lamp!)- if we work on this we could get a tutorial together so other people can retrofit their commercial projectors. there certainly seems to be a lot of demand for this.
with the dirt cheap prices of lcd projectors on ebay with burnt out lamps, this could be the best thing to happen to diy projectors ever!
i don't mean to belittle the efforts of all the diyers here, but not everyone has the time, cash, technical ability, or room for a diy pj
i think that some people go the diy route because they want a cheap functional projector, not because they enjoy the challenge.
my reason for wanting to learn how to relamp old pj's is because, although i could afford to buy the proper lamps, i resent the artificially inflated price (and i want to feel smug)
also, if i do this, my friends will take the plunge and buy an ebay bargain- then we will all have home cinema!
sorry, but i'm new at this (although i do have some electronics experience) so i'm still unsure about a couple of things:
how do i tell what voltage and startup requirements i need, and how do i find a lamp with the same specs? all the lamps i have found on the net in the uk tend to be from aquatics or 'herbal' growing companies and they don't list specs, just classify them by wattage. could this be because all ballasts used by these folks are the same type?
i have even seen electronic ballasts that the vendor claims will run ANY mh lamp of the right wattage.
all the literature i have found seems to say that any ballast will run any lamp as long as the wattage and strike method are the same- they never mention the voltage.
i don't mean to contradict you- what you say about voltage makes perfect sense- i just don't know how to go about buying the right lamp if the vendors don't supply this info.
the only thing i can think of is that if a certain gas needs a certain strike method, buying a lamp that matches the strike method automatically means the voltage is correct too?
when you want to replace a lamp that you have already modified, how easy is it to pick out the muffler cement? i like this idea because i had been trying to work out how i'd attatch the lamp, yet make it removable when another replacement was necessary.
by the way, if anyone from the uk is reading this and wants to try something similar, muffler cement is called 'exhaust putty' here.
i would really like to use the original ballast if at all possible, but if not i believe i have found out how to trick the pj into thinking the bulb's ok (i have the service manual
)bruwed has done most of the work- (and appears to be the only person who has had the courage to remove the arc tube from a mh lamp!)- if we work on this we could get a tutorial together so other people can retrofit their commercial projectors. there certainly seems to be a lot of demand for this.
with the dirt cheap prices of lcd projectors on ebay with burnt out lamps, this could be the best thing to happen to diy projectors ever!
i don't mean to belittle the efforts of all the diyers here, but not everyone has the time, cash, technical ability, or room for a diy pj
i think that some people go the diy route because they want a cheap functional projector, not because they enjoy the challenge.
my reason for wanting to learn how to relamp old pj's is because, although i could afford to buy the proper lamps, i resent the artificially inflated price (and i want to feel smug
) also, if i do this, my friends will take the plunge and buy an ebay bargain- then we will all have home cinema!
tuga,
what ever happened to your mitsubishi s120?
i am waiting for my telex p1000 to arive in the mail ( broken bulb) from what i understand these are the same exact projector.
did you just use a different bulb with the current projector and psu or did you do soemthing else. all \ any details about your s120 would be much appreciated
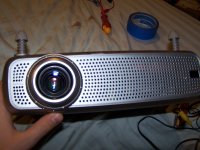
Tuga said:I now have it working with a 15v 150W halogen bulb image is only visible with the room lights off but its ok, maybe a bit on the green side.
Tuga I have some questions about it.
S120 uses a 150W MH Lamp, according to what I know they had an efficiency rate above 80%. Thus mean only 30W are dropped due to heat conversion.
An halogen lamp have an efficiency of aprox. 20%, so you will have in this case 120W that are converted to heat instead of light.
Have you done something to avoid increasing temps inside the equipmen for using this new lamp??
The other question is about how bright it is the image. A MH may have half the luminosity at the end of its life. That means that a 150W (120W whithout the 30W from the loss) may behave as a 60W one. But the halogen starts giving us only 30W out of 150W, thas half the MH a the end of its life. Is it still usable the S120 in that condition???
thanks tuga
hi,
just regd. to say a hearty thanks to tuga for providing such valuable info about this circuit.
I own a Kodak DP1050 and I was successfully able to isolate the opto-isolator and now the projector is running without a lamp.. all i had to do was short-circuit the red and the middle wire and now it runs on its own.
so now i've joined the looking for a replacement lamp club.. if anyone has any ideas on what works best please reply to this thread..
again thanks a million for all the diags and insights.
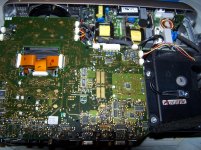
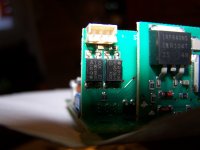
Hello, I am new to the forums. I have just purchased an Infocus LP690 from ebay. I am dealing with similar issues, and have the same 3-wire connector from the igniter board to mainboard. However, I have 3 opto sensors next to this connection.
Tuga notes:
Based on this, if I figure out what the otpos are doing, and which of the 3 wires are 5v can I remove the entire igniter? If this is correct, what do I do with that 5v line?
Tuga notes:
As I said, the igniter and optos are no longer inside my projector so I’ll take a picture when possible.
Based on this, if I figure out what the otpos are doing, and which of the 3 wires are 5v can I remove the entire igniter? If this is correct, what do I do with that 5v line?
Well, maybe a new player in town with a good replacement (only the size of the bugger would be a problem for most beamers I guess (17.3cm x 13.5cm x 9.1cm):
(www.luxim.com)
http://www.lifi.com/dynamic/display.php/36
It's already being used in Panasonic RPTV's.. I just haven't been able to find a price for the unit..
(www.luxim.com)
http://www.lifi.com/dynamic/display.php/36
It's already being used in Panasonic RPTV's.. I just haven't been able to find a price for the unit..
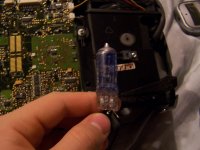
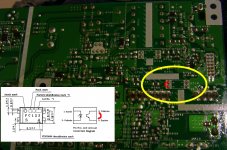
Hey, I bought a Philips LC4431 Projector. I need to bypass the light check, and I need some recommendations for lights and reflectors. I tried a 25w slideshopw light which is barely visable (My projector will show an image until 3 checks then shuts off). Also I got an xenon 80watt 12v automotive light which did better but the reflector I used melted under the heat because it was plastic. I don't have much money and I really want this to work.
No, because I bought it without the bulb and reflector. Also I can't seem to find where to short it to get pass the bulb check.[special=]%[/special] Hope these pics give you an idea.
Attachments
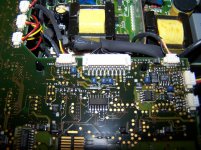
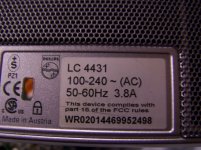
Philips LC4431
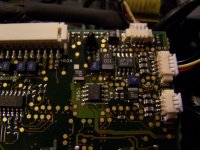
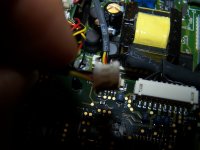
Hey again, I went at it some more and found the basalst and removed it. Found the 3 wires. In my case it seems to me typical to colour. Red 5v, Black ground, and Yellow standby. Now I know I have to short the 5v to ground with a 5v resistor, but what about the standby? Also I heard someone went to home depo and bought a work light and used that with its basalst. Worked great apparantly. I seem set but I thought it would be helpful for you guys.
Hey again, I went at it some more and found the basalst and removed it. Found the 3 wires. In my case it seems to me typical to colour. Red 5v, Black ground, and Yellow standby. Now I know I have to short the 5v to ground with a 5v resistor, but what about the standby? Also I heard someone went to home depo and bought a work light and used that with its basalst. Worked great apparantly. I seem set but I thought it would be helpful for you guys.
Attachments
Hi All:
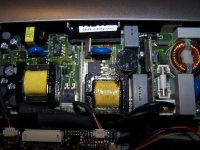
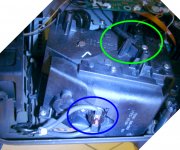
My projector is [SHARP XR-11XC]
1.
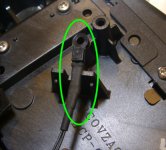
I try to link the Emitter pin and Collector pin together of the PHOTOCOUPLER (I think it's PC123Y) like picture 01.jpg, and it work!! It will not show "LAMP OFF" anymore! But......
It shows "Warming Up, Please Wait...", and after few minutes...it turn off! @.@|||
2.
There is two components outside the lamp housing in picture 02.jpg which might relate to "Warming up" sensing I guess.
The close-up pictures are 03.jpg and 04.jpg.
Does anyone knowes how to solve this situation?
Thanks
PS: I am sorry for the poor english. T.T
My projector is [SHARP XR-11XC]
1.
I try to link the Emitter pin and Collector pin together of the PHOTOCOUPLER (I think it's PC123Y) like picture 01.jpg, and it work!! It will not show "LAMP OFF" anymore! But......
It shows "Warming Up, Please Wait...", and after few minutes...it turn off! @.@|||
2.
There is two components outside the lamp housing in picture 02.jpg which might relate to "Warming up" sensing I guess.
The close-up pictures are 03.jpg and 04.jpg.
Does anyone knowes how to solve this situation?
Thanks
PS: I am sorry for the poor english. T.T
Attachments
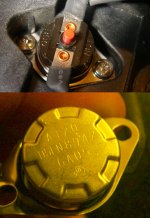
Pic 3 seems like a thermistor. If it is then it is likely to be a PTC type where the resistance increases with the temperature. I don't think that the thermistor has anything to do with the projector not staying on after shunting the photocoupler. It is purely temperature related. Pic 04, you may need to take it off and show it in more detail. Somehow I feel you may be shunting the incorrect photocoupler.
Thank You Gizmotech.
You are right! I was wrong!
There is another PHOTOCOUPLER (PC123Y) somewhere else. It setting on a narrow space that i can't take picture. This one is the correct PHOTOCOUPLER! So my problem now is to put a suit lamp in. It's really diffical to find this suit lamp....I'm still searching for the lamp!
Did anyone have idea about a lamp bright enough and cheap enough and easy to use for the projector? If the lamp use 110V will be most convenient, because it need no adaptor.
Thank you again!
Pic 3 seems like a thermistor. If it is then it is likely to be a PTC type where the resistance increases with the temperature. I don't think that the thermistor has anything to do with the projector not staying on after shunting the photocoupler. It is purely temperature related. Pic 04, you may need to take it off and show it in more detail. Somehow I feel you may be shunting the incorrect photocoupler.
How did you defeat the thermal sensor? I am working with a dlp projector and I have this last sensor board to fool. I tried putting it next to different heat sources to get it to work and read the ohms of resistance at the right temp but so far I have not had any luck.
Flickr: CGIAnimated's Photostream
At room temp I measure 11 ohms of resistance and with the sensor on a cup of hot coffee, then near a candle. I got it down to 5 ohms but I could not get the projector to power up properly without the red temp light coming on.
there are 4 wires and Im not sure how i should go about splicing in a resistor to simulate the right temp.
- Status
- This old topic is closed. If you want to reopen this topic, contact a moderator using the "Report Post" button.
- Home
- General Interest
- Everything Else
- The Moving Image
- Lighting and OHP
- DIY replacement lamp for projector