Some tinkering I've been doing:
View attachment Guitar Preamp.pdf
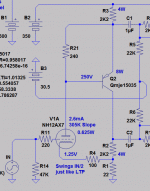
Taking advantage of the things I learned from my recent guitar amp build, I have come up with something a bit different. It combines features of the 2 channels from the Ampeg VH140 into one, mostly with respect to tone control.
Basically a clean preamp, it has some edge when the gain is turned up. Or, at least that's how it looks in simulation.
Suggestions for improvement welcome.")
One thing I want to do is a side by side comparison of the actual results to the simulated, as the build progresses. First thing I did was to verify the amount of gain I had from the FET/BJT combo input stage, as the sim didn't give me the expected results. Since I'm not overly experienced with jfets, I breadboarded the circuit:

I discovered that the simulation model I have for the J201 is a bit off, giving a lower than expected gain for the stage. In fact, there isn't a jfet model in the MS database that gives near to an accurate result for the gain through this stage. I find this a bit perplexing TBH.
To make the stage simulate the correct gain, I had to change R24 to 880 ohms (gain for the stage is actually supposed to be ~R17/R24).

View attachment Guitar Preamp.pdf
Taking advantage of the things I learned from my recent guitar amp build, I have come up with something a bit different. It combines features of the 2 channels from the Ampeg VH140 into one, mostly with respect to tone control.
Basically a clean preamp, it has some edge when the gain is turned up. Or, at least that's how it looks in simulation.
Suggestions for improvement welcome.
One thing I want to do is a side by side comparison of the actual results to the simulated, as the build progresses. First thing I did was to verify the amount of gain I had from the FET/BJT combo input stage, as the sim didn't give me the expected results. Since I'm not overly experienced with jfets, I breadboarded the circuit:
I discovered that the simulation model I have for the J201 is a bit off, giving a lower than expected gain for the stage. In fact, there isn't a jfet model in the MS database that gives near to an accurate result for the gain through this stage. I find this a bit perplexing TBH.
To make the stage simulate the correct gain, I had to change R24 to 880 ohms (gain for the stage is actually supposed to be ~R17/R24).
Last edited:
Feed a fraction of the collector voltage back to the source makes a linear voltage amp.
Transforms horizontal curves of your JFET + BJT Sziklai pair to vertical curves of a triode.
Reminds me of O.H.Schade's Fig#35 (search it on the tube forum). And you have done
so entirely with direct coupled local feedback, very cool indeed!
But also reminds me of my own project, PNP concertina with equal impedance split.
Was already 1/100 voltage feedback from plate=emitter and Mu, wanted to balance
that with a similar fraction of voltage feedback from the collector side.
You could increase your JFET's open loop gain using VBE as a constant current source.
Use a larger value R1 in parallel with this current if you still want some resistive slope.
Ref to your R1, not mine...
Attachments
Last edited:
Properly selected values of R17 and R24 might make R25 unnecessary?
Try 820 and 120
Thanks for your help! I have adopted your change to eliminate R25 and adjust R17, R24 to compensate. I have left R2 in place for now - the degeneration may make the stage more stable.
Interestingly enough, the changes have brought my J201 model closer to reality, but still off. A much better fit now, giving nearly dead-on results, is the 2SK170 model. The model you posted for the J201 gave me worse results than the model I have. Same as the model I got from Fairchild - crap results.
On the face of it, it appears the models are overly influenced by how much current passes, as demonstrated by your changes and my new results.

With the 1K resistor back temporarily (now R5), I have nearly exact match with the actual circuit.
Everything readjusted so's current in JFET and battery are same as your original.
Sorry, seems gain had to go up if we center the output for maximum headroom.
Not sure if that has now over-linearized the thing in some harmful way?...
The gain for the stage needs to stay relatively low, with just enough headroom to cover the typical output of a guitar being played fairly aggressively. This, according to my measurements, is around 1Vpp. The idea is that clipping will happen in the first gain stage and not in the following stages (they clip, but it's controlled via diodes and not rail to rail on the opamps). That's the primary purpose of this first stage, or at least how I envisioned it.
Some detailed looks.
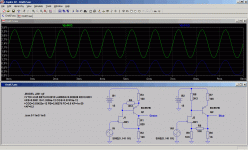
Despite the problems with accurately modeling the fet/bjt combo, I expect the opamp stages to sim within reason. In particular, the amount of gain and the quality of the distortion, with regard to wave shape.
After the input stage, there are 2 'clipping' stages. The first has the high tone control included in its feedback loop. What I have tried to do is limit the clipping in this stage to ~50% of the gain control and up. So, with the gain set at 25%, there should be no clipping:

resulting in a very clean output:

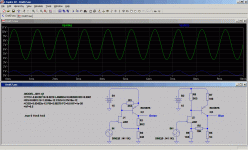
With the gain set to 100%, there will be clipping:

resulting in a nicely distorted output:

This is a balancing act and it took some considerable fiddling with levels to get it here. Hopefully, the actual circuit mirrors the simulated performance. Based on the measurements I made on the distorted channel of my build, it shouldn't be far off.
Despite the problems with accurately modeling the fet/bjt combo, I expect the opamp stages to sim within reason. In particular, the amount of gain and the quality of the distortion, with regard to wave shape.
After the input stage, there are 2 'clipping' stages. The first has the high tone control included in its feedback loop. What I have tried to do is limit the clipping in this stage to ~50% of the gain control and up. So, with the gain set at 25%, there should be no clipping:
resulting in a very clean output:
With the gain set to 100%, there will be clipping:
resulting in a nicely distorted output:
This is a balancing act and it took some considerable fiddling with levels to get it here. Hopefully, the actual circuit mirrors the simulated performance. Based on the measurements I made on the distorted channel of my build, it shouldn't be far off.
I need to build a prototype of the whole circuit before I can test the accuracy of the data in the previous post. That will be a matter of doing a rough layout, etch that board, stuff and test. If my previous experience has counted for anything, that first board won't be the final one.
On to the main reason for doing this. In my original build, I followed the Ampeg schematic to the letter, except for one small detail: I didn't notice that there were log pots (and a couple of reverse log pots) on the schematic. I used linear pots only. This was more of a problem for the clean channel, as it uses more log pots. There is a rather abrupt transition in adjustment of the tone controls on the clean channel.
Here, I set out to minimize that, and still use linear pots. I think I've done a pretty good job, if the frequency response of the real preamp matches the FR of the sim.
Here is the response with the bright switch off. The 5 traces represent the response of the preamp with the tone controls set to 0%,25%,50%,75% and 100%, with 0% being the bottom (green) trace:

Not too bad, with more than 10db of boost over the pots travel.
This is the response with the bright switch on:

High shifted up 5-6db, pulling the mid up slightly too. Not too shabby.
I did try to jack up the mid a bit more but it killed that deep null when the pot is at 0. I think that deep null might be more desirable than a hump, especially as the speakers have the highest output at that point. Could be interesting, again, if the real circuit matches the sim.
On to the main reason for doing this. In my original build, I followed the Ampeg schematic to the letter, except for one small detail: I didn't notice that there were log pots (and a couple of reverse log pots) on the schematic. I used linear pots only. This was more of a problem for the clean channel, as it uses more log pots. There is a rather abrupt transition in adjustment of the tone controls on the clean channel.
Here, I set out to minimize that, and still use linear pots. I think I've done a pretty good job, if the frequency response of the real preamp matches the FR of the sim.
Here is the response with the bright switch off. The 5 traces represent the response of the preamp with the tone controls set to 0%,25%,50%,75% and 100%, with 0% being the bottom (green) trace:
Not too bad, with more than 10db of boost over the pots travel.
This is the response with the bright switch on:
High shifted up 5-6db, pulling the mid up slightly too. Not too shabby.
I did try to jack up the mid a bit more but it killed that deep null when the pot is at 0. I think that deep null might be more desirable than a hump, especially as the speakers have the highest output at that point. Could be interesting, again, if the real circuit matches the sim.
I have the test board layout done:

took a while longer than I expected as I'm coming to dislike PCB layout...
Ready to etch at any rate and I can do some testing once it's stuffed. One slight problem is that I don't have a 25K pot for the high tone control. I could wait or just use a 50K instead for testing. As I'm nearly certain this will not be the 'final' board revision, I think I'll press on and use the 50K pot.
A wonderful, snowy day here in Hell - a great opportunity to prototype the circuit.
I actually etched the board a few days ago (something else I'm starting to get sick of) and just finished populating it. A brief power on test confirms that it is working.
Next are some pics (of course!) and eventually, maybe today, some RMAA tests to compare to the simulation results.
Should be a hoot and a holler.

First stage.
There is some boring stuff but in the interest of completeness, I'll present it. First, I had to make a small adjustment to the simulation to make it match the real circuit on the fet/bjt input stage. I had already established that the fet model is less than perfect.
So, with that done, I simmed the first opamp gain stage:

Note the rms V at the output of U1A. With all of the pots set to the same level as in the sim, I measured the same (give or take a bit - setting a rotary pot with no scale and no knob to exactly 25% is pretty hard to do) rms voltage on the actual circuit.
Scope shot at that node:

That was with the gain pot at 25%. The following is with it at 100%.
Simmed:

Actual:

Output voltage is once again within tolerance. The actual circuit is clipping just as predicted by the simulator. This is good news. Aside from build a preamp, one of the things I wanted to do was to verify (or debunk) the simulator. I want to find out first hand how reliable it's results are. So far, so good but there is some more demanding content ahead.
Simmed:
Actual:
Output voltage is once again within tolerance. The actual circuit is clipping just as predicted by the simulator. This is good news. Aside from build a preamp, one of the things I wanted to do was to verify (or debunk) the simulator. I want to find out first hand how reliable it's results are. So far, so good but there is some more demanding content ahead.
Hi MJL21192,
It is very interesting to follow your approach. In addition, your results expresses worth seeing.
Is there perhaps a sample on youtube?
I develop even just a guitar amplifier. The Poweramp is ready. Now I'm doing a layout for a development board for the Preamp.
It is very interesting to follow your approach. In addition, your results expresses worth seeing.
Is there perhaps a sample on youtube?
I develop even just a guitar amplifier. The Poweramp is ready. Now I'm doing a layout for a development board for the Preamp.
Thanks Glad to see someone is watching...
No sample on YouTube (yet).
Onward!
Second gain stage. Here there is some deviation and I can't chalk it up to tolerance.
With the gain at 25%, the output on the actual circuit is ~60mVACrms while the sim shows this:

Not a large difference but significant.
Actual scope shot:

Waveform is the same and that is the main thing.
With the gain at 100%:

and the actual:

measured output with gain at 100% was ~260mVACrms. Quite a bit less than the simulation. I've tried some different opamp models to see if that makes the difference - nothing so far.
Glad to see someone is watching...No sample on YouTube (yet).
Onward!
Second gain stage. Here there is some deviation and I can't chalk it up to tolerance.
With the gain at 25%, the output on the actual circuit is ~60mVACrms while the sim shows this:
Not a large difference but significant.
Actual scope shot:
Waveform is the same and that is the main thing.
With the gain at 100%:
and the actual:
measured output with gain at 100% was ~260mVACrms. Quite a bit less than the simulation. I've tried some different opamp models to see if that makes the difference - nothing so far.
3rd stage.
More voltage deviation, though the wave shape is still accurate.
Gain at 25%, actual measures 395mVACrms while the sim reads 528mV:

Actual:

Gain at 100%. Actual measures 1.87mVACrms, sim measures 2.71mV.

Actual:

Looks like I'll need to make some changes in the actual circuit, if I want it to match the simulation.
More voltage deviation, though the wave shape is still accurate.
Gain at 25%, actual measures 395mVACrms while the sim reads 528mV:
Actual:
Gain at 100%. Actual measures 1.87mVACrms, sim measures 2.71mV.
Actual:
Looks like I'll need to make some changes in the actual circuit, if I want it to match the simulation.
Last edited:
measured output with gain at 100% was ~260mVACrms. Quite a bit less than the simulation. I've tried some different opamp models to see if that makes the difference - nothing so far.
Arnt the opamp stages gain set by the passive elements (feedback networks)? And usually the gain of allmost any stage should be set by passive components if you want reliable and repeatable gain figures. (transitor parameters are far to variable, from temperature, bias, and manufacturing)
I know a sim relies on good models, but how can the model account for a single transistor type when the hfe (for one) can vary up to 100% of the value in the data sheet. The models might be worst case (if the lawyers get involved) and these would not behave like an average specimen. I can see the next generation of sims and models give results with a range that covers the parameter ranges of all the devices.
Vout=285mv +20/-17 mv because the hfe of Q1 is typically between 100 and 150 at 25 degrees.
I would tap the power supply. Try using a larger capacitor. Or simulate with a small resistant in the power supply to check this.
Not sure what you are talking about - I've been comparing the performance of the simulated circuit to the real circuit.
Arnt the opamp stages gain set by the passive elements (feedback networks)? And usually the gain of allmost any stage should be set by passive components if you want reliable and repeatable gain figures. (transitor parameters are far to variable, from temperature, bias, and manufacturing)
After spending more than an hour double checking my circuit (the real one) for mistakes, and finding none, I believe the reason for the disparity in voltages comes from the way the simulation handles the passive components between opamp stages. Individually, the gain stages are accurate but NOT when linked together, via passive components (resistors especially). I think the simulator is not accurately calculating the voltage drop between stages, or at least that is my best guess.
For example: to bring the actual circuit results in line with the simulated results, I reduced R15 to half its value (5K):

This brought the voltage up in the following stages closer to the simulated results.
Yes, I understand, but my english is too bad to express myself right.I've been comparing the performance of the simulated circuit to the real circuit.
Next try ... an assessment: The power supply is perhaps too weak. The roofs of the rectangle is a break.
Grace
- Status
- This old topic is closed. If you want to reopen this topic, contact a moderator using the "Report Post" button.
- Home
- Live Sound
- Instruments and Amps
- ☠ Guitar Pre. Clean With Some Sizzle.