I am starting this thread to discuss the guitar amp I have been designing and building for my son. The design and build process is complete. Which is of course a lie, design never ends! I am redesigning various parts, ready for version 2 ") But this is version 1.5...
But this is version 1.5...
A brief description of the (ambitious) project is as follows:
... A guitar amp to provide over 100 Watts RMS
... 2 independent lines of input with independent pre-amplifiers
... Reverb unit utilising accutronics 18" springs
... At least 2 * 12" speakers
... All hand made, no kits purchased
... Op-amps use forbidden
... Above rule above with the use of the LM3886 as the power amp
... Amp-box made by hand
Most units used were designed by me (with some help from the forums here) and tested on breadboards. I also used Excel to be able to calculate quickly biasing points, impedances and gains for 2-3 stage amplifiers. Schematics and PCBs were designed using DipTrace, the freebie edition, which has a limit of 250 pins per board. DipTrace exported Gerber files which I then sent to a UK person that did the boards at a low(ish) cost. PCBs came silver plated and pre-drilled.
I will start by describing first what worked straight away and what still does not work satisfactorily.
The Power Amps
As the project was quite complex I decided to try to reduce some of the risk by using the LM3886 as the power amp. In the future I will experiment with discrete power amps.
I used 3 LM3886s in total, 2 of them powering an 8 Ohm 12 " speaker each, and the third one powering 2 * 5.25" mid-range speakers. In total 4 speakers. Speakers were bought on ebay , and they were a good price and used quite heavy magnets. They also have holes (vents) at the back to keep them cool and are rated at 150 (or 200) Watts RMS each. The mid-range ones were each rated at 50 Watts RMS but I am using two in series for a total of 100 Watts.
As you might have seen on the speakers forums, those 4 speakers were junk (Skytronics). I have since bought the Eminence "The Tonker" which are guitar speakers at 102db! I therefore took one LM3886 out and am left with just two powering one speaker each. I have left the small Skytronics on the cabinet disconnected.
The boards were designed by me and are quite spacious at 10 x 10 cms each. If I were asked to do them again, I would probably be able to reduce them to 70% of this area. Each LM3886 has a total of 2300 uF local bypass on board. Each chip is cooled by a cooler at 2.5 C/W (10cm x 5 cm x 2.5 cm)- which I found is inadequate. I have utilised a 12 Volt, 12 cm fan to keep them at working levels.
Whilst testing the amps I noticed loss at high frequencies so I got rid of all optional components except the Zobel network.
Power supply is a 300VA 2x25V toroidal, 6 x 4,700uF caps and 2300uF on each LM3886. Off load the supply gives something like +/-38 Volts. Testing on a dummy 7.5 Ohm, 200 Watt load, each LM3886 delivers sinusoidal +/- 34 Volts at a number of frequencies ( I think I tried up to 20 KHz ), I did not try square waves. That is equivalent to 77 Watts RMS each.
The slow-start
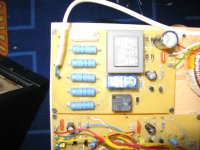
The 300VA toroidal requires a 1.25 A fuse, but will happily blow a 2 A fuse on start, so a slow-start circuit was designed and implemented. It uses an on board encapsulated transformer to drive two 12V relays, one opens immediately as soon as you flick the switch, and the other after a small delay (a few hundred ms). The first one delivers power (240V) through 5 * 10 Ohm 10 Watt resistors. This allows the toroidal to start even with a 1 A fuse. In addition the on/off switch is now on 12 Volts and not 240 which makes it safer for the whole design as the 240 V lines are kept confined somewhere at the back.
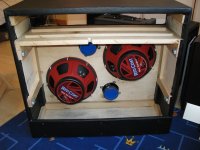
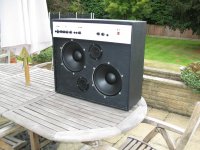
The cabinet
We made this from thin plywood. Unfortunately I did not examine it properly and I used the worst quality plywood you can get... But we covered it in vinyl leather and it looks ok now (still removing splinters from my hands!)
But this is version 1.5...A brief description of the (ambitious) project is as follows:
... A guitar amp to provide over 100 Watts RMS
... 2 independent lines of input with independent pre-amplifiers
... Reverb unit utilising accutronics 18" springs
... At least 2 * 12" speakers
... All hand made, no kits purchased
... Op-amps use forbidden
... Above rule above with the use of the LM3886 as the power amp
... Amp-box made by hand
Most units used were designed by me (with some help from the forums here) and tested on breadboards. I also used Excel to be able to calculate quickly biasing points, impedances and gains for 2-3 stage amplifiers. Schematics and PCBs were designed using DipTrace, the freebie edition, which has a limit of 250 pins per board. DipTrace exported Gerber files which I then sent to a UK person that did the boards at a low(ish) cost. PCBs came silver plated and pre-drilled.
I will start by describing first what worked straight away and what still does not work satisfactorily.
The Power Amps
As the project was quite complex I decided to try to reduce some of the risk by using the LM3886 as the power amp. In the future I will experiment with discrete power amps.
I used 3 LM3886s in total, 2 of them powering an 8 Ohm 12 " speaker each, and the third one powering 2 * 5.25" mid-range speakers. In total 4 speakers. Speakers were bought on ebay , and they were a good price and used quite heavy magnets. They also have holes (vents) at the back to keep them cool and are rated at 150 (or 200) Watts RMS each. The mid-range ones were each rated at 50 Watts RMS but I am using two in series for a total of 100 Watts.
As you might have seen on the speakers forums, those 4 speakers were junk (Skytronics). I have since bought the Eminence "The Tonker" which are guitar speakers at 102db! I therefore took one LM3886 out and am left with just two powering one speaker each. I have left the small Skytronics on the cabinet disconnected.
The boards were designed by me and are quite spacious at 10 x 10 cms each. If I were asked to do them again, I would probably be able to reduce them to 70% of this area. Each LM3886 has a total of 2300 uF local bypass on board. Each chip is cooled by a cooler at 2.5 C/W (10cm x 5 cm x 2.5 cm)- which I found is inadequate. I have utilised a 12 Volt, 12 cm fan to keep them at working levels.
Whilst testing the amps I noticed loss at high frequencies so I got rid of all optional components except the Zobel network.
Power supply is a 300VA 2x25V toroidal, 6 x 4,700uF caps and 2300uF on each LM3886. Off load the supply gives something like +/-38 Volts. Testing on a dummy 7.5 Ohm, 200 Watt load, each LM3886 delivers sinusoidal +/- 34 Volts at a number of frequencies ( I think I tried up to 20 KHz ), I did not try square waves. That is equivalent to 77 Watts RMS each.
The slow-start
The 300VA toroidal requires a 1.25 A fuse, but will happily blow a 2 A fuse on start, so a slow-start circuit was designed and implemented. It uses an on board encapsulated transformer to drive two 12V relays, one opens immediately as soon as you flick the switch, and the other after a small delay (a few hundred ms). The first one delivers power (240V) through 5 * 10 Ohm 10 Watt resistors. This allows the toroidal to start even with a 1 A fuse. In addition the on/off switch is now on 12 Volts and not 240 which makes it safer for the whole design as the 240 V lines are kept confined somewhere at the back.
The cabinet
We made this from thin plywood. Unfortunately I did not examine it properly and I used the worst quality plywood you can get... But we covered it in vinyl leather and it looks ok now (still removing splinters from my hands!)
Attachments
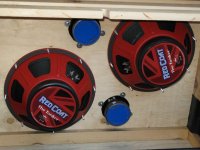
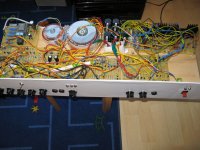
In the pictures above you can see the junk skytronic speakers which I had to replace.
I attach a close-up of the slow-start.
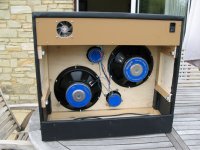
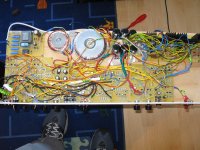
The various PCBs and components were mounted on a piece of plywood . I did really try to find an aluminium enclosure but there is nothing ready made in that size and I would have to order it. As this was my first project I did not want to commit to some kind of enclosure that I was not sure was going to fit everything.
As you can see there are many PCBs because I wanted to keep modules separate for ease of repairs/debugging.
Suffice to say there were a few errors in the PCB design and in the circuit design and I had to patch PCBs and add componets here and there...
I also followed a grounding design that has each "ground" line taken individually back to the PSU. Same with power lines. Hence the jungle of wires you see!
My new pre-amp design puts everything in one board so that should cut down majorly on the number of wires.
I also attach a close up of the slow start PCB.
I attach a close-up of the slow-start.
The various PCBs and components were mounted on a piece of plywood . I did really try to find an aluminium enclosure but there is nothing ready made in that size and I would have to order it. As this was my first project I did not want to commit to some kind of enclosure that I was not sure was going to fit everything.
As you can see there are many PCBs because I wanted to keep modules separate for ease of repairs/debugging.
Suffice to say there were a few errors in the PCB design and in the circuit design and I had to patch PCBs and add componets here and there...
I also followed a grounding design that has each "ground" line taken individually back to the PSU. Same with power lines. Hence the jungle of wires you see!
My new pre-amp design puts everything in one board so that should cut down majorly on the number of wires.
I also attach a close up of the slow start PCB.
Attachments

The preamps
Based on my limited experience with guitar amps I decided to allow a variable gain so that band players could connect keyboards, bass guitars, perhaps acoustic guitars or a violin, or even a microphone. After running some tests I settled on 4 distinct pre-amps:
gain x6 impedance 50K for keyboards etc
gain x12 impedance 500K for guitars
gain x24 impedance 500K for quiet guitars
gain x56 impedance 5K for microphones
I also decided to add "peak detectors" so that I would be able to see whether I was overdriving the amp. My design consists of 3 LEDs, green, yellow and red, and is calibrated so that the red one lights up when you are about to clip.
Those peak detectors have proven invaluable in a number of situations, eg making sure you are not overdriving the amp, and setting up external effects boxes!
For example my son is playing tomorrow and he has set up his effect box (Line6 PODxt) for a total of 16 sounds, all of which have been adjusted to just flicker the red LED, so we know the distortion and other effects will be coming from the POD and not from the amp.
We have another 2 amps at home, a VOX and a Fender and with those you can never tell whether you are overdriving the amp or not.
However I have now decided that providing 4 distinct pre-amps is a bit silly, a more elegand solution would be the VOX's "GAIN" knob which adjusts gain at the eraly stages. This means I only need to have 1 pre-amp, but I will not be able to alter the impedance, only the gain.
Another problem was that gain 12x is too much for all three guitars we have at home, my amps start clipping at 1.25V rms and the peak detectors flash a solid red unless the guitar knob is turned down to 1/2-3/4 of its range (when you play chords)!
I have also provided a SEND and RETURN jack to allow external effects units to be attached and there is a separate peak-detector to make sure we are not overdriving the amp.
The final problem, which almost ruins the whole thing, is the potentiometers. Again bought on ebay, and ended being complete rubbish! You cannot turn them fully CCW because it seems the wiper somehow disconnects and goes open circuit (or it does something else) and you get huge, horrible noises coming out of every part of the amp
For my "version 2" I will have to fork out and buy decent pots from Farnell.
Tone controls
Having decided not to use op-amps, I was certainly not going to use the age-old and proven Fender/Marshall tone circuitry nor the Baxandall one. I was of course going to design my own.
So I did, and it works. It provides Bass and Treble and an adjustable filter pole so we can tweak it for different instruments, eg a bass or a violin.
I attach the schematic. There is a band pass filter chopping anything below the low pole and everything above the high pole. There are another two filters which allow everything below the low pole or above the high pole. The poles are adjusted with dual-gang pots.
This design works well but it is nowhere near as effective as the tone stacks in the Fender or the VOX amps! In those amps when you turn the TREBLE up it is as if you have just added another power amp, that's how powerful they are!
So I need to re-do my design to provide more TREBLE control because this is what gives the guitar amps their characteristic sound.
Attachments

So what do we have today after dozens of bug fixes and last minute repairs.
SLow start cirxuitry working well. Except the Claitronics encapsulated transformer which gets very hot.
154 Watts RMS into two 12" speakers (Eminence, The Tonker)
300 VA transformer, 32,300 uF
2 x LM3886 power amps with heatsinks and a fan
Inadequate tone-controls (for a guitar amp)
Reverb circuitry not working at all, reverb omitted.
Hum elimination not approached from the start, ended up adding a makeshift voltage regulator to try and reduce it. The amp is now quieter than the ageing Fender but has more hum than the VOX (but then again the VOX is 30 Watts).
In terms of noise outside hum the amp is dead quiet even at max level. What makes noise is the fan.
In terms of loudness it is very loud without audible distortion (and I do look at the peak detectors for verification), I cannot describe how loud but "disco loud" makes the air inside your lungs move
My son is gigging with this amp tomorrow, and in case it goes up in flames (touches wood) we are also taking the Fender with us. The stage engineer may mic it up or let it play as it is, we have no idea at this moment, but the stage PA is 10 KW we are told so he may mic it up.
MJL21193 : Your cabinet looks great, can you take some more pictures? What electronics will you put in it?
Thanks,
I will start a thread soon to work through some of the details.
For the pre, I'm working from a modded version of Rod Elliotts design (I don't have a problem with opamps):

For the power amp, I'll use this:

My Abomination amp. It's been laying around since last year without a purpose so I may as well use it here.
I want reverb and left room for the tank.
Wow .... Looks nice , Lots of circuitry ... Im also working on a simular project but without the restrictions on opamps , It a 2 channel amp with independant tube preamps and 5 Band active tone controlls and useing 2 x TDA7294 power amp chips (one fort each channel ), I got it set up so I can use each channel independantly with 2 instruments or run one instrument with each channel in paralell ... it"s all home etched stuff accept I am useing a bought Poweramp PCB , still got lots of work to do on it but I got the preamps built and the 5 band eq"s built and the Face plate made .....
again , love yer project !!!
again , love yer project !!!
Wow .... Looks nice , Lots of circuitry ... Im also working on a simular project but without the restrictions on opamps , It a 2 channel amp with independant tube preamps and 5 Band active tone controlls and useing 2 x TDA7294 power amp chips (one fort each channel ), I got it set up so I can use each channel independantly with 2 instruments or run one instrument with each channel in paralell ... it"s all home etched stuff accept I am useing a bought Poweramp PCB , still got lots of work to do on it but I got the preamps built and the 5 band eq"s built and the Face plate made .....
again , love yer project !!!
Thanks.
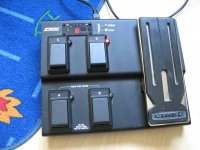
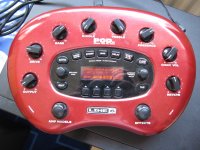
Now this is the thing. When you are on stage you will want to switch between many sounds (effects). It does not matter what the amp has built-in, nothing can be as versatile as having an effects console, or a dozen pedals on the floor. Now the effects units have become really cheap. Look at the attached pictures of the Line6 PODxt and the 4 channel footswitch + pedal. This thing is programmable from the onboard knobs or from your PC. You can download effects and program it to do almost anything you like. It is like having many different pedals but it is better because it memorises settings which you can recall at the press of a switch.
I can not even imagine why you'd ever need anything on the amp other than the most clean amplification. No tone controls, no distortions, no crunch, no chorus, nothing at all is needed on the amp. Some amps are like a half-way house, they have some effects built in and provide a foot switch. But nothing can be as advanced as the POD or similar effects consoles. When you are on stage you do not run back and fro to the amp, all you want is at your feet even the volume control.
Now you could say that the "real thing" is the real valve amp which is overdriven to create a particular sound, however the electronic effects come really close that you'd have to be a very serious pro to care. For example I compared the sound between the 19" accutronics reverb springs (best in class) with the reverb from the POD and well if there is slight difference it will be absolutely lost on stage, you'd need to be wearing headphones in a very very quiet room to tell any differences. So why bother.
Of course there are stomp pedals out there which are cr*p, absolutely horrible. Luckily the POD is leagues ahead in quality. We went to the music shop (Andertons) and tried out many pedals and half of them are rubbish and the other half cost as much as the POD each. And they cannot be programmed or anything like that.
Which makes me thing, perhaps for version 2 I should ditch the pre-amp amd tone controls completely - just provide a cabinet with good speakers and good power amps as noone is likely to plug his guitar straight in.
Attachments
Thanks,
I will start a thread soon to work through some of the details.
For the pre, I'm working from a modded version of Rod Elliotts design (I don't have a problem with opamps):
View attachment 142091
For the power amp, I'll use this:
View attachment 142092
My Abomination amp. It's been laying around since last year without a purpose so I may as well use it here.
I want reverb and left room for the tank.
I did not want to use op-amps for this project because I was trying to follow first principles. Obviously using op-amps would have made my life 1000% simpler, they would just work off the box and they would offer many advantages eg ripple rejection, supply voltage torelance etc. With transistors and FETs the whole design is very fragile, very easy to screw it up, or to get different results because of impedances etc. But I do not regret it, it gives more satisfaction to make something that works this way, it just gets longer to get there
You pre-amp's tone controls are the Fender/Marhall type, almost 100% the same as in my Princeton Chorus amp.
Not sure what the abomination is, I suppose it has been discussed here, it appears to be discrete. Again for my discrete amp project I will again try to follow first principles and see how far it gets me, for example I will have no long tail pair amps and no feedback.
I was also interested in your cabinet looks really slick, mine is much cruder.
Wow .... Looks nice , Lots of circuitry ... Im also working on a simular project but without the restrictions on opamps , It a 2 channel amp with independant tube preamps and 5 Band active tone controlls and useing 2 x TDA7294 power amp chips (one fort each channel ), I got it set up so I can use each channel independantly with 2 instruments or run one instrument with each channel in paralell ... it"s all home etched stuff accept I am useing a bought Poweramp PCB , still got lots of work to do on it but I got the preamps built and the 5 band eq"s built and the Face plate made .....
again , love yer project !!!
Did you say face plate? Can you show pictures of the enclosure and the face plate?
Thanks.
Now this is the thing. When you are on stage you will want to switch between many sounds (effects). It does not matter what the amp has built-in, nothing can be as versatile as having an effects console, or a dozen pedals on the floor. Now the effects units have become really cheap. Look at the attached pictures of the Line6 PODxt and the 4 channel footswitch + pedal. This thing is programmable from the onboard knobs or from your PC. You can download effects and program it to do almost anything you like. It is like having many different pedals but it is better because it memorises settings which you can recall at the press of a switch.
I can not even imagine why you'd ever need anything on the amp other than the most clean amplification. No tone controls, no distortions, no crunch, no chorus, nothing at all is needed on the amp. Some amps are like a half-way house, they have some effects built in and provide a foot switch. But nothing can be as advanced as the POD or similar effects consoles. When you are on stage you do not run back and fro to the amp, all you want is at your feet even the volume control.
Now you could say that the "real thing" is the real valve amp which is overdriven to create a particular sound, however the electronic effects come really close that you'd have to be a very serious pro to care. For example I compared the sound between the 19" accutronics reverb springs (best in class) with the reverb from the POD and well if there is slight difference it will be absolutely lost on stage, you'd need to be wearing headphones in a very very quiet room to tell any differences. So why bother.
Of course there are stomp pedals out there which are cr*p, absolutely horrible. Luckily the POD is leagues ahead in quality. We went to the music shop (Andertons) and tried out many pedals and half of them are rubbish and the other half cost as much as the POD each. And they cannot be programmed or anything like that.
Which makes me thing, perhaps for version 2 I should ditch the pre-amp amd tone controls completely - just provide a cabinet with good speakers and good power amps as noone is likely to plug his guitar straight in.
I have a Totally different take on guitar amps and effects ..... I don"t use any effect accept for overdrive/Distortion and Tone controlls (My other DIY Guitar amp has a 15 band EQ) so all I need is a good clean channel and a good extreme overdrive channel and some Versitile tone shapeing , and while I used to be a proponent of Solid state preamps Ive been getting into useing Tubes for getting that compressed squeeling overdrive sound (a la Slayer) .... I guess I"m a bit old school in that regard .....
as for the Pod and other DSP effects processors they are pretty cool and very versitile but there is just sometimg about there sound I don"t like , It"s hard to describe , Like they sound I thin or Lo-Fi , I don"t have much experience with them accept the guitarist for my Band tries one every few months for a while trying to look for his holy grail tone , You figure at 62 he would have found it by now but not yet....lol
Cheers
I did not want to use op-amps for this project because I was trying to follow first principles.
Understandable. Nicely done circuitry, BTW

I use opamps wherever I can to increase SQ and decrease parts count, especially in things like this preamp. They work for me.
Not sure what the abomination is, I suppose it has been discussed here, it appears to be discrete.
It's an amp project I did last year. Yes, it's a discrete amp - it's a folded cascode design and uses 6 thermal track outputs, very good performance and fairly robust. There is a thread about it.
I was also interested in your cabinet looks really slick, mine is much cruder.
I put some pics in an album on my profile page. Check it out (and a few other interesting things)
Last edited:
Did you say face plate? Can you show pictures of the enclosure and the face plate?
Well I haven"t done the enclosure yet (thinking of doing it in the Diamond textured Stainless Steel) but the face plate is done minus drilling the hiles ....
Here"s a Picture of it , I couldn"t get the whole thing in the frame .....
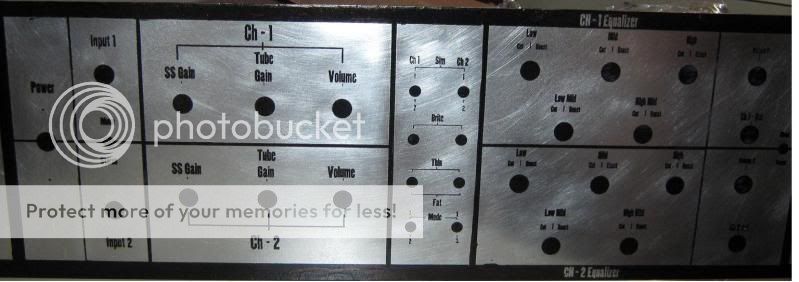
It"s far from perfect but it will suit be fine ....
Cheers
Well I haven"t done the enclosure yet (thinking of doing it in the Diamond textured Stainless Steel) but the face plate is done minus drilling the hiles ....
Here"s a Picture of it , I couldn"t get the whole thing in the frame .....
It"s far from perfect but it will suit be fine ....
Cheers
What is it made of? Aluminium or steel?
What is the enclosure going to be like? A shoe-box?
The enclosure gave me great headaches. A steel box would be very hard to drill, so I thought of using aluminium, but they were asking about 100 pounds for the most basic U shape. Since I was not sure how everything would fit together I put everything on a plank of plywood. For face plate I used a piece of hardboard and on it a glued printed A4 sheets... It is a big kludge and impossible to drill it accurately. On the next version I might use extched PCBs of the right size.
Understandable. Nicely done circuitry, BTW
I use opamps wherever I can to increase SQ and decrease parts count, especially in things like this preamp. They work for me.
It's an amp project I did last year. Yes, it's a discrete amp - it's a folded cascode design and uses 6 thermal track outputs, very good performance and fairly robust. There is a thread about it.
I put some pics in an album on my profile page. Check it out (and a few other interesting things)
Your wood workign skills are superb. I have a router too, but have not thought of using it to cut out the speaker holes. Or to dig channels into which to slot the panels. What instrument is that attached to the router to make the round holes? Is this an inch thick plywood?
I have a Totally different take on guitar amps and effects ..... I don"t use any effect accept for overdrive/Distortion and Tone controlls (My other DIY Guitar amp has a 15 band EQ) so all I need is a good clean channel and a good extreme overdrive channel and some Versitile tone shapeing , and while I used to be a proponent of Solid state preamps Ive been getting into useing Tubes for getting that compressed squeeling overdrive sound (a la Slayer) .... I guess I"m a bit old school in that regard .....
as for the Pod and other DSP effects processors they are pretty cool and very versitile but there is just sometimg about there sound I don"t like , It"s hard to describe , Like they sound I thin or Lo-Fi , I don"t have much experience with them accept the guitarist for my Band tries one every few months for a while trying to look for his holy grail tone , You figure at 62 he would have found it by now but not yet....lol
Cheers
During the performance today Alex (my son) used the POD and pedal cointinuously to do fill ins, lead solos, chords, harping, power chords : for every song he has 4 memorised channels and as he also uses two guitars he has fine tuned the POD accordingly, different channels and settings for each guitar. Before every song he selects the correct channel and then during the song he has 4 choices + pedal.
We just kept the amp to "clean" except we could not use my amp, he had to use another band's Marshall amp which was already on stage and all mic-ed up. Shame, my amp never saw live action!
Your wood workign skills are superb. I have a router too, but have not thought of using it to cut out the speaker holes. Or to dig channels into which to slot the panels. What instrument is that attached to the router to make the round holes? Is this an inch thick plywood?
Thanks again
That is my homemade circle cutting jig:

The plywood is cheap 3/4 inch sheathing. I ran it through my thickness planer then lots of sanding to make it smooth.
- Status
- This old topic is closed. If you want to reopen this topic, contact a moderator using the "Report Post" button.
- Home
- Live Sound
- Instruments and Amps
- Yet another Guitar amp project