...input switching, ... mute, mono, and R/L invert switches, recording buffer, headphone output, phono preamp, as well as remote control functions to consider. It is quite dizzying.
Yes. I guess these are the reasons there are so many uninspiring preamps out there in vacuum land!
Richard,
I built the Sapphire in mid to late 2015. I housed it in the same chassis as shown in your #1 post on this thread. However, I don't use it much and I've now decided to move it to another chassis. I have an audio rack in my listening room. The rack cannot accomodate the Sapphire in its current box. The only location alternative is near the phonostage, but that results in noise. Also, I built the Sapphire using a temporary chassis (aluminum cake pan). The amp was essentially noise free at that point. However, after moving it to the permanent chassis, I picked up noise - not horrible, but not great either. (The Sapphire was one of my earlier builds. I've got more tools and more experience now and should be able to get the Sapphire performing closerer to spec.)
I've ordered a 2u, 19" rack-mountable enclosure from Asia and plan to reorganize my stack and include the Sapphire. The larger chassis will enable me to separate the power supply components from the circuit boards, to re-do the wiring, and to upgrade the attenuator(s).
It will probably be a month before I get the new chassis and start this project, but I thought I'd ask a few preliminary questions. First, since 2015, have you made any project upgrades that I should consider? Second, what are your views on volume control; I used only a modest Alps pot in the Sapphire. Last year I built a 6SN7 preamp and used two gold point 47 step attenuators ($300 +/-). The 6SN7 sounds fantastic, but I'd appreciate your views on upgrading the Sapphire to that extent.
I'll doubtlessly have other questions as the rebuild progresses.
Thanks in advance
Warren
Hi Warren,
You probably have the Sapphire 3, rev. 30 or 31 boards. The latest version is a fully discrete circuit with adjustable gain and open/closed loop alternate configurations. It's called the Sapphire 4 and you can read the story of its development by scrolling through the last few pages of this diyaudio thread. As you'll see, 3->4 is well worth the upgrade.
I use Goldpoint for my volume control in both my Sapphire 4 builds (preamp and headphone amp) and highly recommend them if you can spare the cash. Something like my Gitzo tripod (.....), its something you only ever need to buy once, so its worth getting the best.
Noise can be a connection issue (ground loops) or it can be an interference issue (from nearby transformers). Feel free to pm/email me, hopefully we can sort it out.
Richard,
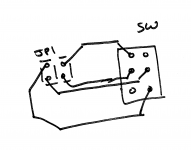
I mentioned that the sapphire 4.1 I'm working on is going to be housed in a 19" rack-mount chassis. So it won't be practicable to open the unit to change the gain with the jumpers. I'd like to mount a toggle switch on the front panel. I'm thinking that a three position dpdt switch should suffice but I don't know how to wire it. Help appreciated.
Warren
Assuming the switch has a stop in the middle (neither switched) this will work, but it's a bit weird - middle will be low gain, up (or down) will be mid, down (or up) will be high.
Maybe there's a better way. Well, best would be relays on the board... but I didn't go that road. I'd be careful wiring to the switch ... keep leads short.
/R
Maybe there's a better way. Well, best would be relays on the board... but I didn't go that road. I'd be careful wiring to the switch ... keep leads short.
/R
Attachments
Last edited:
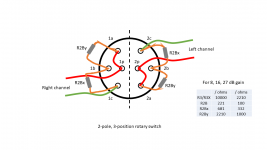
I'm sure something useful could be implemented with a rotary switch. Exactly how best to do it would require some additional thought.
Grounding the Sapphire 4 is the same as all previous versions. Either the chassis is connected via OUT- at the headphone jack by virtue of the panel jack making that connection automatically, or, if isolated, then the chassis connects to the GND pads.
From my testing it doesn't really matter which.
Grounding the Sapphire 4 is the same as all previous versions. Either the chassis is connected via OUT- at the headphone jack by virtue of the panel jack making that connection automatically, or, if isolated, then the chassis connects to the GND pads.
From my testing it doesn't really matter which.
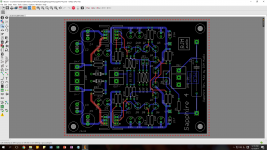
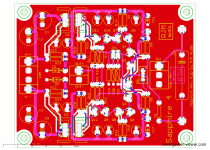
Sapphire 41p preview
Looking at 41m today there isn't much I would update, but recently I have moved away from poly fill for the power traces so I thought I should bring the Sapphire 4 to this new design convention.
The component layout is unchanged. Minor edits to the metal and silkscreen layers only.
Looking at 41m today there isn't much I would update, but recently I have moved away from poly fill for the power traces so I thought I should bring the Sapphire 4 to this new design convention.
The component layout is unchanged. Minor edits to the metal and silkscreen layers only.
Attachments
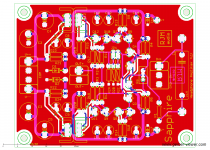
The next production Sapphire board revision is 4.1t.
There are no substantive changes from 4.1m. I needed to reorder the boards and decided to edit the trace and metal layers for consistency with my most recent designs at this opportunity. The circuit and component layout is unchanged.
Minor edit from 4.1p above.
Basic changes/improvements since 4.1m:
- power V++, V--, V+, V- poly fill replaced by 60 mil traces. Keeps the layout cleaner and should be easier to solder to.
- graphics and RJM Audio branding updated to current logo etc. I've dropped the "4" from both the Sapphire and Phonoclone names.
- Transistor outlines labelled with a dot for NPN, dash for PNP. I think this makes it a lot easier to populate the boards.
- zero potential pads marked by rectangle outline, non-zero / signal+ by beveled outline.
- C1 alternate pad lead spacing shortened.
- The spacing of the "heat sink sandwich" Q13-16 has been reduced to align the transistor pad spacing of the back-to-back packages. (It was fractionally too wide before, but didn't affect mounting at all.)
Attachments

Last edited:
How to use connect a rotary switch to the Sapphire 41m boards to enable front panel gain selection.
Experimental. The inductance of long lead wires may cause stability problems, especially with the closed loop configuration.
Front panel gain rotary switch tested and works fine, so if that's a convenience feature you want to add go right ahead.
I have a ton of audio-related items to wade through this weekend, let me deal with this one first, it's the most straightforward.
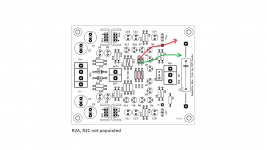
I have two Sapphire (4) builds at home, one is configured as a headphone amplifier, the other as a line stage. The headphone amp is set up closed loop, the line stage open loop. The linestage gain is switchable 3-6-9 dB. Today I converted the line stage to run closed loop, keeping the gain setting 3-6-9 dB as before. R3X = 2.21k, R2A = 4.75k, R2B = 4.75k, R2C = 1.5k.
When I first build the linestage I reported I couldn't really hear it in my system so I might as well keep it open loop. Recently I was comparing (phono + line stage) vs (phono stage direct) into my Sapphire headphone amplifier, and I could detect a small loss of transparency with the line stage present.
The open loop Sapphire line stage induces a slight "thickening" of the music signal, adding warmth and smoothness and the expense of resolution. LTSpice says the open loop has about 10 dB higher 2nd and 3rd harmonic distortion than the closed loop at 0 dB signal output, 6 dB gain. We are talking about the difference between -90 dB 2nd harmonic distortion and -100 dB. The distortion is barely perceptible, but it is perceptible.
On the principle that the best line stage is the least audible, I switched to the closed loop. The sound is clearer and cleaner, more solid.
I see no downside with going closed loop in this circuit. Even at low 6 dB gain where phase margin is supposedly marginal, I encountered no hint of any nervousness. It sounds almost exactly as before, just slightly cleaner. In comparison the open loop version has a slight vintage feel to it. I prefer the closed loop R3X version hands down.
I've added some line stage gain configuration suggestions to the attached BOM 4.1t2.
Attachments
sapphire-41t1 70x90 fixed short
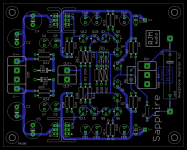
Sapphire board is standard Eurocard, 80x100 mm.
I had a request for a fractionally smaller one, so the attached Gerber is 79.8x99.8 mm. Apparently the fabrication house was adding 0.05 mm to the size automatically which pushed the unit cost into the next price bracket.
Sapphire board is standard Eurocard, 80x100 mm.
I had a request for a fractionally smaller one, so the attached Gerber is 79.8x99.8 mm. Apparently the fabrication house was adding 0.05 mm to the size automatically which pushed the unit cost into the next price bracket.
Attachments
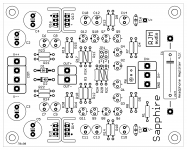
Finished Rack Mount V4
Completed this project around Christmas but had to wait to source and modify one of the knobs before finishing.
As noted earlier, I built the v3, liked the sound, but had a couple of issues. In the small chassis, I had no place to keep it except on top of the m/c phono stage and that proximity caused some interference. Second, the small size of the chassis made separation of signal and power cabling difficult.
I decided to build the v4 in a rack mountable chassis, killing two birds with one stone. However, with a kind of permanent rack chassis the impedance jumper system would have been impracticable to use. So Richard was kind enough to provide a solution for a panel mount gain switch which he posted a few weeks ago. That worked out fine.
Attachments

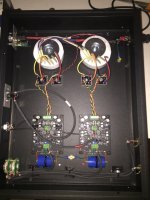
An excellent demonstration of the advantages to using an oversize enclosure.
In addition to providing plenty of separation between the power supply and input signals, all the hardware can be placed in the ideal position without compromise.
It's the most formal component layout and frankly still the best: viewed from the backplate, input signal far left, power supply on the far right, input to output sections moving left to right.
- Home
- Amplifiers
- Headphone Systems
- RJM Audio Sapphire Desktop Headphone Amplifier