Found it - it's now here...http://www.diyaudio.com/forums/vendors-bazaar/211184-odac-offerings-epiphany-acoustics-14.html
Bit confusing in that the title refers to one of the commercial vendors, but everyone who's selling ODACs is now merged in - and the links from NwAVGuy's last ODAC blog entry are all broken as a result...
Bit confusing in that the title refers to one of the commercial vendors, but everyone who's selling ODACs is now merged in - and the links from NwAVGuy's last ODAC blog entry are all broken as a result...
Last edited:
Here's just a little idea to make cables up front look tidier - if you use a little right angle adapter cable off of eBay, then you have a bit less sticking out front. I think I'll do the same for my 3.5mm input later on as well.
Anyone know what happened to Swalter's GB for O2 parts and the ODAC - it seems to have disappeared...
The moderators have moved every thread thats discussing the ODAC into one thread in the vendoors bazaar in the commercial sector
Hi greenalien,
as you found out already all threads that discussed the ODAC in the slightest way have been merged together, even so I took the pre-orders explicitly out of the O2 thread.
I will create a new thread shortly in the commercial section, hope that one than stays...
Stefan
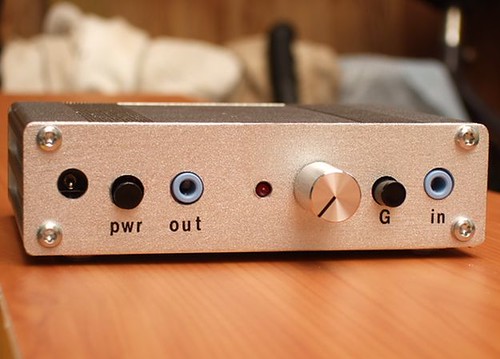
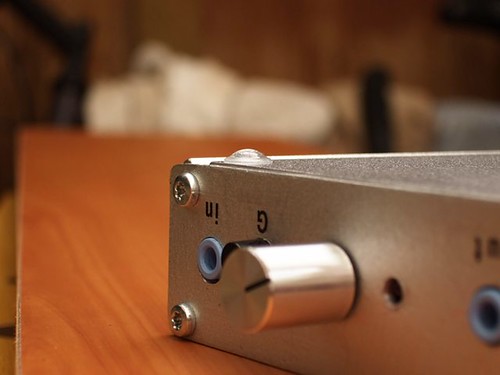
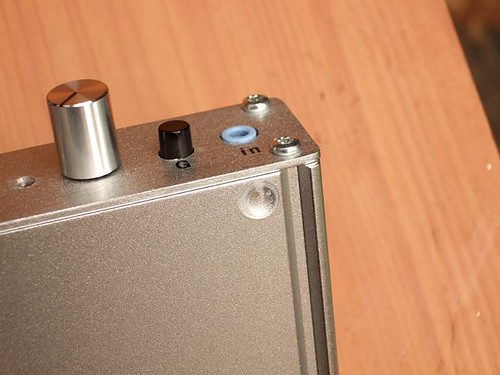
I've finally drilled my frontplate. Write-up for those looking to cheapscate. General reaction/suggestions/ideas from what I wrote below most welcome.
To get the positions accurate I printed the fpd files at 106.95% scale (trial and error to get the scaling right). I also ticked "print reference points" in the print dialog which made getting the right place for the auto punch easy though it isn't a cross hair but a single dotted line. I used an occasional squirt of kerosene (uk: paraffin) for cooling and drilled slow. I have no prior drilling experience.
With advice from here, I used an auto center-punch and then HSS-G (for aluminium) drill bits. Despite the punch the drill did wander quite significantly. I had to punch a second time to try to steer the drill. Not a total disaster, as you can see from the pics, but I need to get a spot drill bit, I think, for the next two. The drill bits are Bosch 3mm, 6.5mm and 7mm, off ebay. I used a cheap, tapered hand-reamer (3mm to approx 12mm) off amazon to widen to the specified size and de-burr. I used too much force with the reamer on one hole and actually caused a heavy burr. The reaming generally didn't do a good job on the burrs but they aren't objectionable.
I used letraset transfers for the lettering. It was a nightmare. Quite apart from letters not taking or nearby letters also transferring, it was difficult to get alignment both in the vertical and the horizontal (letter spacing) and you can see the wonky results. I gave up once I had the absolute minimum done. I then laquered the letters, from my gold-leafing kit, to stop them coming off. The laquer was too visible so I ended up laquering the whole font plate. I should have stuck to just one coat as it looked alright. By the 3rd coat too much dust and dirt was making itself present and the surface was taking on an undesired texture. At least it's not shiney as varnish would have done.
My next attempt will be to use the print-'n-iron circuit-board creation technique. Print the lettering, using a standard laser, in mirror image and iron it on to the frontplate. I'll probably laquer that too but this time not fuss about the marginal difference in appearance of the anodised aluminium.
I used white-spirit to clean surfaces before letrasetting or applying the feet.
All in all it was a lot of fun and satisfying though the result is not as good as the GB face-plates. However at least I get to preserve the colouring for the blue and red enclosures.
From Farnell (minimum for free postage is £30) I got a silver volume knob (Farnell's pics are inaccurate; it's 12mm diameter 'slim', the one in my pics) and a fat 20mm silver knob (too close to the led on standard faceplate) for my B003 enclosure. It's held in place with a screw rather than the tight-fit semi-circle of the BOM knob. Very cheap. Much cheaper than digikey. I also got tiny rubber 'feet' to stop the O2 slipping off my table or scratching it.
Damnably I lost a screw for the enclosure. Anyone got a clue as to replacements? I've not much idea about such things.
Prep for drilling. The printed dimensions of the faceplate are actually slightly bigger than the real faceplate but the holes aligned exactly :
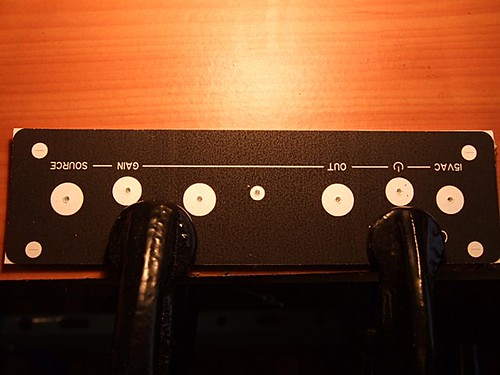
DSCF7602-w640 by midnighttoadstool, on Flickr
DSCF7612pp by midnighttoadstool, on Flickr
DSCF7616pp-w640 by midnighttoadstool, on Flickr
DSCF7614-w640 by midnighttoadstool, on Flickr
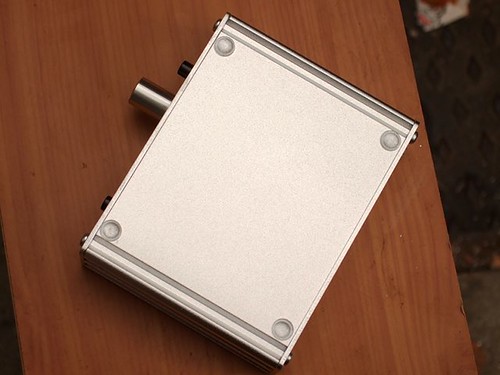
DSCF7618pp-w640 by midnighttoadstool, on Flickr
To get the positions accurate I printed the fpd files at 106.95% scale (trial and error to get the scaling right). I also ticked "print reference points" in the print dialog which made getting the right place for the auto punch easy though it isn't a cross hair but a single dotted line. I used an occasional squirt of kerosene (uk: paraffin) for cooling and drilled slow. I have no prior drilling experience.
With advice from here, I used an auto center-punch and then HSS-G (for aluminium) drill bits. Despite the punch the drill did wander quite significantly. I had to punch a second time to try to steer the drill. Not a total disaster, as you can see from the pics, but I need to get a spot drill bit, I think, for the next two. The drill bits are Bosch 3mm, 6.5mm and 7mm, off ebay. I used a cheap, tapered hand-reamer (3mm to approx 12mm) off amazon to widen to the specified size and de-burr. I used too much force with the reamer on one hole and actually caused a heavy burr. The reaming generally didn't do a good job on the burrs but they aren't objectionable.
I used letraset transfers for the lettering. It was a nightmare. Quite apart from letters not taking or nearby letters also transferring, it was difficult to get alignment both in the vertical and the horizontal (letter spacing) and you can see the wonky results. I gave up once I had the absolute minimum done. I then laquered the letters, from my gold-leafing kit, to stop them coming off. The laquer was too visible so I ended up laquering the whole font plate. I should have stuck to just one coat as it looked alright. By the 3rd coat too much dust and dirt was making itself present and the surface was taking on an undesired texture. At least it's not shiney as varnish would have done.
My next attempt will be to use the print-'n-iron circuit-board creation technique. Print the lettering, using a standard laser, in mirror image and iron it on to the frontplate. I'll probably laquer that too but this time not fuss about the marginal difference in appearance of the anodised aluminium.
I used white-spirit to clean surfaces before letrasetting or applying the feet.
All in all it was a lot of fun and satisfying though the result is not as good as the GB face-plates. However at least I get to preserve the colouring for the blue and red enclosures.
From Farnell (minimum for free postage is £30) I got a silver volume knob (Farnell's pics are inaccurate; it's 12mm diameter 'slim', the one in my pics) and a fat 20mm silver knob (too close to the led on standard faceplate) for my B003 enclosure. It's held in place with a screw rather than the tight-fit semi-circle of the BOM knob. Very cheap. Much cheaper than digikey. I also got tiny rubber 'feet' to stop the O2 slipping off my table or scratching it.
Damnably I lost a screw for the enclosure. Anyone got a clue as to replacements? I've not much idea about such things.
Prep for drilling. The printed dimensions of the faceplate are actually slightly bigger than the real faceplate but the holes aligned exactly :
DSCF7602-w640 by midnighttoadstool, on Flickr
DSCF7612pp by midnighttoadstool, on Flickr
DSCF7616pp-w640 by midnighttoadstool, on Flickr
DSCF7614-w640 by midnighttoadstool, on Flickr
DSCF7618pp-w640 by midnighttoadstool, on Flickr
Damnably I lost a screw for the enclosure. Anyone got a clue as to replacements? I've not much idea about such things.
I have tons of them since I don't use them for my builds. pm me your mailing address and I will drop a bag of them into the mail for you
I might have an extra set of front and back plates if you want to try again
-joe
I have tons of them since I don't use them for my builds. pm me your mailing address and I will drop a bag of them into the mail for you
I might have an extra set of front and back plates if you want to try again
-joe
That would great, joe. I think I'll have to pay postage as we're on different continents.
Any Euro zone persons with spare screws and even better spare faceplates? Willing to pay postage, of course.
I think this:
http://lifehacker.com/5903575/unleash-your-headphones-full-potential-with-a-usb-dac-and-amplifier
needs a bit of ODAC attention.
http://lifehacker.com/5903575/unleash-your-headphones-full-potential-with-a-usb-dac-and-amplifier
needs a bit of ODAC attention.
That would great, joe. I think I'll have to pay postage as we're on different continents.
Any Euro zone persons with spare screws and even better spare faceplates? Willing to pay postage, of course.
I can just throw it into the envelope and put a stamp on it..
-joe
I think this:
http://lifehacker.com/5903575/unleash-your-headphones-full-potential-with-a-usb-dac-and-amplifier
needs a bit of ODAC attention.
I doubt that Lifehacker is very DIY friendly..
and anyone in europe have a spare b2 black box to send me? i paid one to jokener GB but never receive anything....and can't find one...::S
i got tons.. pm me
-joe
and anyone in europe have a spare b2 black box to send me? i paid one to jokener GB but never receive anything....and can't find one...::S
Hi CrustyD3mon,
I will get a shipment of cases similar to the B2 by the end of next week, I will also have the matching front panels to go with it.
Stefan
Hi CrustyD3mon,
I will get a shipment of cases similar to the B2 by the end of next week, I will also have the matching front panels to go with it.
Stefan
The cases are in the same dimension? i only ask because i already have the proper front pannel...whats the price?
The cases are in the same dimension? i only ask because i already have the proper front pannel...whats the price?
yes, the dimensions are the same, the outer surface is different and the mounting holes are for M2.5 threads. The corner radius is R4 on case and panels compared to R3 on the B2 panels.
Prices are listed in my shop, see the first link below, the case, including 2 blank panels, 8 screws and 4 rubber feet, will cost 11.99 CHF for buyers outside of Switzerland (- 8% VAT).
Stefan
The pannel that i have is this:

the holes have the same posision in that "R3" case?
the holes have the same posision in that "R3" case?
R3 is the corner radius of your panel, my case has a corner radius of R4, so 1mm wider. Meaning the corners of your panel will stick out slightly. The positioning itself is exactly the same.
Stefan
R3 is the corner radius of your panel, my case has a corner radius of R4, so 1mm wider. Meaning the corners of your panel will stick out slightly. The positioning itself is exactly the same.
Stefan
Ahh ok! thanks for the explanation....can you post a pic of those black cases that you have?
- Home
- Amplifiers
- Headphone Systems
- The Objective2 (O2) Headphone Amp DIY Project