
I wonder if using solder paste would be a lot easier? Simply blob a tiny bit out of the syringe onto the pads, push on the component, apply heat to both sides at once. The component is pulled into position by the solder as it melts? I saw this with a tutorial I watched. Was very easy and the joints looked very good and clean and tidy.
Personally the biggest problem with surface mount is seeing them! I had to buy a stereo microscope. Not even with the x4 'ready readers' and much brighter lighting could I adequately do it. Now I can see how well the solder sets, some of it seems to leave 'fault lines' and some sets with a smooth homogeneous looking joint. I wasn't paying attention to that and had a few little samples of solder I was using up before I noticed a difference, but I think it might have been the Cardas, Owen's favourite, that was the best in this regard. Can't repeat the test as I used it all.
I also bought another soldering iron, a used Metcal MX and a host of excellent tips. I using a fairly tiny tip now for everything, 2mm rods down to tiny surface mount, it really delivers heat and fast. And exactly where I want it. I followed a recommendation from someone in a forum who works for maybe Panasonic on an assembly line populating large boards with some large PTH screw down wire connectors and perhaps re-working some surface mount. He had the choice of any of the very many Metcal tips and said they they all ended up using just the one. IIRC, he said he did boards of about 100 joints in about 100 seconds. With this: STTC-126 = 0.4mm conical, Bent, 30°. I have used the 2mm tip and others but this small one works. With Metcal the heating element is in the tip itself so it responds fast to touching the pad and joint, it doesn't rely on the thermal mass of the tip to dump heat into the joint, as do other designs of soldering iron. I would say though that the older used power supplies are flaky; I have two failed ones out of four and they are not at all easy to repair due to Metcal keeping secret the schematics and there being no available repair service and certain unavailable transistors.
Last edited:
What one can do with the bent tip is lay it flat on the pad, either to the side or across the rear of the component. One can also point the tip down onto the pad and run solder onto it.
For PTH it's the same plus you can (and for RCA plugs and 2mm rod) lay the thick end of the tip on the target and run some solder in. Then run the thin part of the tip up beside the wire in the RCA plug for example. This thin tip does rod and capacitor lugs as well as, if not better than, the 6mm bit on the 50Watt Antex.
For PTH it's the same plus you can (and for RCA plugs and 2mm rod) lay the thick end of the tip on the target and run some solder in. Then run the thin part of the tip up beside the wire in the RCA plug for example. This thin tip does rod and capacitor lugs as well as, if not better than, the 6mm bit on the 50Watt Antex.
Hi MisterRogers,
You'll find that the PSU actually runs a little cooler as a result, since increasing the output voltage from 15V to 18V will reduce the voltage dropped by the reg by 3 volts, and the current will not increase by any meaningful amount.
You will notice that the SE-SE boards themselves will run a little warmer as a result of the increased dissipation on the buffers and the op-amps. At +/-18V the LME49990 runs quite hot, but this is normal and will not adversely impact performance or longevity. If you want to be extra safe, get a few of those little copper ram heatsinks they sell at computer stores (for cooling VGA RAM ICs) and stick them onto each buffer, and try to get one across the two LME ICs if it will fit. Thermal conductivity through the plastic casing isn't great, but it still helps.
You will also want to make sure your transformer is up to the task, and that the VA rating is high enough so that the secondary voltage does not sag to unacceptable levels under full load.
As far as the PSU in concerned though, you'll be fine with two SE-SE boards on the same PSU at +/-18V. By increasing the rail voltage, you're essentially shifting power dissipation off the PSU and onto the SE-SE boards themselves.
Cheers,
Owen
Hello,
Anyone here with a PS board that they wish to sell?
Thanks!
I understand any PS with an LM317/337 would work fine for the amp, however I am confused to identify any that would match this amp well, if I am not able to get a spare PS board from anyone. On a glance, the Salas shunt appears to work but I'd like to keep the PS as compact as the amp, if I could. I apologize if this has already been discussed in this thread and I have missed it but any PS suggestions for an SE-SE amp would be much appreciated. Thanks.
Why not just fit the same components Owen onto some Vero board, or better, Tripad board? It's easy enough to do.
I was considering that as my last resort as I am not an experienced DIY'er. Maybe I will look into it more seriously. Thank you.
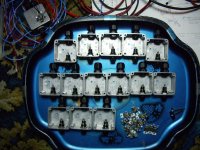
The heatsinking was done by the case the regulator fitted into.
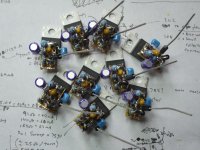
If there was a next time I'd look at using more surface more components. With this project, on the non variable +5V regulators, I used just one surface mount, a tant cap which can be just about seen on the 3 regulators on the bottom right.
If there was a next time I'd look at using more surface more components. With this project, on the non variable +5V regulators, I used just one surface mount, a tant cap which can be just about seen on the 3 regulators on the bottom right.
Attachments
Last edited:
ThanksThat looks fantastic!
")
I could; more dull treble, less distinct and more 'rough', especially on some metal chimes and any sound with fast edges.I'm about to solder into the signal leads some Panasonic micro relays to see if I can hear any difference with the HD800's
I was able to hear the difference when I unplugged the XLR to varnished solid silver to XLR lead as well. Was more expressive and cleaner, better pronounced 'highlights'. Seemed as if the treble had been turned up a bit.
Not vast changes, but ones worth having.
Last edited:
Finally gotten around to rectifying my [hopfully] final mistake from when I built my original The Wire se-se. I used a 10K Alps pot but didn't change the related resistors. I did remove the 1K resisters some months ago but never changed the 10k ones for 100K...
All done now and my word it's loud & still sounding ultra fine with the HD-650's...
All done now and my word it's loud & still sounding ultra fine with the HD-650's...


Thanks mate! I'm open to suggestions re: wiring. I didn't pull down the shrink wrap or tie up the routing yet; still thinking about the wiring routing. Apart from keeping power lines from output and twisting power, what else should I be tending to?
I like the Khozmo - a lot. It steps quietly, and I really like the 48 steps. It is big though
I like the Khozmo - a lot. It steps quietly, and I really like the 48 steps. It is big though
Well done!
You shoud twist everything very tightly (not only power wires).
Also, I see the main power cables and the transformer are a bit too close to the attenuator. I would probably try to swap the position of the attenuator and the headphone output socket, if that is possible.
Also, your picture screams for a detailed comparison with the schiit mjolnir!
- Home
- Amplifiers
- Headphone Systems
- "The Wire" Ultra-High Performance Headphone Amplifier - PCB's