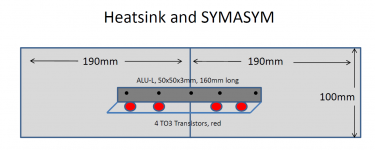
3mm thick for the angle is too thin.
try to find 5mm to 7mm thick for effective heat transfer.
I guess from the diagram that the biggest radius is around 120mm.
That leaves a radius:thickness ratio of 120:5 (24:1)
That is very much larger than the usually recommended 10:1 for aluminium.
try to find 5mm to 7mm thick for effective heat transfer.
I guess from the diagram that the biggest radius is around 120mm.
That leaves a radius:thickness ratio of 120:5 (24:1)
That is very much larger than the usually recommended 10:1 for aluminium.
Gentlemen, as I have written: there is no current project using these heatsinks and ALU-L - or T-shaped ALU - profiles!
It is simply to show an alternative for an expensive, continous heatsink with dimension: 100 x 400mm approximately.
But in case this alternative will be chosen, I will surely recommend to use ALU-L profiles with a thickness of 5mm.
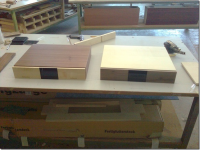
In the meanwhile Gerhard has published some pictures of the ALU-frame: unfolded and folded!
He is doing a very great job, as I think.
I have never seen such kind of professionality before.
I will not show any more detailed pictures.
Gerhard has done a lot of thinking about the case's design, and the secrets of his design shall remain his property.
Best regards - Rudi_Ratlos
It is simply to show an alternative for an expensive, continous heatsink with dimension: 100 x 400mm approximately.
But in case this alternative will be chosen, I will surely recommend to use ALU-L profiles with a thickness of 5mm.
In the meanwhile Gerhard has published some pictures of the ALU-frame: unfolded and folded!
He is doing a very great job, as I think.
I have never seen such kind of professionality before.
I will not show any more detailed pictures.
Gerhard has done a lot of thinking about the case's design, and the secrets of his design shall remain his property.
Best regards - Rudi_Ratlos
Attachments


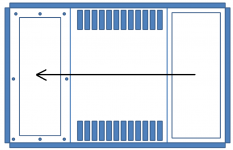
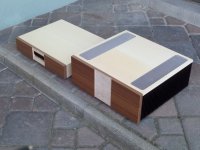
Gentlemen, I think /feel that Gerhard's emerging cases will be real milestones in the story of AUDIO - cases.
Consider his PRE-Amplifier case (images attached) - for example.
It will contain a solid ALU-frame (left image).
The frame will be modified to include a separate and exchangeable ALU-back-panel (image 2), so you can drill and use the AUDIO - connectors (RCA- and Speaker connectors, ...) that you like.
The front will use a small metal plate to cover the apertures (?) of the LCD, ..., and an imprint (if you like) and will include holes for a Power-On- and Attenuation knob, if you need.
Gerhard and I still need to settle upon the colour / material of the woodden panels.
Best regards - Rudi_Ratlos
Attachments
Last edited:
Awesome work....
Hi Rudi,
Awesome work...!!!! Looking forward to see final product, options and prices. For sure I am going to buy some...
Best Regards
Jorge
Gentlemen, I think /feel that Gerhard's emerging cases will be real milestones in the story of AUDIO - cases.
Consider his PRE-Amplifier case (images attached) - for example.
It will contain a solid ALU-frame (left image).
The frame will be modified to include a separate and exchangeable ALU-back-panel (image 2), so you can drill and use the AUDIO - connectors (RCA- and Speaker connectors, ...) that you like.
The front will use a small metal plate to cover the apertures (?) of the LCD, ..., and an imprint (if you like) and will include holes for a Power-On- and Attenuation knob, if you need.
Gerhard and I still need to settle upon the colour / material of the woodden panels.
Best regards - Rudi_Ratlos
Hi Rudi,
Awesome work...!!!! Looking forward to see final product, options and prices. For sure I am going to buy some...
Best Regards
Jorge
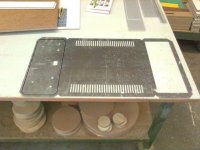
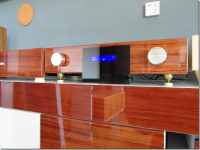
Jorge, I received another picture from Gerhard (the carpenter) today, showing the PRE-Amplifier case in a "nearly - done" state.
I can't await holding this case (and the amplifier's case as well) in my hands.
The ACRYL glass -plate still needs to be cut and will be glued on top of the wooden front plate.
Best regards - Rudi
I can't await holding this case (and the amplifier's case as well) in my hands.
The ACRYL glass -plate still needs to be cut and will be glued on top of the wooden front plate.
Best regards - Rudi
Attachments
Last edited:
Wow!!!
This is getting better and better and better....
Regards
Jorge, I received another picture from Gerhard (the carpenter) today, showing the PRE-Amplifier case in a "nearly - done" state.
I can't await holding this case (and the amplifier's case as well) in my hands.
The ACRYL glass -plate still needs to be cut and will be glued on top of the wooden front plate.
Best regards - Rudi
Hi Rudi,
This is a wonderful case ! It cannot be cheap too
 ... Have you already an idea of how much it will be charged for getting such a nice case ?
The wonderful SymAsym TO3 will have a royal chassis
 . I do like the idea.
Best regards
rephil
Member
Joined 2009
Paid Member
Jorge, I received another picture from Gerhard (the carpenter) today, showing the PRE-Amplifier case in a "nearly - done" state.
I can't await holding this case (and the amplifier's case as well) in my hands.
The ACRYL glass -plate still needs to be cut and will be glued on top of the wooden front plate.
Best regards - Rudi
Yeeeez, what a beautiful case.
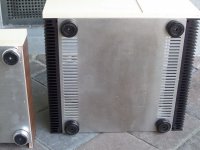
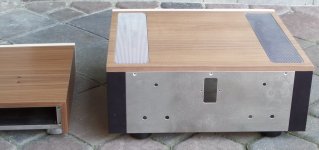
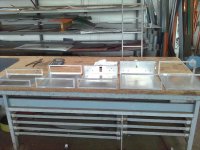
Gerhard, my carpenter-DIY-friend, has programmed his water-cutter machine and has already cut and bent the case's inner ALU structure of several cases.
He will offer 3 cases: a pre-amplifier case (height is 80mm), a small amplifier's case with Fischer 400 x 100mm heatsinks as side panels and a big amplifier's case with Fischer 400 x 150mm heatsinks.
He will offer the cases with various wooden front and top lids.
We are currently discussing how to cover the slot in the front panel needed for LCD, LED, knob, infra-red, ... either with Acryl-glass or a thin sheet of metal or ...
I can't wait for the case that I have ordered to install my new TO3-SYMASYM and R-Pre into it.
Best regards - Rudi_Ratlos
Attachments
Last edited:
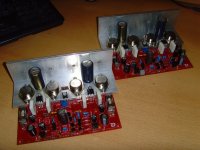
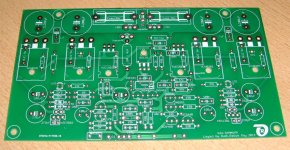
Maybe that I will even install my brand-new NJW0-SYMASYM into Gerhard's case (hopefully the NJW0-SYMASYM sounds as well as the TO3-version!).
The "news" about these NJW0-SYMASYM - PCBs: the NJW0 power-transistors and drivers, ..., need to be mounted beneath the PCB, directly onto the heatsink.
This SYMASYM-version does no longer need an ALU-L profile!
Each transistor has its own reservoir-capacitor; the Power-GND plane is on top of the PCB and does no more "embrace" the "small-signal" circuit.
I am even thinking about giving this SYMASYM a 2x30 (!) VAC transformer for the backend (inspired by my DIY-friend REPHIL) and a separate 2 x 35VAC transformer (limited by a 43VDC Zener
in the on-board CAP-multiplier to not destroy the used MPSA18 differential pair) for the frontend.
"DIY makes fun - let me drive it to its limits".
Best regards - Rudi_Ratlos
Attachments
Last edited:

Simon: Gerhard, my DIY-friend, is a professional carpenter, and he will of course offer these cases.
I have already ordered a small amplifier's case with 100mm heatsinks and a cut-out for a LCD in the front-panel, and Gerhard promised me to send it by the end of June.
I will then post a picture of this case with a SYMASYM installed.
Best regards - Rudi
I have already ordered a small amplifier's case with 100mm heatsinks and a cut-out for a LCD in the front-panel, and Gerhard promised me to send it by the end of June.
I will then post a picture of this case with a SYMASYM installed.
Best regards - Rudi
- Home
- Group Buys
- TO-3 SYMASYM