One of the BiB's were completed this weekend!
BUT probably I screwed up...
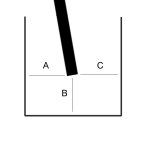
When mounting the internal baffle I measured equal distance front, back and bottom. But when again checking the plans on Zilla's site I belive it should be measured in the centre of the baffle and NOT from it's surface. If so the internal baffle is one centimeter to long.
Have I just made some expensive firewood? I can't see a way to chisel/grind away some material from the baffle inside that long pipe.
Btw. I ordered one more blank for the "optimal" construction, maybe I have to order one more now.
BUT probably I screwed up...
When mounting the internal baffle I measured equal distance front, back and bottom. But when again checking the plans on Zilla's site I belive it should be measured in the centre of the baffle and NOT from it's surface. If so the internal baffle is one centimeter to long.
Have I just made some expensive firewood? I can't see a way to chisel/grind away some material from the baffle inside that long pipe.
Btw. I ordered one more blank for the "optimal" construction, maybe I have to order one more now.
i doubt it would make any audible difference. the BIB deign seems to be very forgiving as it takes large changed to significantly change the response, more than the tolerence of published T/S parameters would. i would lsiten to it, if it sounds good, id build the other one the same just for symmetry and psychoacoustics reasons.
Completed BIB's
I completed a pair of BIB's using Fostex FE168E Sigmas three weeks ago. They have been playing 24/7 for three weeks which gives a run-in time of 504 hrs. plus the 100+ that I put on them while they were in the workshop....about 600+ hours total time.
They were constructed using 3 sheets of 4' X 8' 3/4" birch plywood from Home Depot. The plywood was not Baltic birch and it had many small voids. I went through two pallets before selecting the three sheets that were required for the project due to the varience in quality of the surfaces. The height of the enclosures at 64" disallowed the use of half sheets and since Baltic birch is only available in my area in this size it was not a choice. The Home Depot material proved adequate although a little coarse.
The panels were cut with a 45* bevel for mitered joints. I prefer to hide the plywood edges and don't especially care for butt joints. Just a preference.....not a criticism. I used a circular saw fitted with a CMT 40 tooth ABT blade and a saw board to make the miter cuts. I do not own a table saw. The full sheets were ripped on a cutting table after they were cross cut to the 64" finished length using a 90* cross cut saw board. The edges were cut at 90*, i.e., no bevels since there were no tops and the bottoms did not require bevels for mounting the bases.
Three panels were glued at one time...the back, front and one side.....for each enclosure. I used the same cabinet maker's field technique that Terry Cain used. You align the panels edge to edge with the outside surfaces up and the ends flush. Then apply a strong, wide tape ( masking tape or packing tape works fine ) down the full length of each seam. A couple of cross straps are a good idea just for additional strength. Next, flip them over making sure that nothing shifts and apply glue to the canal between the panels making sure that all surfaces are coated....it is not necessary to fill-up the cavity....just enough to get a small glue line when mated. Now for the easy part...swing the front and back panels up 90* into an upright position with the side panel between them and stretch a few pieces of tape across the chasim where the remaining side panel will go to hold everything in place. Check for square angles with your carpenter's square and adjust for any slippage. I didn't need any clamps for mine but if you have a little bit of warp in any of your panels you may need to use a clamp to bring it into alignment. Simple!
After the glue dried I sealed all of the joints with silicon caulk. I then cut and fitted the internal baffles and glued them in place. No trick here just measuring and carefull cutting using the saw board again. After the glue dried I also sealed the baffels with silicon caulk.
The fronts/baffels were routed to accept the drivers using a Jasper Jig but were not rebated. The drivers' mounting ring negated the need; I also was advised on this thread that it was unnecessary. T-nuts were installed after the holes for the mounting bolts were drilled. I do not have a drill press so I purchased a contraption that attaches to my hand held corded drill to assure a perpendicular reference to the baffle surface when drilling the holes. It worked great and I bought it at Harbor Tools for $9.99 on sale!
The remaining sides were glued into place this time using clamps and weights. I purchased several Bessey K-Body clamps and had no problem with squirming joints. The parallel jaws really work well to prevent movement of wet, slippery glue joints. Since I could not reach the inside of the joints to seal them with silicon caulk I thinned some glue and streamed it down the length of the joint while holding the cabinets upright but at an angle (the joint being sealed was at the bottom ). I quickly placed the cabinets on saw horses and blocked them so that the corner being sealed was at the bottom. The next day I repeated the process with the other corner joint. The amount of glue is a guess; just start a good stream and keep adding to it until it almost reaches the end.
I made two bases out of 3/4" birch plywood 1" wider than the footprint of the cabinets. The edges were wraped with shoe molding and the miter cuts were made for me by a friend with his miter saw.
Everything was sanded with 80 grit paper and three coats of cherry stain were applied. It was then sanded with 120, 180,and finally 220 before the polyvarnish finish was wiped on.
I glued four hardwood corner blocks into the bottom corners of each cabinet to give the mounting screws for the base something to grip. Plywood edges do not hold very well. Two holes were drilled into the backs of each cabinet 6" from the bottom for the connector terminals and sealed with silicon gasket cement when they were installed.
Finally I installed the drivers and hooked them up using doubled strands of CAT5. The wires were held in place within the cabinets using silicon gasket cement. I filled the cavity above the drivers with polyfill from Michael's Hobby/Craft Shop and placed a carpet pad behind them on the internal baffle.
A couple of notes:
The backs of the drivers were about 1/8" away from the internal baffles so be careful that your baffles are straight and installed true. It is a close fit and a little warp can cause a lot of bad language!
It only takes a modest amount of glue and 15lbs. of clamping pressure to make a sound joint using PVA. The tape used during glue-up will keep the excess glue off of the outside cabinet surfaces only if you don't over do the amount used. Glue will NOT accept stain!
How do they sound.....impressive. Initially they were harsh and shouty but with increased break-in time and some tinkering with fill they have really sweetened. The pad behind the driver made the greatest difference. Initially I packed the fill above the driver very tightly but after removing some of it and giving it a bit of fluf the edge began to further abate. I added some fill at the bottom to the inside of the base and I think that I am about there. The lows are around 35hz (guess) and are amazingly tight....no sea of mud rolling toward you here! The mids are still edgy but improving....we shall see. The only negative is a positive--they are very accurate and very revealing which makes them cruel to some old favorite recordings. FM reception is unbearable unless the signal is CLEAN. They do their best work on closely miked recordings especially jazz and chamber music, in particular woodwind ensembles. You can tell the difference between Arnold Steinhart's Guinari and an Amati or Strativarius.
My attempts to attach pictures have failed. I guess I am simply a digital dud! I have sent several to Zilla for posting on the BIB site so maybe in the near future they will appear. No pressure Zilla...the BIB site is a generous volunteering of your time and effort and greatly appreciated.
Overall it is a very simple project with a much greater reward than the effort justifies. Even my wife likes them sonically and visually. Go Figure?!
Ray Collins
Congrats, Ray,
Welcome to Club Sigma. An excellent choice!! Over time the 168 does mellow out, slowly, and up the register it goeth. Just another 500+ hours should do it...
Once broken in, they actually can "rock" quite well, although mostly I listen to acoustic instrumentation with them. With SET they are perfect, very musical and authoritative sound. And I also have noticed the very high WAF here. Chix just plain dig em folks, a VERY good reason to consider this type of alignment.
Ray,
Actually it was Terry Cain whom deserves the credit, about three years ago, with his technical argument for the FE168, put to me this way, "Dan, just build the f^*ing things and see for yourself..." when I was meandering abit too much... being one to appreciate such eloquent, and succinct technical arguments, I built the original mules and right away they were great. And so this time last year, I had them done up with CNC cuts, and a nice dark veneer wrap. Anyone could build this particular alignment, and build a Bottlehead SEX amp, maybe add some PIO caps, and enjoy a sound at home soooooooooo good, it is awarded "Black Eye" status anti hi-fi, no jokes. Blumenco has heard the little SEX amp with his BIB's, he built mine, he oughta know. Add one of the many inexpensive non-oversampling DAC's around, and presto: just a great, simple, cost effective combination, leaving all well in your musical world, with sound pretty hard to beat.
Actually it was Terry Cain whom deserves the credit, about three years ago, with his technical argument for the FE168, put to me this way, "Dan, just build the f^*ing things and see for yourself..." when I was meandering abit too much... being one to appreciate such eloquent, and succinct technical arguments, I built the original mules and right away they were great. And so this time last year, I had them done up with CNC cuts, and a nice dark veneer wrap. Anyone could build this particular alignment, and build a Bottlehead SEX amp, maybe add some PIO caps, and enjoy a sound at home soooooooooo good, it is awarded "Black Eye" status anti hi-fi, no jokes. Blumenco has heard the little SEX amp with his BIB's, he built mine, he oughta know. Add one of the many inexpensive non-oversampling DAC's around, and presto: just a great, simple, cost effective combination, leaving all well in your musical world, with sound pretty hard to beat.
I know this is the fullrange section but....
How would this model?
Fostex 8” WOOFER
Hybrid pulp cone
8 ohm impedance
90db sensitivity
Frequency response from 29 Hz to 5 kHz
Flange 230 mm
Cut-out 182 mm
Depth 94.8 mm
Znom 8 ohm
Re 5.8 ohm
Le@1kHz - mH
fs 29 Hz
Qms 13.2
Qes 0.21
Qts 0.20
Mms 40 g
Cms - mm/N
Sd - cm2
BL - N/A
Vas 43.4 ltrs
Xmax 6.5 mm peak
VC Ø 81 mm
Sensitivity
1W / 1m 90 dB
Nom. Power 100 W
Since the BIB is a simply a horn how about using it for bass and then add an outboard FR driver.
Freeing up a full range driver from the bass duties only helps I have found.
Andrew
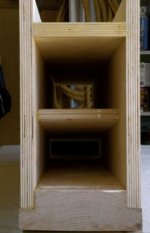
Its a start Fe108 sigma
The cab is for the 108 sigma.
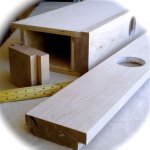
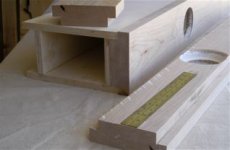
I cut the front from a two inch thick peice of maple. Then cut rabbits on either side to recieve the 3/4" birch ply.
The inside measures are 4.5" x 7.5". The divider is placed at 3.75"
This box is seriously strong.
The box is 44 inches tall.
The cab is for the 108 sigma.
I cut the front from a two inch thick peice of maple. Then cut rabbits on either side to recieve the 3/4" birch ply.
The inside measures are 4.5" x 7.5". The divider is placed at 3.75"
This box is seriously strong.
The box is 44 inches tall.
Attachments
FE108 Sigma
The back "ears" will stay as they are.
I like the sides of the cab to extend beyod the back.
Three reasons:
One: The added extension adds to the overall strenght and rigidity.
Two: Any slight missmatches won't matter.
Third: The overalll shape looks better.
I shape the back edge in a bow so that it has a nice gentle curve...It looks nicer than a straight line.
The 2 inch thick maple front is overkill but then it's what I had in the parts bin.
The top will be fitted with a kinda crown molding and a "grill cloth".
Because the speaker is well below the ear level I'm thinking some kind of bottom treatment to get the box up in the air. Legs or some box with sand. I'm leaning to legs since this thing is HEAVY and the sand (weight) is not really needed.
The bottom will be more of the 2" maple cutoffs.
Finish: Rubbed on spar varnish. Three or four coats.
Wiring: 28 ga. cotton covered soild silver wire. (Matches the rest of my amps and preamp)
Connectors: Lemos. Love them Lemos for everything!
I'll finish the boxes next week and mount the drivers. The sigmas have been in daily use for about six months so they are well broken in.
Next Project:BIB Lowther DX3...YEA!!!
I guess I'm "it"
Why so much discussion about this? it seems that the mathematics and theory are pretty well known... Perhaps someone could summarize the 1000 posts into a cd or archive. Let's see if there's something else out there.....
No dis to Terry Cain, intended, but even he has moved on...
Why so much discussion about this? it seems that the mathematics and theory are pretty well known... Perhaps someone could summarize the 1000 posts into a cd or archive. Let's see if there's something else out there.....
No dis to Terry Cain, intended, but even he has moved on...
- Home
- Loudspeakers
- Full Range
- Terry Cain's BIB -why does it work and does anyone have those Fostex Craft Handbooks?