The other problem is that a bit of glue tends to seep out onto the veneer. Since I'm "clamping" them with tape, some of it seeps under the tape so I can get it off, and it soaks into the veneer and no amount of sanding will remove it. I'm assuming this is going to make the speaker un-stainable.
I have tried a mitering technique that seems to work. Read about the technique from a book called Woodworking Techniques, Essentials of woodworking from Taunton press.
The panels are ripped and crosscut to the final outer dimensions(with square edges). Then the miters are cut with the blade buried into scrap stock clamped onto the rip fence of the table saw.
Once all miters are done put the panels outer side up and align the adjoining edges, use clear packing tape to hold the joint together (like in your picture, but also put tape along the whole edge. This will give a very tight hold that prevents the glue from sipping out. If the material is pre-finished (that's what I have done) then you don't have to worry about the glue at all. As long as the materials is cut square initially all the miters should match.
Attachments
oh, hey, that's a pretty nift idea... that way you'd only have to measure out once for each angle and just slide all your pieces through. Accuracy on my miter cuts really wasn't an issue with this build, but if I can get that technique down right, it would /definitely/ shave a lot of time off the build.
I'd really like to do a small production and maybe sell some of these so.. time saved is money earned!
I'd really like to do a small production and maybe sell some of these so.. time saved is money earned!
I have tried a mitering technique that seems to work. Read about the technique from a book called Woodworking Techniques, Essentials of woodworking from Taunton press.
The panels are ripped and crosscut to the final outer dimensions(with square edges). Then the miters are cut with the blade buried into scrap stock clamped onto the rip fence of the table saw.
Once all miters are done put the panels outer side up and align the adjoining edges, use clear packing tape to hold the joint together (like in your picture, but also put tape along the whole edge. This will give a very tight hold that prevents the glue from sipping out. If the material is pre-finished (that's what I have done) then you don't have to worry about the glue at all. As long as the materials is cut square initially all the miters should match.
oh, hey, that's a pretty nift idea... that way you'd only have to measure out once for each angle and just slide all your pieces through. Accuracy on my miter cuts really wasn't an issue with this build, but if I can get that technique down right, it would /definitely/ shave a lot of time off the build.
I'd really like to do a small production and maybe sell some of these so.. time saved is money earned!
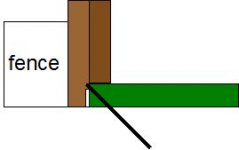
If I'm reading the picture correctly, the offcut will be pinched between the sacrificial fence and the blade.
While I've used this setup myself ( as it requires no changes for width of stock), there is the very present danger of the offcut being kicked back. As safe cutting technique would ensure that you're not standing in the path, as I've found out, the real risk is in damage to any material behind you.
Absolutely, you are correct, one must be carefull!!!. The small cutout below and to the left of the blade is to minimize the kickback.
Sorry I might have pushed the wrong buttonSure!
The other problem is that a bit of glue tends to seep out onto the veneer. Since I'm "clamping" them with tape, some of it seeps under the tape so I can get it off, and it soaks into the veneer and no amount of sanding will remove it. I'm assuming this is going to make the speaker un-stainable. I'm pretty sure I just need to figure out exactly how much glue I need and not use too much, but that will always change based on how tight the angle is, etc. Hmm!
 If you pre-stain and apply a first coat of your finish before you cut, the glue bleed will be minimized. PVA glue doesn't seem to like to stick to glossy finish and you can most often pick off any globs with your fingernails.
uFonkens
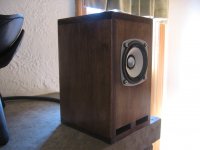
a pair of uFonkens for the fireplace-fi. because my finishing skills are limited, i went with a rough, aged patina look. BB sanded with 80grit, wood conditioner, dark walnut gel-stain, and tung-oil. i'm hoping the tung-oil will yellow a bit more. otherwise, they sound great driven with the Amp4/BM DAC1.
a big thanks to Dave . i can't wait to get started on my next FF85K project for rockin' out in the man-cave.
a pair of uFonkens for the fireplace-fi. because my finishing skills are limited, i went with a rough, aged patina look
. BB sanded with 80grit, wood conditioner, dark walnut gel-stain, and tung-oil. i'm hoping the tung-oil will yellow a bit more. otherwise, they sound great driven with the Amp4/BM DAC1.a big thanks to Dave
. i can't wait to get started on my next FF85K project for rockin' out in the man-cave.Attachments
Sorry I might have pushed the wrong button
Oh! This is a fantastic idea! Thank you for this, as I'm about to build another similar set, this time ported using Alpair10s
fishski13 : Are you satisfied? Do they need much 'cream' (a Swedish expression for power)?
I have just cut pieces of pine for uFonken. Will try it out with a a pair of HiVi B3N.
i use a pair of HiVi B3N for testing purposes on the workbench. i have yet to cab them up, but dB for dB, they need a bit more cream than the FF85K. i've only powered the uFonken FF85K with a 50W LM3875 Gainclone and 50W Amp4. YMMV.
Magnus... if you use HiVi it isn't a Fonken (Fostex + Onken) and you are taking a flyer using the wrong driver in the box... everyone of these i've done needs a different tuning for each different driver.
dave
A Honken then ... (that's the nick-name of one of Sweden's most famous hockey goal-keepers). Yea, I know that another driver may work differently, bu I got the HiVis cheap and I wanted to test something completely different.
Thanks for answers.
... finally finished the brines.
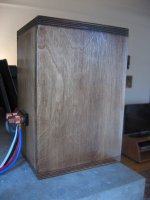
first woodwork project ever so its been slow.
Veneer is cherry with 4 coats of danish oil and finally some paste wax.
first woodwork project ever so its been slow.
Veneer is cherry with 4 coats of danish oil and finally some paste wax.
An externally hosted image should be here but it was not working when we last tested it.
i was messing with tube length, its now installed properly.
An externally hosted image should be here but it was not working when we last tested it.
... finally finished the brines.
first woodwork project ever so its been slow.
Veneer is cherry with 4 coats of danish oil and finally some paste wax.
That's your first woodwork project
Fantastic work, beautiful finish
- Home
- Loudspeakers
- Full Range
- Full Range Speaker Photo Gallery