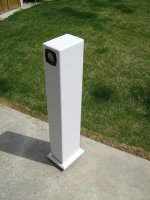
AdamThorne said:Since I just finished painting up my needles I thought I'd share pics of them, for any interested.
You can see that when the light hits them just so irregularities in the finish and texture of the (textured) paint show. Mostly they look fine, however. The textured paint helps hide my oopses. In retrospect I think more coats of the spray paint would have evened out the texture more. I applied 3 coats. It was easier to to see the imperfections after I got them out of my home made spray booth and back into the living room...
The wife appreciates that they aren't just bare MDF any more tho.

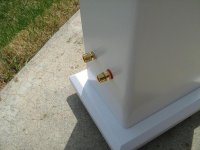
very nice, black makes a nice statement contrast to mine here: http://www.diyaudio.com/forums/attachment.php?s=&postid=1172666&stamp=1175359666 Speaker seems to be installed little lower than mine...
gychang
Yes, they are two different looks. I had initially thought of the woodgrain look, but I'm not unhappy with the black. I bought some light woodgrain vinyl covering, but after a test piece I decided I didn't like the way it looked. I particularly like your stabilizer / foot implementation. Perhaps one day I'll see about remaking the boxes with more practiced skills... As it is, whenever I look at 'em I kinda want to play "Also Sprach Zarathustra" ...
Yes, my driver does appear to come in below yours... I converted the plans to 3/4" wood 'cause that's what was around, then I whoopsed an extra half inch into the width on top of the extra half inch wide for thicker sides. Then I think I made the driver-to-edge distances equal for the sides and the top. Since the side distance was longer that dropped my driver as well. If that's the way it actually happened, then my driver would be 1/4" low (relative to the external top) for thicker wood, and 1/2" low because of the extra width of the box. Presuming there aren't other mistakes I don't know about... =P
Happily, it still seems to sound pretty good.
AdamThorne said:Happily, it still seems to sound pretty good. [/B]
agreed, looks and sounds good to me too.
gychang
Here is my cyburg needles I built for a set of Aura NS3's. They now reside in my parents place.
They sound a hell of a lot better than the small sealed box I had them in before, and the cabinet seems a good match, with a little active filtering on the low end then dont bottom out.
Not a very loud or clear driver, but a cheap and easy (Painting aside) project.
Building Notes:
Cat 5 Solid core internal wiring.
No filtering (made them too warm for the application)
MDF, Wood glue, and clamps, no screws except to hold the base on extra.
MDF Edges are sealed with drywall compound, works better than anything I've ever seen, sands WAAAAYYY nicer than glue. No water needed.
Primer is Bejamin Moore Alkyd Enamel Underbody 217 00
Just slightly thinned with mineral spirits and applied with a fine foam roller, fresh roller used for last coat. 3-coats, Sanded @400 between coats when completely Dry.
Paint is Benjamin Moore Interior Alkyd Semi-Gloss 578 01
Went with the semi because I couldn't get Satin and it hides wonderfully and has enough sheen to look expensive. Applyed with a fine foam roller, fresh one each coat for a total of 3 Paint coats.
I made a small paint booth with plastic drop-cloths in a spare bedroom (house is in reno's anyways) that didnt have much dust, then just took my time and cleaned up any hairs that happened to fall. Seemed to work better than a spray booth.
It's all in the amount of paint on the roller, not too much, light coats, take your time.
My only regret is having as much glue on the external surfaces as I did, wood glue dries way to hard to sand effectively, and it is noticable under the paint at close inspection. In hindsight, I would not have approched with the thought to seal my edges with the glue, and made sure I used the least needed to bind the edges. Oh, and flush cut trim bits cover a lot of sins!
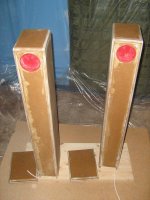
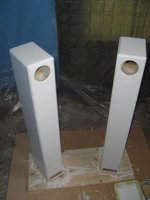
On to the pics:
One side done. That "sawhorse" is a family heirloom I'm told, I'll refinish it later if it gets too scratched")
They sound a hell of a lot better than the small sealed box I had them in before, and the cabinet seems a good match, with a little active filtering on the low end then dont bottom out.
Not a very loud or clear driver, but a cheap and easy (Painting aside) project.
Building Notes:
Cat 5 Solid core internal wiring.
No filtering (made them too warm for the application)
MDF, Wood glue, and clamps, no screws except to hold the base on extra.
MDF Edges are sealed with drywall compound, works better than anything I've ever seen, sands WAAAAYYY nicer than glue. No water needed.
Primer is Bejamin Moore Alkyd Enamel Underbody 217 00
Just slightly thinned with mineral spirits and applied with a fine foam roller, fresh roller used for last coat. 3-coats, Sanded @400 between coats when completely Dry.
Paint is Benjamin Moore Interior Alkyd Semi-Gloss 578 01
Went with the semi because I couldn't get Satin and it hides wonderfully and has enough sheen to look expensive. Applyed with a fine foam roller, fresh one each coat for a total of 3 Paint coats.
I made a small paint booth with plastic drop-cloths in a spare bedroom (house is in reno's anyways) that didnt have much dust, then just took my time and cleaned up any hairs that happened to fall. Seemed to work better than a spray booth.
It's all in the amount of paint on the roller, not too much, light coats, take your time.
My only regret is having as much glue on the external surfaces as I did, wood glue dries way to hard to sand effectively, and it is noticable under the paint at close inspection. In hindsight, I would not have approched with the thought to seal my edges with the glue, and made sure I used the least needed to bind the edges. Oh, and flush cut trim bits cover a lot of sins!
On to the pics:
One side done. That "sawhorse" is a family heirloom I'm told, I'll refinish it later if it gets too scratched
Attachments
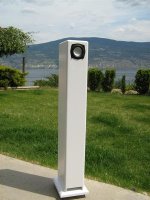
ruerose said:Here is my cyburg needles I built for a set of Aura NS3's. They now reside in my parents place.
They sound a hell of a lot better than the small sealed box I had them in before, and the cabinet seems a good match, with a little active filtering on the low end then dont bottom out.
Not a very loud or clear driver, but a cheap and easy (Painting aside) project.
Building Notes:
No filtering (made them too warm for the application)
It's all in the amount of paint on the roller, not too much, light coats, take your time.
On to the pics:
One side done. That "sawhorse" is a family heirloom I'm told, I'll refinish it later if it gets too scratched
Thanks for putting up the details. Very helpful and learned lots on how to finish MDF with minimal work and expense. Good work.
I have several questions.
1. did u install the notch filter that was recommended for W3-871?
2. did u use the same cabinet dimensions?
I built 2 needles with W3-781's and love them, used the notch filter in both. I wonder if NS3s is worthwhile for my 3rd build...
gychang
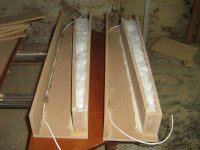
So I'm currently building a pair of these, right now I'm gluing the joints, and I was wondering how much damping I should be putting in, i.e. does the damping go around the bend or end at the top of the angled board? Looking through pictures, I've seen people who have done both. Which is the correct method?
I've attached a picture because that description is pretty ambiguous. Grey stuff is the insulation.
I've attached a picture because that description is pretty ambiguous. Grey stuff is the insulation.
Attachments
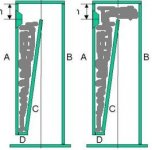
Elfer said:So I'm currently building a pair of these, right now I'm gluing the joints, and I was wondering how much damping I should be putting in, i.e. does the damping go around the bend or end at the top of the angled board? Looking through pictures, I've seen people who have done both. Which is the correct method?
I've attached a picture because that description is pretty ambiguous. Grey stuff is the insulation.
I used the left method on my W3-971S, and sounded good to me.
gychang
hahaha
Well for the sake of completeness, I used neither - I stuffed up to the top of the internal volume, but didn't cross the center line (splitting the difference of the diagram). I figured I'd cover the whole back of the driver, but didn't want to push it over to the point that it might fall down the empty volume inside the speaker and come out the slot mouth.
This is where the damping is relatively light anyway, I expect it isn't so important. I attributed more importance to the other end of the stuffed region.
Decided to use the third poster's method and stuff to the central axis.
I also clamped the other side on and weighted the top to do a little demo of one of the speakers, sounds great. I was surprised by the amount of bass they can put out for such tiny drivers (can make my desk vibrate, anyway), as well as the overall quality of the sound.
I switched back to my 5.1 computer speakers just to compare, and now they just sound muddy with distorted bass.
Sigh, my ears are ruined forever.
Elfer said:Decided to use the third poster's method and stuff to the central axis.
I also clamped the other side on and weighted the top to do a little demo of one of the speakers, sounds great. I was surprised by the amount of bass they can put out for such tiny drivers (can make my desk vibrate, anyway), as well as the overall quality of the sound.
I switched back to my 5.1 computer speakers just to compare, and now they just sound muddy with distorted bass.
Sigh, my ears are ruined forever.
I agree these can get u spoiled, like them a lot. gychang
Glad to hear that you're pleased with the construction, elfer. What are you using as amplfication? How many watts? Are these computer speakers? Are you considering using the convolution filter? It's tough once you get 'em assembled, you won't want to take them down to finish them. I didn't, anyway.
gychang, I know you've made a fair number of simple floorstanders now. Is there some thread where you've compared the different things you've made? Gychang's Construction Roundup - I'd be interested to check it out...
gychang, I know you've made a fair number of simple floorstanders now. Is there some thread where you've compared the different things you've made? Gychang's Construction Roundup - I'd be interested to check it out...
I'm using a Marantz 1515 stereo reciever, which is 15 watts, if I recall correctly.
The drivers are TB W3-593SF
I'm not using any filters right now, but I'm leaving a little extra wiring in the case in the event that I ever want to install them.
I'm going to run a line from my computer to the stereo, but the speakers are primarily going to be used for music.
The drivers are TB W3-593SF
I'm not using any filters right now, but I'm leaving a little extra wiring in the case in the event that I ever want to install them.
I'm going to run a line from my computer to the stereo, but the speakers are primarily going to be used for music.
AdamThorne said:
gychang, I know you've made a fair number of simple floorstanders now. Is there some thread where you've compared the different things you've made? Gychang's Construction Roundup - I'd be interested to check it out...
I am surprised someone know I keep builiding these things. Thanks for giving me the credits I don't deserve.
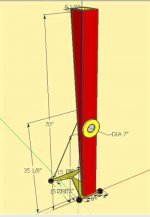
I have built 2 BIBs, 1 metronome, and 2 Cyburg Needles. (all given away so far except for one BIB for my main room). Right now in my garage I have another BIB (will be "cone" style) and DelSol minispeaker being slowly finished. I started out with Plywood, and more recently using MDF (good finish takes much longer with MDF).
I am not an expert in woodwork or audio, but these things to me are satisfying, since to me they look good and sound good (so far). I wish I had golden ear so I can optimize the stuffing etc...
I don't think I deserve a separate thread under my name, but when I finish my most recent BIB ("cone"-raw MDF now) I will show the world. (attached is the sketchup cabinet)
gychang
Attachments
- Home
- Loudspeakers
- Full Range
- Cyburgs-Needle for Tangband W3-871S