Hi All
I'm about to start a build of the Dallas II.
I've drawn the design full size on a scrap panel and have noticed something that raises a question.
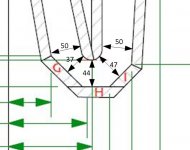
In the first bend, the cross section of the horn decreases before returning to its original size. See image attached.
A similar exercise on the second bend shows that it increases before returning to (roughly) the original value.
My question is: is this by design and best left alone, or would smoother curves (by using more pieces), maintaining a constant throat size through the turn, be better?
Many thanks for any advice
Chris
I'm about to start a build of the Dallas II.
I've drawn the design full size on a scrap panel and have noticed something that raises a question.
In the first bend, the cross section of the horn decreases before returning to its original size. See image attached.
A similar exercise on the second bend shows that it increases before returning to (roughly) the original value.
My question is: is this by design and best left alone, or would smoother curves (by using more pieces), maintaining a constant throat size through the turn, be better?
Many thanks for any advice
Chris
Attachments
Hello again
I now have my wood and the drivers have arrived - FE208E Sigma + FT96H.
There's been a delay as I needed to make a sled to enable me to (hopefully) make accurate, square cross-cuts on the table saw.
I'm now getting close to the point of making the first cuts, but I have another question.
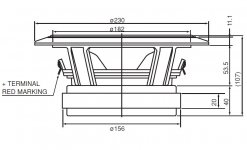
I've read several times that drivers should be recessed such that the front of their bezel/mounting flange is flush with the baffle.
On FE208E Sigma the bezel is mostly tapered with a small square step at the edge (see picture attached).
So my question is whether or not I need to make a recess equal to depth of this step or whether it is unnecessary.
I notice that the Fostex standard enclosure design has no recess but I also know that their designs are not always considered to be optimal.
As always, many thanks for any advice.
Chris
I now have my wood and the drivers have arrived - FE208E Sigma + FT96H.
There's been a delay as I needed to make a sled to enable me to (hopefully) make accurate, square cross-cuts on the table saw.
I'm now getting close to the point of making the first cuts, but I have another question.
I've read several times that drivers should be recessed such that the front of their bezel/mounting flange is flush with the baffle.
On FE208E Sigma the bezel is mostly tapered with a small square step at the edge (see picture attached).
So my question is whether or not I need to make a recess equal to depth of this step or whether it is unnecessary.
I notice that the Fostex standard enclosure design has no recess but I also know that their designs are not always considered to be optimal.
As always, many thanks for any advice.
Chris
Attachments
We rebate to hide the step
LOL - all that time I've believed it was because it affected imaging

Thanks for the replies.
Hopefully there will be some progress over the weekend.
Chris
all that time I've believed it was because it affected imaging
On the sigmas, not likely much. Particularily the large ones.
dave
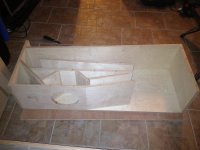
At last a bit of visible progress. Both cabinets are in the same state. Now I'm thinking about finish before final glueing. I fancy white sides and natural wood middle but not sure I have the facilities (and maybe patience) to get a decent painted white finish.
Attachments
Excellent idea - thanks! Seems obvious now but I hadn't thought of it! Might reverse the pattern though as I'm concerned large areas of dark wood will be overpowering in my white room.
Point about the stain noted.
Actually the faces of the ply are very good and I'm thinking I might only need to veneer the raw edges. I've ordered a sample of birch edging to see how I get on with it.
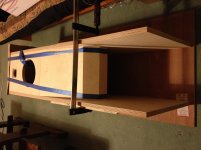
Currently glueing pieces G, H and I together...
(I know the baffle looks a bit off-square - it's not fine tuned/glued yet)
Point about the stain noted.
Actually the faces of the ply are very good and I'm thinking I might only need to veneer the raw edges. I've ordered a sample of birch edging to see how I get on with it.
Currently glueing pieces G, H and I together...
(I know the baffle looks a bit off-square - it's not fine tuned/glued yet)
Attachments
Last edited:
Might reverse the pattern though as I'm concerned large areas of dark wood will be overpowering in my white room.
Sounds like a good idea with these deep and tall cabinets - I got your color scheme reversed the first time
The darker baffle flanked by lighter stained sides will also probably create an impression of a slimmer baffle too.
Last edited:
Well, I've finally got the speakers dry assembled for trials (sealed with draft excluder strip), and I'm pretty impressed already.
What I am finding is that there is a little more upper-bass than I really like and I was able to make an improvement by partially stuffing a cushion in the horns.
I'm wondering what's the best way to achieve the same result in better permanent solution. I guess some kind of stuffing part way along the horn, or in the driver chamber (it is currently lined at the back with carpet underlay).
That's where I'm hoping someone here might be able able to help reduce the options I need to try (as it's quite a pain to remove the clamps and straps, remove a side panel, then refit it all again for each experiment) - can anyone advise on best material and position, just leaving me the amount to experiment with?!
As always - thanks in advance for any suggestions.
Chris
- Status
- This old topic is closed. If you want to reopen this topic, contact a moderator using the "Report Post" button.
- Home
- Loudspeakers
- Full Range
- New Dallas II build question