My FHXL project is slowly taking shape. I have all the components I need, now all is needed is some time with tools and elbow grease. I was able to get the majority of the wooden parts made at a friend's shop, so I didn't have to learn veneering at this time. There will be enough work on the assembly and making sure everything fits right, I'm sure.
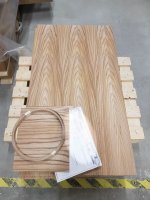
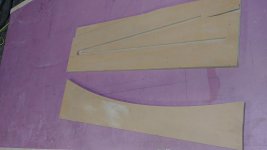
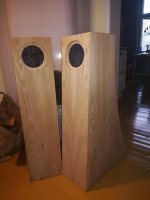
The baffles I made out of an elm plank. In the picture they have not yet been cut into final shape nor finished, so some nasty saw marks are still showing. The other parts will be elm-veneered birch plywood. Let's see how well the woods match, since the solid wood and veneer might have a bit of a difference in tones. If the difference is too noticeable, I will probably stain the baffle to a darker colour, I think the contrast might work quite well.
Meanwhile, back at home a pair of Alpairs is playing mellow classical music to an empty apartment. =)
Attachments
It's been over a month and a half since anybody has said anything about the Frugel-horn XL's here either it is a flop with the people who built them or the best kept secret in audio. I have already leaned towards the later on a couple occasions. So shout out your thoughts on this speaker.
Hey guys, Looking forward to build my speaker and share my experience.
i'm still considering the type of driver. which one would you recommend for some more laid back music playing. one that will not get hearing fatigue after a while?
Also, if Dave is maybe here? Can you please check your email?
Thanks guys!
i'm still considering the type of driver. which one would you recommend for some more laid back music playing. one that will not get hearing fatigue after a while?
Also, if Dave is maybe here? Can you please check your email?
Thanks guys!
Pass DIY Addict
Joined 2000
Paid Member
My FHXLs aren't a flop at all! They've been finished and playing in my main system for about 8-9 months now. I have a nice matching center speaker as well. I continue to marvel at the clarity they present over my previous speakers that had this duty for nearly 20 years. I've been working on several amplifier projects over the past little while, so after getting the FHXLs dialed in to my liking, I've moved my attention elsewhere.
After a few months of listening to them, I added a small notch filter to my 10.3 drivers to tamp down the 7-12kHz bump. I found a parallel notch filter 20R + 1.44uF + 0.27mH in series with the driver to work well for me - ironically this probably makes the 10.3 sound more like the 10P (the 10.3 were on sale when I bought them). This is what I enjoy the most about this cabinet/driver combination: the ability to tweak response to taste. You hear so many people talk about system synergy and how a speaker "is too <this>" and an amplifier "is too <that>" and how they don't match, or "to my ear, it has too much/not enough <whatever>". What a real PITA if you know what you are looking for and don't have thousands of dollars in cash to burn through looking for the "right" combination for "your" room and "your" system and what "you" like. Why be a slave to someone else's design constraints? Why struggle with learning how to read between the lines in the audio magazine reviews. Sure, I learned how to do this, but I blew money I didn't need to until I refined the art of reading audio reviews.
With the FHXL and the 10.3 driver, you have lots of latitude to play with. Like/need lots of treble? run them naked. Want a bit less crispness? add a notch filter. Still too much treble? make the resistor bigger. Go too far? bring that resistor back down. Want more bass? remove some stuffing under the driver. Want even more bass? push them against the wall. Still looking for more? stick 'em in the corner. Not too concerned about the final "fit and finish"? Then you too can build a pair of FHXLs for $300-400. This is the best bargain on the planet! My pair cost me double this, but I used exotic hardwood and matching veneer. With all of the left over materials, a matching center speaker cost me only the price of a new driver. Now I have a matched front LCR array that sounds great!
I have to say that I'm a full-range convert after living with these speakers for some time! The imaging is awesome, the sound stage is quite nice as well. Impressive amount of bass and treble tweaked to taste - I can't wait to finish up my tube amp and see what the combination sounds like. I have a few solid state Pass clones that will see completion first, though... The assessments above come from the FHXLs being driven by a $100 used receiver from ebay") Can't wait to get a better amp behind these gems!
Can't wait to get a better amp behind these gems!
After a few months of listening to them, I added a small notch filter to my 10.3 drivers to tamp down the 7-12kHz bump. I found a parallel notch filter 20R + 1.44uF + 0.27mH in series with the driver to work well for me - ironically this probably makes the 10.3 sound more like the 10P (the 10.3 were on sale when I bought them). This is what I enjoy the most about this cabinet/driver combination: the ability to tweak response to taste. You hear so many people talk about system synergy and how a speaker "is too <this>" and an amplifier "is too <that>" and how they don't match, or "to my ear, it has too much/not enough <whatever>". What a real PITA if you know what you are looking for and don't have thousands of dollars in cash to burn through looking for the "right" combination for "your" room and "your" system and what "you" like. Why be a slave to someone else's design constraints? Why struggle with learning how to read between the lines in the audio magazine reviews. Sure, I learned how to do this, but I blew money I didn't need to until I refined the art of reading audio reviews.
With the FHXL and the 10.3 driver, you have lots of latitude to play with. Like/need lots of treble? run them naked. Want a bit less crispness? add a notch filter. Still too much treble? make the resistor bigger. Go too far? bring that resistor back down. Want more bass? remove some stuffing under the driver. Want even more bass? push them against the wall. Still looking for more? stick 'em in the corner. Not too concerned about the final "fit and finish"? Then you too can build a pair of FHXLs for $300-400. This is the best bargain on the planet! My pair cost me double this, but I used exotic hardwood and matching veneer. With all of the left over materials, a matching center speaker cost me only the price of a new driver. Now I have a matched front LCR array that sounds great!
I have to say that I'm a full-range convert after living with these speakers for some time! The imaging is awesome, the sound stage is quite nice as well. Impressive amount of bass and treble tweaked to taste - I can't wait to finish up my tube amp and see what the combination sounds like. I have a few solid state Pass clones that will see completion first, though... The assessments above come from the FHXLs being driven by a $100 used receiver from ebay
Can't wait to get a better amp behind these gems!
Last edited:
Not a flop at all, I think they are one of the cleverest designs full stop. Every time I see Scott to chew the fat about new stuff we always refer back to the XL. Maybe the hiatus here is seasonal? I sell less kits over the winter (but more drivers) and the kits are picking up again now.
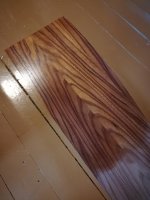
Still working on my pair. Slowly but surely getting there, though. Cutting the driver holes will be the next step, after which it will be time for final assembly and finishing. Latest finishing experiments start to look promising!
I got some of my supplies, including drivers, from you Orangeart. It was nice doing business with you. =)
I hope it is OK to post these occasional updates here in the main thread, by the way. Since I'm not an awfully active poster it didn't really feel good to start an own thread.
Can't wait to hear how these sound!
Attachments
Pass DIY Addict
Joined 2000
Paid Member
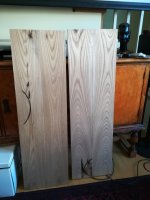
Nikodemuzz - Wow! What a nice looking veneer - those are sharp! It looks like your cabinets are already closed up and you say the cutting driver holes is your next step. It will be helpful to chamfer the backside of those driver cutouts, which can be difficult once things are closed up. But, if you used a 50-80 grit sanding drum and your electric drill, the job is still very easy. Check the images I have posed here.
Thanks Eric! The elm has a really lively grain, and the matching of the veneer over the top section turned out really nice. I am attaching the front baffles last, so they are not yet on. The plan is to make the driver holes before attaching them. I'm using a plank of solid wood as a baffle, in a similar manner to your speakers actually. I didn't put an extra layer of plywood underneath, though.
Thanks for the chamfering tips! To be honest, I don't really follow as to why the backside needs to be chamfered? If it is needed, then thanks for the heads up! Doing that before the cabinets are sealed will be much easier.
Thanks for the chamfering tips! To be honest, I don't really follow as to why the backside needs to be chamfered? If it is needed, then thanks for the heads up! Doing that before the cabinets are sealed will be much easier.
The purpose of chamfering the rear side of openings for full range drivers is to reduce as much as possible cavity resonances and diffraction / reflection at the internal edge. The paper or metal cones of full range drivers are generally very light weight, and in many cases the total cone profile is shallow enough that much of it would be bounded by the walls of the through hole - particularly if drivers are not recessed for flush mounting.
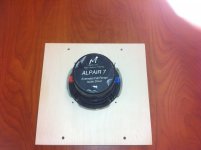
Admittedly, with the spacing of the screw mounting holes in the Alpair's bezels, there's not a lot of clearance to the edge of cut-out, but I've had lots of success in scalloping the chamfers to create small pads at the screw locations.
Attached photo is of A7 - which is even shallower than the 10s - but you get the idea.
Attachments
anyone put spikes on top of their speakers?
After more than a year of getting distracted by other diyaudio projects (including two sets of little speakers) I finally got my FHXLs assembled! I can't give a sophisticated critique of their sound, but they sound wonderful. All the greybeards at record night are floored. Detail routing and finishing will have to wait until next winter- need a roof on the house. And it will be hard to send them back to the shop when time comes.
I have two simple jigs that I am happy to let go to anyone who might want to use them. A pattern for the 65 1/2"R on the back of the speaker. The other jig I built to dado the back and internal panel into the sides, thankfully I read on the forum that it wasn't necessary for strength- so I didn't. It worked great for gluing the joint of the two panels before final assembly. I also have a circle template for routing out a cut-out for the 10M.
I dunno, a Dalek might happen before these get varnish...
Attachments
Pass DIY Addict
Joined 2000
Paid Member
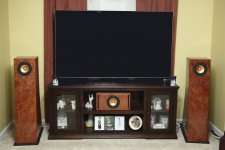
This is not one of my greatest images images (it was late and dark and I was trying to avoid using flash) but here is my LCR array. The center speaker design came from Dave and can be found here:
Alpair 10 Center Designs
Alpair 10 Center Designs
Attachments
The purpose of chamfering the rear side of openings for full range drivers is to reduce as much as possible cavity resonances and diffraction / reflection at the internal edge. The paper or metal cones of full range drivers are generally very light weight, and in many cases the total cone profile is shallow enough that much of it would be bounded by the walls of the through hole - particularly if drivers are not recessed for flush mounting.
Admittedly, with the spacing of the screw mounting holes in the Alpair's bezels, there's not a lot of clearance to the edge of cut-out, but I've had lots of success in scalloping the chamfers to create small pads at the screw locations.
Attached photo is of A7 - which is even shallower than the 10s - but you get the idea.
Thanks for the explanation, it makes sense now.
This is not one of my greatest images images (it was late and dark and I was trying to avoid using flash) but here is my LCR array. The center speaker design came from Dave and can be found here:
Alpair 10 Center Designs
Looks very nice indeed!
Pass DIY Addict
Joined 2000
Paid Member
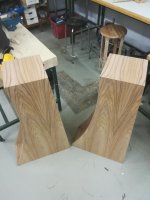
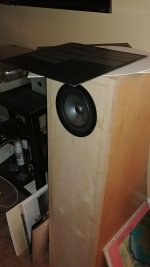
Another progress update. =) The driver holes have appeared on the baffles, and the cabinets are now sealed. I have not done the chamfers (at least yet), because I was worried that there would be too little material left in the flange where the driver is attached. The material thickness I have there is around 6mm with the flush mounting. It seems adequate to me, and the plans show the driver flush mounted on the 18mm baffle as well. Am I worrying about nothing when I'm anxious about the rigidity of the mounting flange if I remove more material?
Anyway, there is still a ton of sanding to do, as well as some small touch ups before I can move to finishing. But I feel as though a large milestone has been reached!
Anyway, there is still a ton of sanding to do, as well as some small touch ups before I can move to finishing. But I feel as though a large milestone has been reached!
Attachments
Pass DIY Addict
Joined 2000
Paid Member
- Home
- Loudspeakers
- Full Range
- Frugel-Horn XL for Alpair 10.3/10p, Fostex FF165wk, more