I just listened to the 0.4x in stereo with a tiny tpa3110d2 amp and a 19v laptop brick power supply. Wow, it rocks! I can't believe how good it sounds and how loud it gets. 
I am a happy foam core builder now!
This is the best sounding deal in diy right now at $10 per driver and $10 for the amp.
Bob, you must be furiously working that glue gun?
I am a happy foam core builder now!
This is the best sounding deal in diy right now at $10 per driver and $10 for the amp.
Bob, you must be furiously working that glue gun?
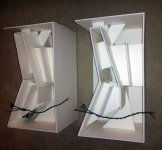
Just finished wiring rig. REAL SOON NOW !!
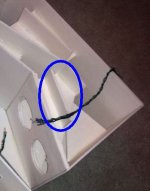
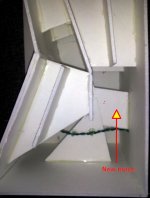
Had some concern about the first support behind the drivers. Is that going to impede/deflect the air flow somewhat?
Had some concern about the first support behind the drivers. Is that going to impede/deflect the air flow somewhat?
Attachments

Last edited:
I just listened to the 0.4x in stereo with a tiny tpa3110d2 amp and a 19v laptop brick power supply. Wow, it rocks! I can't believe how good it sounds and how loud it gets.
I am a happy foam core builder now!
This is the best sounding deal in diy right now at $10 per driver and $10 for the amp.
Bob, you must be furiously working that glue gun?
That is great to hear X. Can't wait to get started on mine, if work would ever slow down.
Just finished wiring rig. REAL SOON NOW !!
Looking great Bob. Don't slow down now.
Bob,
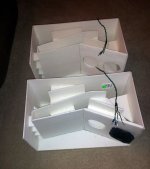
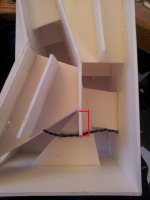
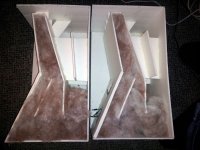
You did a fantastic job with the extra bracing and supports! Looks awesome. I would add one more 90 deg brace between the bottom panel and the lower part of the back panel to reduce wall resonance there. Just glue a piece to existing brace that goes from front to bottom and attach lower back panel.
The brace to the side of the driver is fine - as long as it is aligned along the length of the flow, and directly behind the driver you have clear space. As you have it it will help to breakup internal modes. Use a good amount of stuffing in area behind driver. You don't need any sealant between driver and enclosure, the foam is soft that it gives a little when tightening screws. If you want you can move factory foam gasket from front to back. It will need to be reglued with rubber cement. Not a big deal.
You are very close though - final side needs to be glued on. If the K-slot allows access to drivers without having to mount it with screws like I did that can save some time. But nice thing with screw mounted front is it lets you remove to play with slot shape.
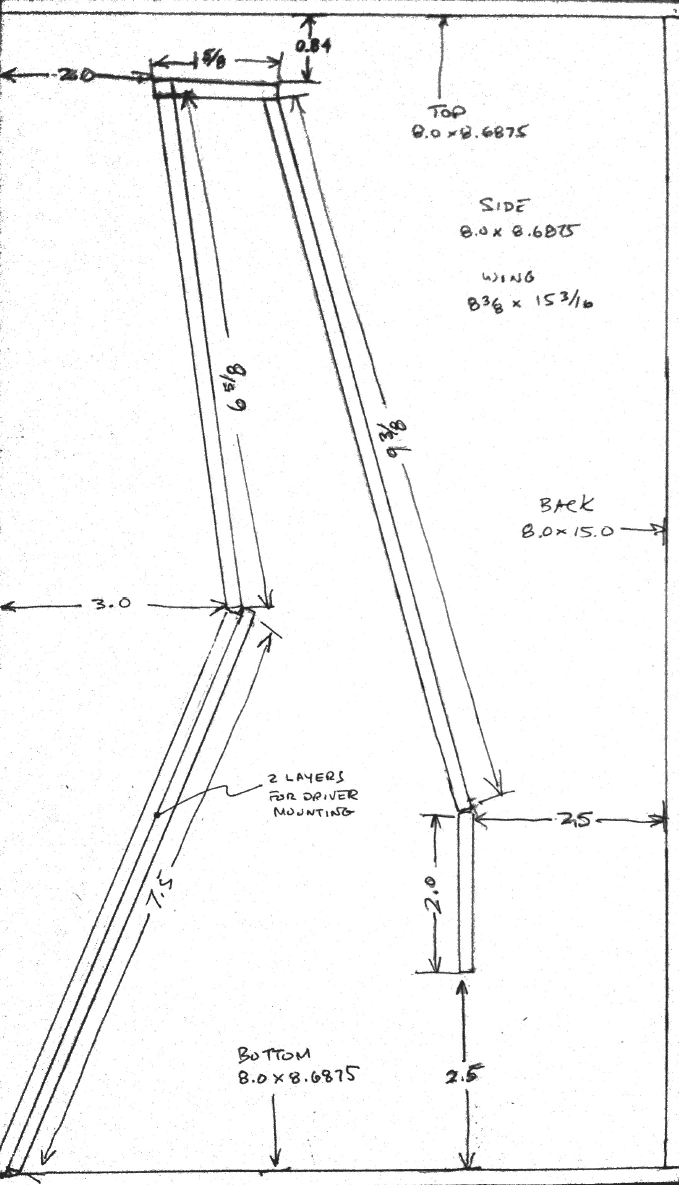
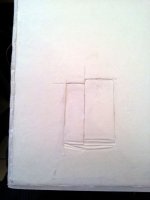
Edit: it may just be an optical illusion in your photos but is the distance between the lower divider lip and bottom panel = 2.5 inches? It should be about the same as the width of the channel that starts flowing up. In the photo, this distance looks larger. That will reduce your pathlength and hence bass extension. You can add a strip of foam to extend it to 2.5 in if you want.
You did a fantastic job with the extra bracing and supports! Looks awesome. I would add one more 90 deg brace between the bottom panel and the lower part of the back panel to reduce wall resonance there. Just glue a piece to existing brace that goes from front to bottom and attach lower back panel.
The brace to the side of the driver is fine - as long as it is aligned along the length of the flow, and directly behind the driver you have clear space. As you have it it will help to breakup internal modes. Use a good amount of stuffing in area behind driver. You don't need any sealant between driver and enclosure, the foam is soft that it gives a little when tightening screws. If you want you can move factory foam gasket from front to back. It will need to be reglued with rubber cement. Not a big deal.
You are very close though - final side needs to be glued on. If the K-slot allows access to drivers without having to mount it with screws like I did that can save some time. But nice thing with screw mounted front is it lets you remove to play with slot shape.
Edit: it may just be an optical illusion in your photos but is the distance between the lower divider lip and bottom panel = 2.5 inches? It should be about the same as the width of the channel that starts flowing up. In the photo, this distance looks larger. That will reduce your pathlength and hence bass extension. You can add a strip of foam to extend it to 2.5 in if you want.
Last edited:
Good eye. I almost posted about that last night. That's how the cut sheet dims worked out, but didn't match the diagram. Just make them equal???
Yes. 2.5 inches on both.
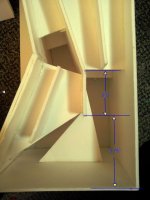
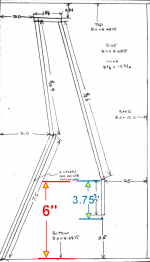
(that is the lip should be 2.5 in from back wall and bottom wall)Is the 3.75" gap ok?
You need to add a vertical piece of foam to extend the bottom of the lip and reduce the gap to 2.5 inches. See my plan below.
Just finished wiring rig. REAL SOON NOW !!
Had some concern about the first support behind the drivers. Is that going to impede/deflect the air flow somewhat?
It isn't going to affect the main bass airflow. It does concern me a bit as far as midrange reflections back through the cone. You could always stick some felt to the inside, and/or cut some holes in it to make it more open.
O.K. I have 6" where you have 5". That will result in a tail at ~ 3.5" where your diagram shows 2.0" Will that be significant?
Bob,
I am not sure how the plans that Oliver provided were so different - maybe it is the cut sheet that is off? Anyhow, the dimension of gap from the lip (or tail as you call it) to the bottom is what is important. Make it equal to 2.5 inches. I am not sure what you are referring to when you say my drawing has 5 inches? If you measure the gap from the tail to the bottom, what is that right now? I can't be sure what it is based on the distances you gave. That would say it is 2.25 in which is (actually less than 2.5 in) but close enough.
Last edited:
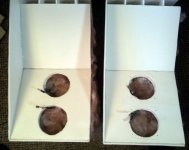
Looks great. If you have a piece of open cell foam or thick felt, it would not hurt to add that to the flat wall directly behind the driver and also the lower back wall to reduce reflections from those surfaces. The stuffing helps a lot but the sound waves still "see" a hard wall behind them.
If you don't not a big deal - still sounds really good.
Good luck with the final capping process!
If you don't not a big deal - still sounds really good.
Good luck with the final capping process!
I have the screw tabs mounted but isn't there a big possibility for leakage along that edge? Maybe the air pressure at that end is low enough? Also found some low spots on the outside so a little more surgery/fill will be necessary.
I saw your post on the foam. I have plenty and will add some. Was adding something to the inside walls of the wings ever resolved?
I saw your post on the foam. I have plenty and will add some. Was adding something to the inside walls of the wings ever resolved?
Regarding the seal between the wing panel and front: I used a bead of hot melt glue all along the edge and smeared a thin coat of vaseline on the edge of the wing that touches the hot melt. Press the wing panel to the still hot glue to form a perfect gasket. The vaseline prevents glue from bonding to front panel. Large gaps can be built up with layers of hot melt prior to final gasket making operation.
Was adding something to the inside walls of the wings ever resolved?
You can try it out after it is all built and adjust to taste. I find that it reduces the high end sparkle a bit but improves imaging. It is a personal preference and easily adjustable and reversible so have fun with it. I just use the white poly fill behind the lower half of the wing (not visible to eye). The brown polyfill may be more noticeable.
- Home
- Loudspeakers
- Full Range
- Mini Karlsonator (0.53X) with Dual TC9FDs