...to the ones who don’t know: WAF is for Wife Acceptance Factor.
The original idea is here:
http://www.diyaudio.com/forums/multi-way/159151-ikea-spherical-speakers-first-build-done.html
( thanks a lot Studio Au ), so I’m not talking about something new, but I think that a step by step building instruction could be useful.
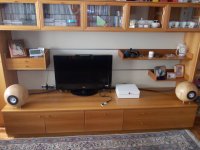
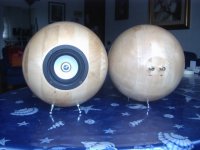
The first picture shows what I’m talking about.
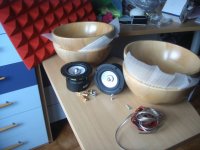
Ingredients ( fig. 2 ):
- 4 IKEA 28 cm ( 11 in. ) Blanda Matt Bowl
- 2 Tang Band W4-657SH full band speakers ( you can put others you like )
- 4 binding posts
- 6 drawer steel knobs
- damping material ( not mandatory )
- speaker wire
Next post: how to build
Ciao.
Luca
The original idea is here:
http://www.diyaudio.com/forums/multi-way/159151-ikea-spherical-speakers-first-build-done.html
( thanks a lot Studio Au ), so I’m not talking about something new, but I think that a step by step building instruction could be useful.
The first picture shows what I’m talking about.
Ingredients ( fig. 2 ):
- 4 IKEA 28 cm ( 11 in. ) Blanda Matt Bowl
- 2 Tang Band W4-657SH full band speakers ( you can put others you like )
- 4 binding posts
- 6 drawer steel knobs
- damping material ( not mandatory )
- speaker wire
Next post: how to build
Ciao.
Luca
Attachments
How to cut speaker hole
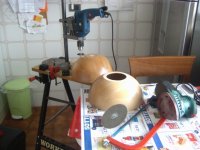
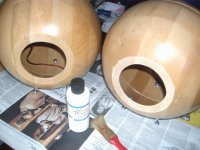
Just take a cup of the same diameter of your speakers and a bubble level: draw a circle with a pencil ( fig. 1 ).
To cut the bowl, I used a column drill ( quite cheap, as you can see … ) with a circular blade saw ( be careful to your fingers !!! ), then a file to enlarge the hole and a sander to smooth the support surface ( fig. 2 ).
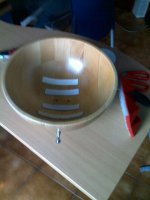
How to put support feet
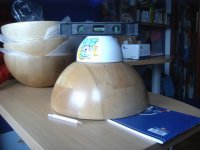
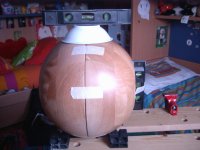
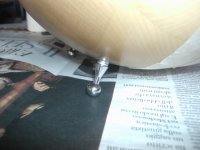
Put togheter the two halves using paper tape, then using another cup and a bubble level ( better use a second one connected to the big hole to keep it vertical ), draw a circle where the 3 feet will lie ( not too large, otherwise the halves will touch the ground, and not too narrow, or the balance of the speaker will be unstable )( fig. 3 ).
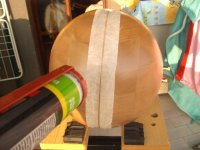
In order to trim the tilt of the speaker, I put some washers to regulate the length of the feet ( fig. 4 ).
Before taking out the tape, draw some crossing lines on “north pole” and “south pole” of the halves, to be sure to put them in the same place as now during glueing.
To be continued …
Just take a cup of the same diameter of your speakers and a bubble level: draw a circle with a pencil ( fig. 1 ).
To cut the bowl, I used a column drill ( quite cheap, as you can see … ) with a circular blade saw ( be careful to your fingers !!! ), then a file to enlarge the hole and a sander to smooth the support surface ( fig. 2 ).
How to put support feet
Put togheter the two halves using paper tape, then using another cup and a bubble level ( better use a second one connected to the big hole to keep it vertical ), draw a circle where the 3 feet will lie ( not too large, otherwise the halves will touch the ground, and not too narrow, or the balance of the speaker will be unstable )( fig. 3 ).
In order to trim the tilt of the speaker, I put some washers to regulate the length of the feet ( fig. 4 ).
Before taking out the tape, draw some crossing lines on “north pole” and “south pole” of the halves, to be sure to put them in the same place as now during glueing.
To be continued …
Attachments
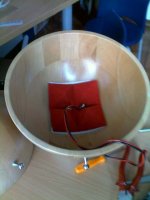
Binding posts, damping and wires
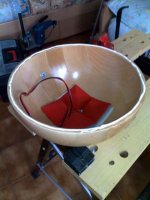
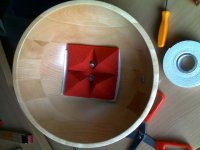
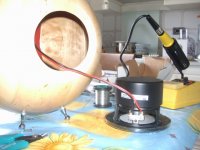
Damping material is kept in place by bi-adhesive strips and binding post washers ( fig. 1 and 2 ).
Then put the connectors and sold the cable ( fig. 3 ).
Glueing
If you’re going to paint the bowls, you can still make some test painting a small area in the inside. Why inside ? Because wood painting is not so easy and, unless you’re almost expert, the results are often mean. If this test doesn’t satisfy you, just keep the bowls in their original colour, as I did.
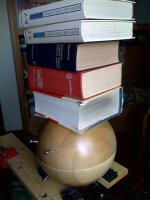
Put the glue on a bowl and, checking that the crossing lines you drew before are aligned, lay the second bowl, then put some weight and wait till next day ( fig. 4 and 5 ).
To be continued …
Ciao.
Luca
Damping material is kept in place by bi-adhesive strips and binding post washers ( fig. 1 and 2 ).
Then put the connectors and sold the cable ( fig. 3 ).
Glueing
If you’re going to paint the bowls, you can still make some test painting a small area in the inside. Why inside ? Because wood painting is not so easy and, unless you’re almost expert, the results are often mean. If this test doesn’t satisfy you, just keep the bowls in their original colour, as I did.
Put the glue on a bowl and, checking that the crossing lines you drew before are aligned, lay the second bowl, then put some weight and wait till next day ( fig. 4 and 5 ).
To be continued …
Ciao.
Luca
Attachments
Sealing up
Sealing up with silicone is necessary, in order to avoid air leaks. Put some paper tape on the sides of the junction, then the silicone ( fig. 1 ). Press it using a wooden spatula or a sheet of paper folded 4 times, then let it rest for a day. Then you can take away the paper tape.
Now the border of the hole is of rough wood: I painted it using matt transparent paint for decoupage ( fig. 2 ).
Screw holes
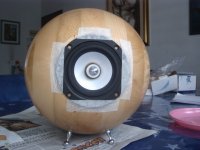
Put the speaker in place with paper tape, then mark the positions. Drill the holes, less than half of the width of the screws you’ll use ( fig. 3 ).
Now you can connect the wire to the speaker ( fig. 4 ) and screw this in its place ( fig. 5 ).
It’s done !
Ciao a tutti.
Luca
P.S.: thanks a lot to everyone for appreciating, or not ;-), and commenting.
P.P.S.: to improve the project, especially in high frequencies, you might use coaxial speakers, with their crossover filter outside the bowls ( or inside, if it fits ) and a bass reflex duct, for low frequencies, but please don’t ask me for calculation and position. Anyway I feel quite satisfied as such.
Sealing up with silicone is necessary, in order to avoid air leaks. Put some paper tape on the sides of the junction, then the silicone ( fig. 1 ). Press it using a wooden spatula or a sheet of paper folded 4 times, then let it rest for a day. Then you can take away the paper tape.
Now the border of the hole is of rough wood: I painted it using matt transparent paint for decoupage ( fig. 2 ).
Screw holes
Put the speaker in place with paper tape, then mark the positions. Drill the holes, less than half of the width of the screws you’ll use ( fig. 3 ).
Now you can connect the wire to the speaker ( fig. 4 ) and screw this in its place ( fig. 5 ).
It’s done !
Ciao a tutti.
Luca
P.S.: thanks a lot to everyone for appreciating, or not ;-), and commenting.
P.P.S.: to improve the project, especially in high frequencies, you might use coaxial speakers, with their crossover filter outside the bowls ( or inside, if it fits ) and a bass reflex duct, for low frequencies, but please don’t ask me for calculation and position. Anyway I feel quite satisfied as such.
Attachments
... a bass reflex duct, for low frequencies, but please don’t ask me for calculation and position. Anyway I feel quite satisfied as such.
I'm guessing about 5l for the enclosure (r=10cm) so just above the Vas of the driver.
A 4 cm2 port about 5cm long should get you rolling off at 70hz. I think
 (extrapolating from curves here )
Thanks everybody for interesting, but please don't ask me questions that I cannot answer ( low, rolloff ... ) as I'm not an audiophile nor a technician.
As you can see, the speakers are not connected to a hihg-end system, anyway I can appreciate their smooth and not fatigating sound for hours.
Ciao a tutti.
Luca
As you can see, the speakers are not connected to a hihg-end system, anyway I can appreciate their smooth and not fatigating sound for hours.
Ciao a tutti.
Luca
About 100Hz if I recall from yesterday.Where is the low fq rolloff?
Looking at Dickason 1997 "Speaker design handbook" p18 we've got Vbox just above Vas so alpha is just below one, so Qtc will be about 1.5 x Qts =1.5 x 0.32 - about 0.5. Quite overdamped. So F3 is going to be about 50% above Fr or 100 hz (F3 is 65Hz).
Any online calculator will do a more accurate job than me!
Last edited:
- Status
- This old topic is closed. If you want to reopen this topic, contact a moderator using the "Report Post" button.
- Home
- Loudspeakers
- Full Range
- How to build simple, cheap, high WAF, full range speakers