Hello all,
As some of you may know, I was quite inspired by Doug Ingram's Clairtone Globe project http://www.diyaudio.com/forums/full...s-doug-coming-along-his-clairtone-globes.html
This put me in search of an old console to "retro"-fit with modern components.
I started with Craig's List and Kijiji, of course, and I found a few old consoles but they were often too far and/or too expensive to bother with.
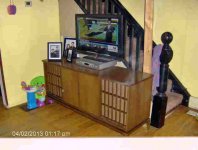
Well, I had Friday off so I went snowshoe hare hunting as I do most weekends, and on the way home I decided to swing by one of the local thrift stores and have a look. To my surprise, I found my Clairtone Console!
There was no price on it, so I asked the manager. "25 bucks", she said.
I snapped a photo of it and went home to discuss it with my wife, then we went and picked it up Saturday morning.
It has some dings here and there and the top is really rough, but nothing I cannot restore. I love woodworking, so that's a non-issue. Part of one of the grille slats on the left side was broken off, but luckily I found it inside the storage compartment of the console. Some yellow LePage's fixed 'er up.
I tested it briefly. It powered up and I was able to tune in a local FM station. It worked, but that's about as nice as I can be about the way it sounded.
If I was going to spend any time restoring the appearance of this piece, the first priority was figure out if I was going to like the sound of it.
So I got to work:
Removed the receiver and TT:
Cut out a section of the back to provide air-flow for the new tube amp:
Removed the drivers (3 each side), crossovers, and lining, then painstakingly removed excess chip board from between the 3 driver holes. This was a delicate operation, as the wooden grille slats were glued into grooves in the chip board. One wrong move and I could have broken one or more of them:
Measured and cut new baffle pieces out of 1/2" ply:
Checked to make sure it was all going to work:
Installed the drivers in the baffles and stuck weatherstripping around the perimeter, then moved them into position:
Secured the new baffles in place with some short #10 screws. I started off on an angle and then "torqued" the screws as I was screwing them in (Robertson rules!), so as to compress the foam baffle seal:
(no, I didn't bevel the back of the driver hole, but I plan to)
I stopped taking photos at some point, but the rest of the steps included:
- Lined the top and 3 sides of speaker enclosures with 2" pink fiberglass
- Calculated a reasonable bass-reflex tuning for the Alpair 10.2 in this volume of enclosure and then installed a 3" x 4" port in each (removable) enclosure bottom plate
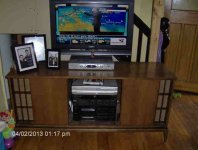
- Installed a piece of plywood in the turn-table shelf, to hold my netbook
- Installed my Shuguang I-25 tube amp into the slot where the old receiver was... It slid right in like it was meant to be there!
- Placed my netboook and DAC in the TT area and then wired everything up
After some tweaking of the EQ (mostly on the treble end) this thing sounds quite good. Prodigious amounts of full, rich bass. Unbelievable, really. Midrange is good, but not perfect. I think I am getting early reflections from the driver holes (which I will remedy) and I also think the driver enclosures could use some stuffing (only the lining in there right now). Also, the driver enclosures are not perfectly sealed at the bottom. All of this will come with later tweaking, if I decide to keep it. Treble is attenuated significantly by the grille, however the Alpair 10.2s seem to respond very well to EQing at the top end and I was able to get them sound quite crisp and "airy".
Imaging and sound stage have taken a significant hit, but to my surprise they have not disappeared entirely. Sound stage is narrower, obviously, but it seems to have retained its depth. On the other hand, "beaming" has vanished (dispersion is excellent). The "sweet spot" is considerably larger, but not quite as "sweet".
It will take at least a week of listening before I make a final decision as to whether I can live with the sound. During that time I will likely bevel the back of the driver holes to see if I can tidy up the midrange, and I will likely run some sweeps through it and see if there are some peaks and nulls that I need to iron out. I suspect there are some in the mids and upper mids.
If I can live with the sound, then I will restore the exterior to as close to its original beauty as possible.
WAF is sky-high, of course!
As some of you may know, I was quite inspired by Doug Ingram's Clairtone Globe project http://www.diyaudio.com/forums/full...s-doug-coming-along-his-clairtone-globes.html
This put me in search of an old console to "retro"-fit with modern components.
I started with Craig's List and Kijiji, of course, and I found a few old consoles but they were often too far and/or too expensive to bother with.
Well, I had Friday off so I went snowshoe hare hunting as I do most weekends, and on the way home I decided to swing by one of the local thrift stores and have a look. To my surprise, I found my Clairtone Console!
There was no price on it, so I asked the manager. "25 bucks", she said.
I snapped a photo of it and went home to discuss it with my wife, then we went and picked it up Saturday morning.
An externally hosted image should be here but it was not working when we last tested it.
It has some dings here and there and the top is really rough, but nothing I cannot restore. I love woodworking, so that's a non-issue. Part of one of the grille slats on the left side was broken off, but luckily I found it inside the storage compartment of the console. Some yellow LePage's fixed 'er up.
An externally hosted image should be here but it was not working when we last tested it.
An externally hosted image should be here but it was not working when we last tested it.
I tested it briefly. It powered up and I was able to tune in a local FM station. It worked, but that's about as nice as I can be about the way it sounded.
If I was going to spend any time restoring the appearance of this piece, the first priority was figure out if I was going to like the sound of it.
So I got to work:
Removed the receiver and TT:
An externally hosted image should be here but it was not working when we last tested it.
Cut out a section of the back to provide air-flow for the new tube amp:
An externally hosted image should be here but it was not working when we last tested it.
Removed the drivers (3 each side), crossovers, and lining, then painstakingly removed excess chip board from between the 3 driver holes. This was a delicate operation, as the wooden grille slats were glued into grooves in the chip board. One wrong move and I could have broken one or more of them:
An externally hosted image should be here but it was not working when we last tested it.
Measured and cut new baffle pieces out of 1/2" ply:
An externally hosted image should be here but it was not working when we last tested it.
Checked to make sure it was all going to work:
An externally hosted image should be here but it was not working when we last tested it.
Installed the drivers in the baffles and stuck weatherstripping around the perimeter, then moved them into position:
An externally hosted image should be here but it was not working when we last tested it.
Secured the new baffles in place with some short #10 screws. I started off on an angle and then "torqued" the screws as I was screwing them in (Robertson rules!), so as to compress the foam baffle seal:
An externally hosted image should be here but it was not working when we last tested it.
(no, I didn't bevel the back of the driver hole, but I plan to)
I stopped taking photos at some point, but the rest of the steps included:
- Lined the top and 3 sides of speaker enclosures with 2" pink fiberglass
- Calculated a reasonable bass-reflex tuning for the Alpair 10.2 in this volume of enclosure and then installed a 3" x 4" port in each (removable) enclosure bottom plate
- Installed a piece of plywood in the turn-table shelf, to hold my netbook
- Installed my Shuguang I-25 tube amp into the slot where the old receiver was... It slid right in like it was meant to be there!
- Placed my netboook and DAC in the TT area and then wired everything up
An externally hosted image should be here but it was not working when we last tested it.
After some tweaking of the EQ (mostly on the treble end) this thing sounds quite good. Prodigious amounts of full, rich bass. Unbelievable, really. Midrange is good, but not perfect. I think I am getting early reflections from the driver holes (which I will remedy) and I also think the driver enclosures could use some stuffing (only the lining in there right now). Also, the driver enclosures are not perfectly sealed at the bottom. All of this will come with later tweaking, if I decide to keep it. Treble is attenuated significantly by the grille, however the Alpair 10.2s seem to respond very well to EQing at the top end and I was able to get them sound quite crisp and "airy".
Imaging and sound stage have taken a significant hit, but to my surprise they have not disappeared entirely. Sound stage is narrower, obviously, but it seems to have retained its depth. On the other hand, "beaming" has vanished (dispersion is excellent). The "sweet spot" is considerably larger, but not quite as "sweet".
It will take at least a week of listening before I make a final decision as to whether I can live with the sound. During that time I will likely bevel the back of the driver holes to see if I can tidy up the midrange, and I will likely run some sweeps through it and see if there are some peaks and nulls that I need to iron out. I suspect there are some in the mids and upper mids.
If I can live with the sound, then I will restore the exterior to as close to its original beauty as possible.
WAF is sky-high, of course!
Last edited:
Nice work - looks like you have been a busy guy! Very cool to put in super state of the art Alpair driversin a vintage box. I love the mix of old and new technology: netbook/DAC, tube amp, modern drivers, vintage cabinet. Very cool. What about your tube pre-amp + modded TA2020 amp combo? She's got you well-trained well in discussing big speaker purchases first before buying! I am the same way....
One thing though.... those poor snow shoe bunnies!
I hope it works out and you decide to restore the wood.
I am the same way....One thing though.... those poor snow shoe bunnies!
I hope it works out and you decide to restore the wood.
Nice work - looks like you have been a busy guy! Very cool to put in super state of the art Alpair driversin a vintage box. I love the mix of old and new technology: netbook/DAC, tube amp, modern drivers, vintage cabinet. Very cool. What about your tube pre-amp + modded TA2020 amp combo? She's got you well-trained well in discussing big speaker purchases first before buying!
One thing though.... those poor snow shoe bunnies!
I hope it works out and you decide to restore the wood.
Thanks xrk!
The tube pre-amp + TA2020 project is destined for the bedroom system. It is in limbo right now as I have decided I want to install a sleep timer in it (just as an electronics challenge for myself).
She does have me well-trained, and I am like a dog... Happy to know the rules.
Snowshoe hare are delicious, plentiful, and not very cute. They also bring some variety in our diet, as the only other meats we eat are deer and moose. Every animal consumed as food must be slaughtered and butchered. I simply choose to take the reponsibility on myself, which gives me intimate knowledge of how the animal died and how it was processed, and the knowledge that the animal lived a natural, free life in the meantime.
Back to the console; I ran a HolmeImpulse sweep on it last night. Will post it later. Suffice it to say I was able to use the sweep graph to dial in my EQ and it looks like I will be restoring this old beauty!
Last edited:
To give you all an idea of the native response of the console without any EQ (ei. to demonstrate exactly what I mean by attenuated highs) I ran a HolmeImpulse sweep on the unit after work yesterday. (Note, the dramatic drop in response after 8k is due to a limitation of the mic used).
As stated earlier, I subsequently used that data to configure a new EQ preset (based on 100% negative EQing) and I have the unit sounding quite remarkable. From crystal clear highs right down to the low 30-ish Hz range. The Alpair 10.2s really are incredibly capable and versatile drivers!!
It is looking more and more like I may continue with this project, giving the driver holes the appropriate bevels (AKA chamfers), adjusting stuffing, sealing the speaker cabinets and bass-reflex port tubes and restoring the finish.
An externally hosted image should be here but it was not working when we last tested it.
As stated earlier, I subsequently used that data to configure a new EQ preset (based on 100% negative EQing) and I have the unit sounding quite remarkable. From crystal clear highs right down to the low 30-ish Hz range. The Alpair 10.2s really are incredibly capable and versatile drivers!!
It is looking more and more like I may continue with this project, giving the driver holes the appropriate bevels (AKA chamfers), adjusting stuffing, sealing the speaker cabinets and bass-reflex port tubes and restoring the finish.
That 20 dB hit you are taking above 2 kHz may be from the wooden venetian blind grill. Have you considered swapping that for a fabric grill cloth? It would still look pretty good.
If you are actually killing and butchering all your own meat then that is great because you truly have a sense of what it means to eat meat and the life that went into it. You must be in the middle of the woods or something?
I have the same drop-off above 10kHz and I don't think it is my mic but the limitation of the built in freq response of the mic input on the soundcard. But for enclosure building, doesn't matter as long as you trust what the manufacturer tells you is the FR of the driver in an IEC baffle.
That 20 dB hit you are taking above 2 kHz may be from the wooden venetian blind grill. Have you considered swapping that for a fabric grill cloth? It would still look pretty good.
Indeed. Definitely it is the wooden grille to blame. I have considered removing it and replacing with brown cloth, but I just love the simple lines of the wood, and the EQing compensation really has resulted in excellent sound. It actually only takes between 9-12dB to correct the issue (not a full 20dB).
If you are actually killing and butchering all your own meat then that is great because you truly have a sense of what it means to eat meat and the life that went into it.
Exactly!
You must be in the middle of the woods or something?
Sort of. I live in a small city. However, if I drive 30 minutes in any direction, I am in the middle of the woods.
I have the same drop-off above 10kHz and I don't think it is my mic but the limitation of the built in freq response of the mic input on the soundcard. But for enclosure building, doesn't matter as long as you trust what the manufacturer tells you is the FR of the driver in an IEC baffle.
Indeed. I don't concern myself with it. I have considered building one of those extremely accurate DIY mics, but I am in no rush to do so.
I'd keep the wooden grill - looks like it helps spread the HF energy around the room better, which is a positive.
Liking this project - I'll be watching closely as (in 10 year's time) I might end up doing something like this myself.
Chris
Right. As I said earlier, the beaming of the 10.2s has vanished and the sweet spot (although not quite as sweet) is considerably larger. EQ compensation has corrected the drop after 2k, and the grilles are beautiful, IMO.
It seems quite obvious to me that these consoles were really designed more for "background, easy listening" than critical audiophile listening, however I am surprised just how good the Alpairs sound in such an unlikely enclosure.
cool
i thought i was the only guy with a refurbed console as main system!
and i do agree the waf is very high!
Pics (or it didn't happen) !
cogitech
i'm a digital idiot how do i link in a pic?
There's two ways:
1) Use the "Post Reply" button (not the "Quick Reply" box below) which will give you access to a button named "Manage Attachments" which pops up an interface which allows you to upload attachments to your post.
2) Upload your pics to an image hosting server (I have my own server, so this is the way I do it) and then use IMG tags in your posts with the image urls like:
[ img ] http://www.yoursite.com/yourphoto.jpg [ / img ]
(but without the obvious extra spaces)
Last edited:
well i'm not sure what to do about the file size it's telling me i can't attach it because it's too big
You'll have to resize the photo to something postable.
If you are using windows, you can download Image Resizer for Windows - Home
Install that and then you will be able to right-click on any image and select "Resize Pictures". There are other ways to resize pictures, but this is the easiest.
- Status
- This old topic is closed. If you want to reopen this topic, contact a moderator using the "Report Post" button.
- Home
- Loudspeakers
- Full Range
- "Retro"-Fit: Vintage Console Meets FR