Wow, that is a great deal on those 16 ohm NS3's at $2.50!
I'm getting 100 for an EnABL trainee to practise on.
dave
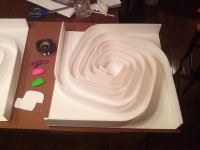
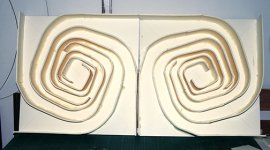
I've been listening to my Cornu horn for about a week now. I built mine using the Elmers foam with the heavy paper backing for the front and back sheets. The inner spirals were made using the dollar store foam board. Size is 20" square with a 2.5" internal depth.
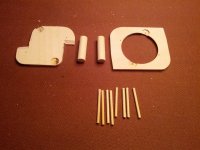
To draw the spirals I used a projector and projected the spiral onto the foamboard while it was taped to the wall and adjusted until it fit, then traced in pencil. Very fast and easy. I glued the inner spirals to the back using standard hot melt glue. My plan has always been to cover these with a cloth "sock" to make them decorative wall pieces. I knew that I had to recess the driver a bit and needed something for it to securely mount to, so I decided to use a piece of 1/4" craft plywood and some dowels to make a mount and support behind the driver. I made small rebates to align the dowels in the ply. I also chamfered the ply where it met the horn inlet. I used short pieces of bamboo skewers at the leading edge of the foam horn inlets to round over the edge. To score the foam, I used a roller paper cutter - it only cuts 1/16" deep and makes fast work of the scoring.
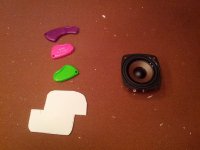
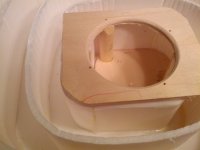
The back plywood piece was glued on with wood glue, as were all the wood pieces. The hole in the plywood was cut with a 76mm hole saw, as was the hole in the foam. Then I traced out the driver frame on the front and removed the top layer of paper and the foam to provide a small recess for the driver. The top was glued on with adhesive caulk - it's cheap, easy to apply, has about a half hour of working time, and fills gaps easily.
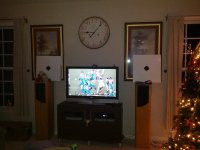
The sound? Not as good as the speakers below them, but darn good for 1/10th the price. There's definitely some peakiness that is noticeable, but the bass is impressive for a 3" speaker. Stuffing isn't optimal - four layers of felt behind the driver and as much polyfill as I could get in the chamber. I probably should have stuffed some of the line, but I was afraid of overstuffing and not being able to remove it. I do notice a lot of highs coming through the back, probably due to the lightweight materials.
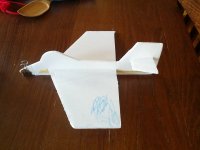
I had a few leftover pieces of foamboard so I made a small craft project for my kids. This foam is good stuff.
To draw the spirals I used a projector and projected the spiral onto the foamboard while it was taped to the wall and adjusted until it fit, then traced in pencil. Very fast and easy. I glued the inner spirals to the back using standard hot melt glue. My plan has always been to cover these with a cloth "sock" to make them decorative wall pieces. I knew that I had to recess the driver a bit and needed something for it to securely mount to, so I decided to use a piece of 1/4" craft plywood and some dowels to make a mount and support behind the driver. I made small rebates to align the dowels in the ply. I also chamfered the ply where it met the horn inlet. I used short pieces of bamboo skewers at the leading edge of the foam horn inlets to round over the edge. To score the foam, I used a roller paper cutter - it only cuts 1/16" deep and makes fast work of the scoring.
The back plywood piece was glued on with wood glue, as were all the wood pieces. The hole in the plywood was cut with a 76mm hole saw, as was the hole in the foam. Then I traced out the driver frame on the front and removed the top layer of paper and the foam to provide a small recess for the driver. The top was glued on with adhesive caulk - it's cheap, easy to apply, has about a half hour of working time, and fills gaps easily.
The sound? Not as good as the speakers below them, but darn good for 1/10th the price. There's definitely some peakiness that is noticeable, but the bass is impressive for a 3" speaker. Stuffing isn't optimal - four layers of felt behind the driver and as much polyfill as I could get in the chamber. I probably should have stuffed some of the line, but I was afraid of overstuffing and not being able to remove it. I do notice a lot of highs coming through the back, probably due to the lightweight materials.
I had a few leftover pieces of foamboard so I made a small craft project for my kids. This foam is good stuff.
Attachments
-
 2012-12-15 18.27.07.jpg391.6 KB · Views: 1,055
 -
 2012-12-15 18.27.22.jpg137.2 KB · Views: 958
 -
 2012-12-21 22.21.25.jpg599.5 KB · Views: 951
 -
 2012-12-21 23.22.24.jpg290.9 KB · Views: 930
 -
 2012-12-21 23.23.04.jpg286.1 KB · Views: 931
 -
 2012-12-22 21.08.01.jpg401.9 KB · Views: 536
 -
 2012-12-23 14.32.16.jpg427.2 KB · Views: 535
Nice work Chaz.
I must say I am worried about you doing the stuffing and closing up the box unless you do as xrk suggests and make sure you can change it if you have to. If you over stuff it, you lose the value of this cabinet. I would do it at the end and make a cup shape for the chamber and use a fork if you want to add some to the throats. Stuffing makes more difference than almost any cabinet, so you have to get it right or you may miss the magic.
I must say I am worried about you doing the stuffing and closing up the box unless you do as xrk suggests and make sure you can change it if you have to. If you over stuff it, you lose the value of this cabinet. I would do it at the end and make a cup shape for the chamber and use a fork if you want to add some to the throats. Stuffing makes more difference than almost any cabinet, so you have to get it right or you may miss the magic.
Great work too Fenris. Can't stress enough the importance of your statement.but I was afraid of overstuffing and not being able to remove it.
I had a few leftover pieces of foamboard so I made a small craft project for my kids. This foam is good stuff.
 Good Daddy.
Very nice work Fenris. I like what you did with the wood driver mount. It looks like you used the $10 buyout TB w3-881si and it sounds good. Awesome to hear. Lots of good tricks you mentioned like the roller cutter for scoring. I have some of that nice Elmers foam board too, looks like it works out well as a baffle. Thanks for sharing.
Here is another project in the works. I'm a little hesitant to post my effort so far. It looks pretty shabby compared to the ones by chaz and fenris
Prezden,
No worries man, I think they look great. It is not a big deal as it is all internal once the cover is on.
The design is pretty forgiving as I have hand drawn my own spirals with drastic mods and both ,my builds manage to sound good. Thanks for sharing.thanks!Nice work Chaz.

I think what I'm going to do is lightly stuff the first 1/3 of the line, approximately, in order to hopefully reduce peaks and dips. It won't be removable but at least I'll have done something. Frankly my more pressing concern is getting a good seal with the back of the box. I'll be using gorilla glue but I've never worked with it before; will I be able to put a bead along the foam board without getting a huge dripping mess? Any advice for this last step? Despite all the precautions I took in getting perfectly straight strips there is a lot of irregularity, which I assume is from the hot glue.I must say I am worried about you doing the stuffing and closing up the box unless you do as xrk suggests and make sure you can change it if you have to. If you over stuff it, you lose the value of this cabinet. I would do it at the end and make a cup shape for the chamber and use a fork if you want to add some to the throats. Stuffing makes more difference than almost any cabinet, so you have to get it right or you may miss the magic.
Chaz,
Your channels look like they will seal just fine. I am not sure why you say that the hot melt glue causes uneveness in channel height. I use hot melt glue to even out any height imperfections by laying thin bead on edges of channels before gluing with pva. We have heard G glue makes a mess, Fenris had good luck with caulking adhesive. You can always hot melt a piece of string to the teased out wad of stuffing and leave that hanging into driver chamber as emergency removal/adjustment recourse. When teasing out pillow stuffing, if you do not break it, just gluing string to end should move whole thing out in one piece.
Good luck with capping operation.
I am thinking out loud here... since we are looking for a driver with a very strong high frequency end, a low Qts, and high efficiency. What do you think of the Dayton PS108-8 (6.5 in) driver? It is 95 dB efficient and has HF peaks in the 105 dB region, a Qts of 0.23, and it will fit in a 36 in x 5 in deep Cornu which my estimates say will have a lower freq of about 30 Hz. This may be the ultimate Cornu design? We could make it thinner for some compression loading of the driver chamber if desired.
http://www.parts-express.com/pe/showdetl.cfm?partnumber=295-344
http://www.parts-express.com/pe/showdetl.cfm?partnumber=295-344
Hey guys, just want to let you know that I've begun sealing my boxes. After cutting away the most egregious bumps, I decided to use some adhesive caulk which I had originally purchased for the job. Specifically I'm using Dap kwik seal. I lave LIGHTLY stuffed the beginning of the line, but don't freak out: I have a backup plan if I think it's overdamped (very unlikely, as my stuffing was pretty much transparent) which involves a vacuum cleaner.
WRT the "ultimate" cornu driver, keep in mind that as Qts drops, the need for a rising HF response diminishes because the bass will not be so exaggerated. (Speaking from the standpoint of someone who hasn't even heard the cornu yet; I'm going off of horn theory.) But of course, low Qts and rising response go hand in hand. That said, the Audio nirvana 6.5" cast frame might be a contender for a large, no-holds-barred cornu design. I'm still daydreaming of a 35" cornu for my tangband w5-1611s though.
WRT the "ultimate" cornu driver, keep in mind that as Qts drops, the need for a rising HF response diminishes because the bass will not be so exaggerated. (Speaking from the standpoint of someone who hasn't even heard the cornu yet; I'm going off of horn theory.) But of course, low Qts and rising response go hand in hand. That said, the Audio nirvana 6.5" cast frame might be a contender for a large, no-holds-barred cornu design. I'm still daydreaming of a 35" cornu for my tangband w5-1611s though.
- Home
- Loudspeakers
- Full Range
- Ever think of building a Cornu Spiral horn? Now you can!