Yup it's undersized, as I could have the board fairly cheap. Going bigger meant lots of wasted woods. I wanted to try out for my Cornu with a smaller model and easy to source 60cm boards...
The front box driver is a good idea! I'll give that a thought on my next cornu!
I think the channel left before bifurcation is 12 cm to 10 cm. Thanks for the sim, X!!!
The front box driver is a good idea! I'll give that a thought on my next cornu!
I think the channel left before bifurcation is 12 cm to 10 cm. Thanks for the sim, X!!!
Ok these are the parameters, using foam 5mm for front and back and 0,3mm for horn with this kind of luodspeaker is correct a dimension of 50cmX50cm how deep had to be the internal foam? thanks for any suggest and information


I would go for a 27.5 in x 27.5 in x 4.0 in depth. The 50 cm is too small I don't think the magnet and basket will fit.
Edodo,
The sims of the Lcao F6 in a 24 in Cornu are not good. I am afraid you will most likely be disappointed with the performance as there is no bass below 100 Hz - sorry to bring bad news...
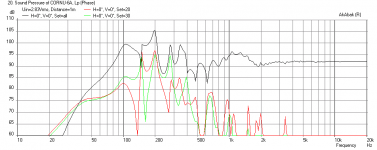
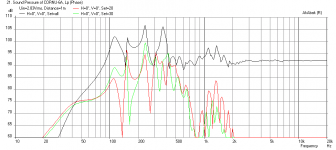
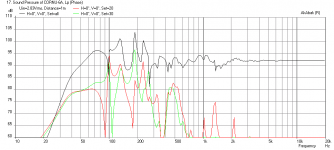
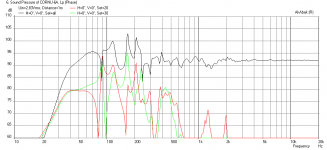
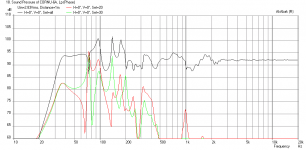
Here is the sim in a 24 x 4 deep Cornu with all channels intact:
Here is with only 5 cm of the initial channels remaining in a 24 in x 4 in Cornu - not very pretty looking:
If you went up to a 36 in x 4 in size it looks better but I am not convinced the driver cutout will fit and also the bass performance looks like it is still needing more volume:

I think the ideal size for the F6 is a huge 40 in x 4 in deep Cornu - but you will get bass extension down to 35 Hz (-10 dB):

Here is the cone displacement for the 40 inch:
Here is the impedance for the 40 in:
If you do build the 40 inch version - it will indeed sound very impressive with the 95 dB bass efficiency. That us very loud at 1 watt and will bother neighbors and vibrate walls and windows badly at 5 watts (don't exceed this to stay below xmax).
I don't think anyone will ever do this but if size were no object, you could even make it 48 in x 6 in deep - a whopping 16 square feet of baffle. A standard 4x8 ft sheet of plywood will suffice for one speaker's front and back, albeit only 1/4 in thick can work... Here is what you get - a solid bass extension down to 33 Hz (-3dB):

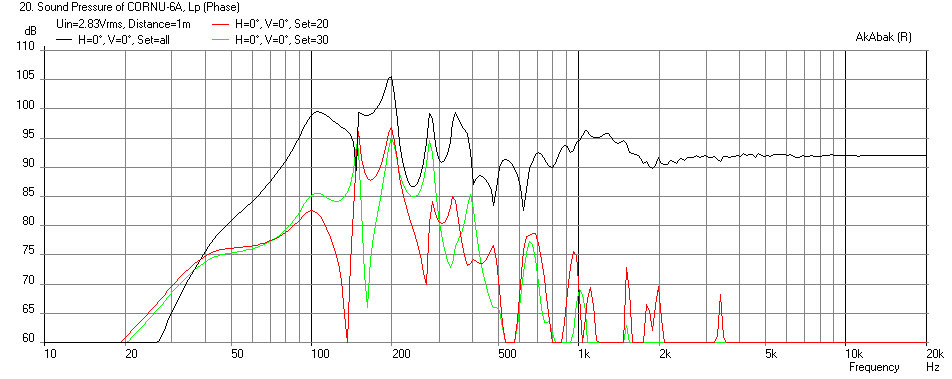
The sims of the Lcao F6 in a 24 in Cornu are not good. I am afraid you will most likely be disappointed with the performance as there is no bass below 100 Hz - sorry to bring bad news...
Here is the sim in a 24 x 4 deep Cornu with all channels intact:
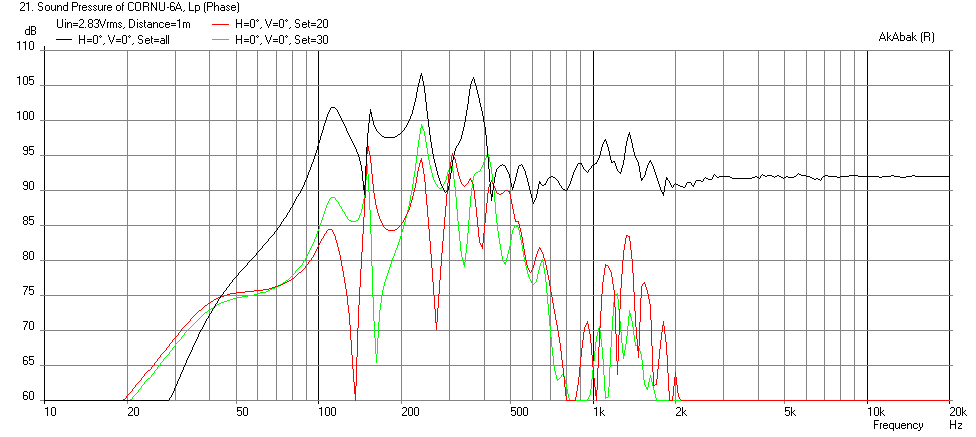
Here is with only 5 cm of the initial channels remaining in a 24 in x 4 in Cornu - not very pretty looking:
If you went up to a 36 in x 4 in size it looks better but I am not convinced the driver cutout will fit and also the bass performance looks like it is still needing more volume:
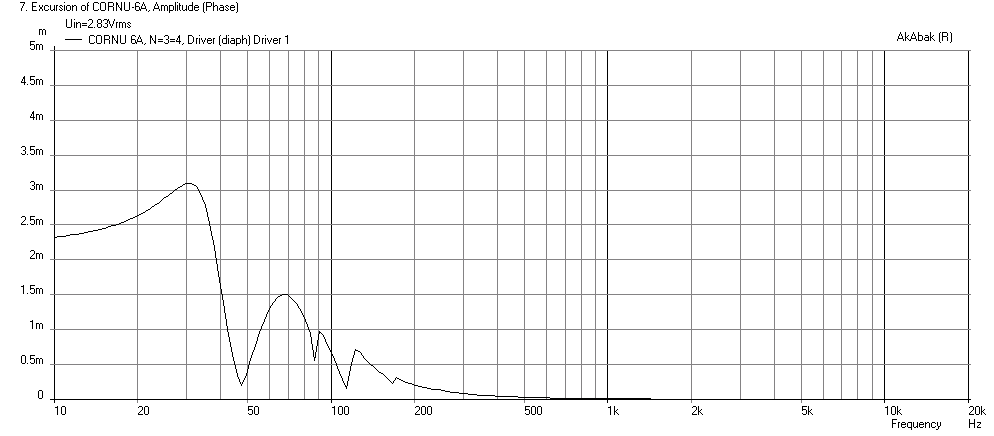
I think the ideal size for the F6 is a huge 40 in x 4 in deep Cornu - but you will get bass extension down to 35 Hz (-10 dB):
Here is the cone displacement for the 40 inch:
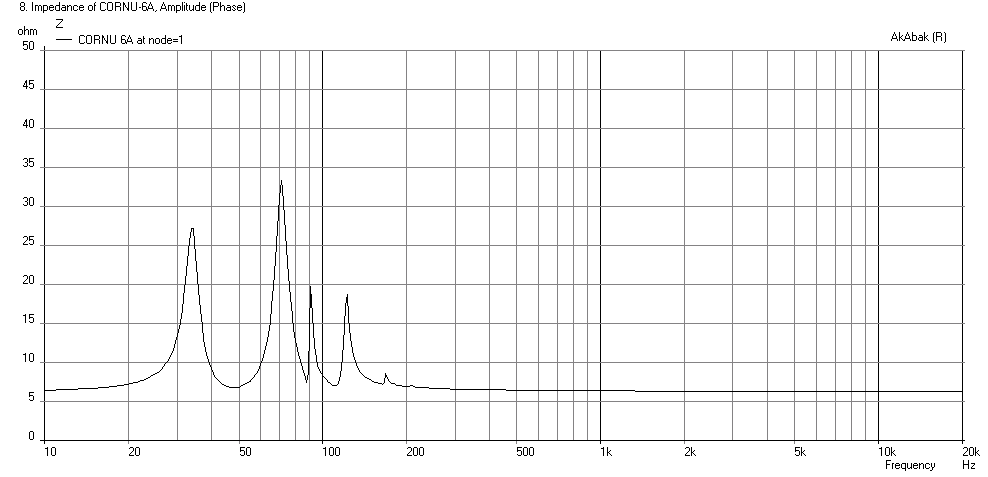
Here is the impedance for the 40 in:
If you do build the 40 inch version - it will indeed sound very impressive with the 95 dB bass efficiency. That us very loud at 1 watt and will bother neighbors and vibrate walls and windows badly at 5 watts (don't exceed this to stay below xmax).
I don't think anyone will ever do this but if size were no object, you could even make it 48 in x 6 in deep - a whopping 16 square feet of baffle. A standard 4x8 ft sheet of plywood will suffice for one speaker's front and back, albeit only 1/4 in thick can work... Here is what you get - a solid bass extension down to 33 Hz (-3dB):
Attachments
-
 Cornu6a-24x4-Lcaof6-freq-1m.png31 KB · Views: 597
 -
 Cornu6a-24x4-shortened-Lcaof6-freq-1m.png37.1 KB · Views: 639
 -
 Cornu6a-36x4-Lcaof6-freq-1m.png35.2 KB · Views: 613
 -
 Cornu6a-40x4-Lcaof6-freq-1m.png36.6 KB · Views: 595
 -
 Cornu6a-40x4-Lcaof6-displ.png29.3 KB · Views: 594
 -
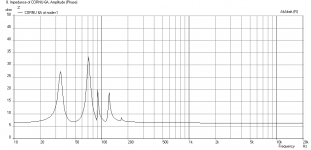 Cornu6a-40x4-Lcaof6-Impedance.png31.7 KB · Views: 575
 -
 Cornu6a-48x6-Lcaof6-Freq-1m.png18.4 KB · Views: 580
Last edited:
I don't think I have ever run a sim of an FE103en in a 24 inch. You may have clearance issues with the basket and the driver chamber on a 24 inch. I know Prezden had issues with the Tang Band W4 bamboo on a 24 incher. Consider a 27.5 inch cornu. Probably 27.5 x 4.5 inch should work - similar to FF125WK.
Is 8 cm deep what X recommended?
Didn´t want to bother him with yet another sim, i guess he would recommend 4inch - 10cm with 24 inch. But 8 cm will be close enough for me
I don't think I have ever run a sim of an FE103en in a 24 inch. You may have clearance issues with the basket and the driver chamber on a 24 inch. I know Prezden had issues with the Tang Band W4 bamboo on a 24 incher. Consider a 27.5 inch cornu. Probably 27.5 x 4.5 inch should work - similar to FF125WK.
The w4-1320sif was my preferred driver, but i had problems getting it here for a reasonable price / in a decent ammount of time.
The basket should be fine, the mounting hole on the drawing of the 70cm cornu is 10cm and the driver chamber is 12cm. Scaled to a 61cm cornu that would be a 8,7cm hole with a 10,5cm chamber. The hole diameter for the fe103en is 9,2cm, so it should fit the chamber easily. I also know the xmax of the fe103en is limited (0,6mm), but i read multiple posts of people saying they didn´t run into any problems exceeding it. I also read a review of a cornu with a fostex fe103sigma (0,35mm xmax), which was very positive. Anyhow, this gives me a chance to try something new. And in the worst case i'll end up with a set of fe103en-s for another project, which isn't that bad.
Last edited:
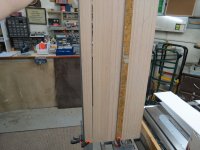
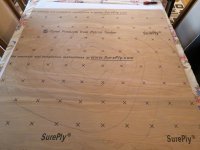
Yesterday was raining so I kicked off early and headed to Home Depot. Bought the Sure-Ply after discovering that beautiful veneered stuff is now what you see in the pics. Got layout done, made a jig (quick to make, easy to use, why didn't I do this before?) and cut the pieces, scored the first few at the bend points and went to bed.
Attachments
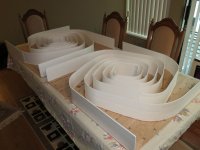
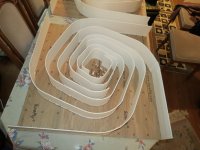
Today was raining again so I kicked off early again and headed home. You can see what happened. I changed the way I do it and just like the cutting jig, it was faster, easier, less painful and cheaper. I am only spot adhering the foamcore with hot glue and then caulking it. I used only 2.5 sticks of glue, (12" variety) and a half tube of caulk for both. The caulk I used is that Alex Plus stuff that was just laying around anyway. So fast, so easy, just remember to do the caulking right away before you proceed with the next piece so you don't cover it. Leftover caulk went in the driver chamber to deflect the wavefront...honest. What looks like gaps is the spots where the hot glue was used.
The dumb thing I did was to add the channels to the front panels rather than the rear so now I can't cut the driver holes until the caulk sets. Dumb Cal. Aside from that this has gone so much faster than the first 3 that I can now sit back, make a Margarita and feel good about things.
The dumb thing I did was to add the channels to the front panels rather than the rear so now I can't cut the driver holes until the caulk sets. Dumb Cal. Aside from that this has gone so much faster than the first 3 that I can now sit back, make a Margarita and feel good about things.
Attachments
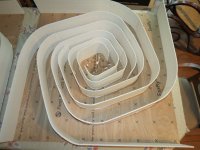
Yesterday was raining so I kicked off early and headed to Home Depot. Bought the Sure-Ply after discovering that beautiful veneered stuff is now what you see in the pics. Got layout done, made a jig (quick to make, easy to use, why didn't I do this before?) and cut the pieces, scored the first few at the bend points and went to bed.
Great looking ply! Almost makes me feeling bad about using mdf
I also tought about making a jig but haven't gotten around to making one yet. How does yours work? You put the foam up against the wooden fence? Do you have a spacer to get the ruler in the same position?How does yours work? You put the foam up against the wooden fence? Do you have a spacer to get the ruler in the same position?
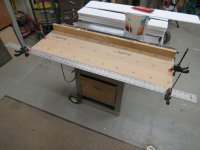
Yes the foam goes up against the small fence on the bottom and then the whole thing goes against the table saw fence to allow me to push on the foam and keep it tight.
Yes use a spacer as a gauge and alway use the first piece as a template for comparison. Remember to flip the pieces around to ensure the guides haven't slipped.
Cal I showed the wife your pics and was told no!
Easier to say sorry than to ask permission. These things do seem huge. That was my wife's comment. " I thought you were making another pair like the first ones." hehe Yes honey, only 9" bigger.
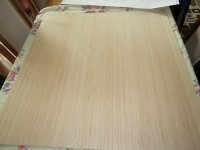
Not sure I'm going to finish these like the first pair. The veneer is something that doesn't really turn me on. The reason I bought it is because the same thing in 1/4" G1S plywood cost $7 more per 4x4 sheet. Go figure.
Yes the foam goes up against the small fence on the bottom and then the whole thing goes against the table saw fence to allow me to push on the foam and keep it tight.
Yes use a spacer as a gauge and alway use the first piece as a template for comparison. Remember to flip the pieces around to ensure the guides haven't slipped.
Ahh, you have a table saw! I expected you made a jig for the knife cuts. That's one of the things still on my powertool wish list, but i dont expect to get one soon....
What kind of caulk are you using, silicone?
- Home
- Loudspeakers
- Full Range
- Ever think of building a Cornu Spiral horn? Now you can!