Hi again, i now measured my design and it cannot fit the Tang Band driver 4". Is it possible that i instead use a 3" driver. Maybe this one Tang Band W3-1878 3" Full Range Driver | 264-902. My design can fit an 8cm cutout speaker. My design is 57cm*57cm
Thanks again
Thanks again
I don't know if i am using the right plan. I attached a picture of the plan i am using and on that plan there is only 1.5 cm from wall to wall in the throats. Am i scaling it down wrong or am i using the wrong plan? Thanks
This one should work.
http://www.diyaudio.com/forums/attachments/full-range/317685d1355524743-ever-think-building-cornu-spiral-horn-now-you-can-cornu_orj.pdf
Great to see this thread still going, I haven't looked at it until now (it was back around post #350 when I last checked in).
Ages and ages ago I modeled the ideal cornu speaker cabinets in cad with an idea for 3d printing as it offers rigidity, less than 1mm precision, perfect curves etc.
I'll talk you through the photo's.
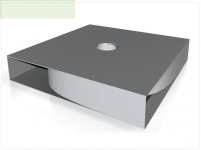
Cornu 1 is the 508mm (20") variant as a complete full unit.
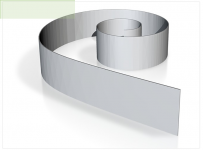
Cornu 2 is one of the two long "ribs" with a view to using your own front and back. (Of course I modeled the short rib too).
Cornu 3 is the only way the 27" version is small enough to print, split it into 4 sections, this shows one on the sections.
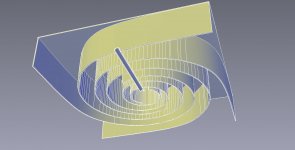
Cornu 4 is an underside unrendered shot showing a cable void.
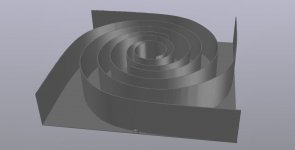
Cornu 5 is an above rendered shot (the cable void is clearly visible)
Wall thickness is a couple of mm, rigid due to structural form and workable enough but delicate.
The individual fins etc are of course rigid so there's no holding any foam in place but after obtaining printing prices they are incredibly expensive (eye-watering) so, in tribute to my newly kindled interest in this type of enclosure (I forgot about it, simple as), I'm off to buy some foam and glue!
Best
Nathan
PS Ignore the faceted edges etc, it's not my best cad work by any stretch, it was a knock up I did in my spare time.
Ages and ages ago I modeled the ideal cornu speaker cabinets in cad with an idea for 3d printing as it offers rigidity, less than 1mm precision, perfect curves etc.
I'll talk you through the photo's.
Cornu 1 is the 508mm (20") variant as a complete full unit.
Cornu 2 is one of the two long "ribs" with a view to using your own front and back. (Of course I modeled the short rib too).
Cornu 3 is the only way the 27" version is small enough to print, split it into 4 sections, this shows one on the sections.
Cornu 4 is an underside unrendered shot showing a cable void.
Cornu 5 is an above rendered shot (the cable void is clearly visible)
Wall thickness is a couple of mm, rigid due to structural form and workable enough but delicate.
The individual fins etc are of course rigid so there's no holding any foam in place but after obtaining printing prices they are incredibly expensive (eye-watering) so, in tribute to my newly kindled interest in this type of enclosure (I forgot about it, simple as), I'm off to buy some foam and glue!
Best
Nathan
PS Ignore the faceted edges etc, it's not my best cad work by any stretch, it was a knock up I did in my spare time.
Attachments

Last edited:
To be honest they look just like the foam when you score it and round it over.PS Ignore the faceted edges etc,
")
Atta boy!I'm off to buy some foam and glue!
Nah, the foam looks better
Well, I'm armed with:
Logitech Z150 speakers
2x A2 foam panels @ 5mm thick
2x A3 foam panels @ 3mm thick
1x scalpel set
1x 115ml Gorilla Glue
1x printout.
I'll post pics of the job start to finish when I get it done. Anything I should def know in advance please feel free to warn me. I've read the threads but, well, it's a lot to take in I must admit.
Onwards and sidewards.
Best
Nath
If you've read through, then we have all added our bits to the mix so you should have the best job, first time round.
Take the time to practice on spare pieces. Let your glue gun warm 15 minutes. Score some strips of foam and try and pre-curve them so you aren't stressing it when you go to glue. Find out how long you have to work with the glue bead once it is laid. Find out how long of a bead to lay and how much you can hold in place while it's drying. It's not rocket surgery or brain science but it helps to feel confident before proceeding.
Remember, all the foam core eyes are upon you.
Don't disappoint us.
I've just started work on my first pair this week, and I'd ran out of hot-melt glue with a previous attempt.
Still, I'm using Liquid Nails, and being patient with weights and boards holding the spirals down while the glue sets. It does take a while to become tacky, so re-positioning before a final 'clamp' is quite easy.
I also found that 'scoring' the strips of foam on my bandsaw allowed me to bend the foam more easily than with a knife - presumably because the saw is wider than the knife blade, and removes material too.
The spirals of the first one are nearly done, so maybe I'll have it running tomorrow! I'll dig out some stuffing too, as I think I remember xrk971 saying that a certain amount of the horn paths needed to be filled...
Tsk tsk.
I've just started work on my first pair this week, and I'd ran out of hot-melt glue with a previous attempt.

Is this for the first side or the second?Still, I'm using Liquid Nails, and being patient with weights and boards holding the spirals down while the glue sets. It does take a while to become tacky, so re-positioning before a final 'clamp' is quite easy.
Umm... X, you have anything to say about this?I also found that 'scoring' the strips of foam on my bandsaw allowed me to bend the foam more easily than with a knife - presumably because the saw is wider than the knife blade, and removes material too.
That is very dependant on the environment.The spirals of the first one are nearly done, so maybe I'll have it running tomorrow! I'll dig out some stuffing too, as I think I remember xrk971 saying that a certain amount of the horn paths needed to be filled...
It sounds like he is using liquid nails on the first side - which sounds like a complicated and difficult endeavor. The instant hardening of the hot melt glue is the key to making this work and function as it allows simple finger clamping for 30 seconds per section.
I can't see how you would score the foam with a bandsaw - it would make it too bendy and reduce structural integrity as too much material would be missing. Unless the foam is very thick or stiff - not the soft thin $1 per sheet stuff we use.
But, if this works - that is fine as we are all learning new ways all the time.
One trick I learned is to use the hot melt like caulk or body filler putty. For uneven channel depths apply a thin bead of hot melt to build up the channel height. The. When final glue is applied the seal will be better. Applying a bead of hot melt along a joint corner like sealing caulking works well too. Then use either the back of your finger (nail part) or a wetted finger tip and quickly rub the hot melt bead to smooth it to a nice fillet that seals the corner joint. It can look really smooth and clean.
Finally another tip on the final side panel glueing operation. I use a combination of hot melt and PVA - the hot melt in critical shorter sections like near the throat and chamber where a seal must be solid and leak free. PVA is used in sections along the periphery where it is less critical. And spots of bare foam along the PVA sections where a bead of hot melt is used to act as a tack or clamp to secure the foam while the PVA dries.
Thanks for your responses! I'm more used to this approach with gluing, as I've had to employ that method with building Bill Fitzmaurice's speaker designs. All of the horn designs of his I have use a folded horn design that looks like a single spiral, so getting things right before gluing the final side on is quite critical - and taking that deep breath before gluing that side on is always needed!
To smooth out the glue around areas where gaps appear (usually to a poorly-cut piece of foam) between the channel and the wood side panel (I'm gluing the pieces to the back panel first), I'll use an old credit card to scrape the excess glue into those gaps, and tidy up where I can.
Thanks for the tips! It sounds that, like with the Bill Fitzmaurice designs, to put 'too much' glue on the edges of the spirals before gluing the front panel to it. xrk, I'll try to find that thread and reference it here where you discuss using filler with the design for the Aurasound NS3-194 speakers...
http://www.diyaudio.com/forums/full-range/242645-help-newbie-aurasound-speakers.html#post3635247
That sounds quite straight-forward! Cal, how much do you think that would differ? I'm not quite sure which room(s) these will end up in, so I suppose I will have to compromise somewhat for this first pair.
As for the foam core board I'm using, it's 3/16" thick, and pretty much the only stuff we could find at a local craft shop (Michaels). The blade on my bandsaw is fairly old, so cutting the slots is quite easy, and not quite as dangerous as unwieldy as it could sound
To smooth out the glue around areas where gaps appear (usually to a poorly-cut piece of foam) between the channel and the wood side panel (I'm gluing the pieces to the back panel first), I'll use an old credit card to scrape the excess glue into those gaps, and tidy up where I can.
Thanks for the tips! It sounds that, like with the Bill Fitzmaurice designs, to put 'too much' glue on the edges of the spirals before gluing the front panel to it. xrk, I'll try to find that thread and reference it here where you discuss using filler with the design for the Aurasound NS3-194 speakers...
http://www.diyaudio.com/forums/full-range/242645-help-newbie-aurasound-speakers.html#post3635247
I just ran a simulation of these drivers in 20 in x 2.5 in deep Cornu mounted at 45 in above the floor. Use moderate stuffing in driver chamber and 40% of the segment leading from the driver chamber to the split in the paths.
That sounds quite straight-forward! Cal, how much do you think that would differ? I'm not quite sure which room(s) these will end up in, so I suppose I will have to compromise somewhat for this first pair.
As for the foam core board I'm using, it's 3/16" thick, and pretty much the only stuff we could find at a local craft shop (Michaels). The blade on my bandsaw is fairly old, so cutting the slots is quite easy, and not quite as dangerous as unwieldy as it could sound
what about the Alpair?
Markaudio Alpair-7A ??
Fostex FE108EZ ??
Do people have experience with these in a cornu?
At the moment I have a pair of Fostex FE126E, which might be fine.
(Cornus are not fully built yet, so I can't test the options.)
With the required break in period, it does not seem that testing multiple drivers is very practical to attempt - could take weeks.
Colin
- Home
- Loudspeakers
- Full Range
- Ever think of building a Cornu Spiral horn? Now you can!