Carlp,
Welcome to the world of foam core!") Thanks for sharing and giving us the great feedback with the problems issues you are running into. You are very correct to notice that cabinet resonances can be a problem. I am not sure if you are using internal bracing, but I try not to have any span of foam that stretches more than 5 inches without an internal brace or strut. Having the bracing really cuts down on resonances and flexing of the walls which would reduce efficiency. There is definitely vibrations and hence, sound that passes thru the foam walls. That is to be expected as the 3/16 in walls are rather transparent to sound. Bcmbob is correct in noting that the Cornu is unique in having very small spans with built in bracing so that it is very stiff. Squarish or rectilinear type boxes need lots of bracing. If you look at the photos of my Fh3-inspired horn, or my box shaped back loaded horn, or the flat panel speaker I built, they have numerous braces and struts. If you want it super stiff, a span 3 inches is a good number to keep with bracing as a minimum.
Thanks for sharing and giving us the great feedback with the problems issues you are running into. You are very correct to notice that cabinet resonances can be a problem. I am not sure if you are using internal bracing, but I try not to have any span of foam that stretches more than 5 inches without an internal brace or strut. Having the bracing really cuts down on resonances and flexing of the walls which would reduce efficiency. There is definitely vibrations and hence, sound that passes thru the foam walls. That is to be expected as the 3/16 in walls are rather transparent to sound. Bcmbob is correct in noting that the Cornu is unique in having very small spans with built in bracing so that it is very stiff. Squarish or rectilinear type boxes need lots of bracing. If you look at the photos of my Fh3-inspired horn, or my box shaped back loaded horn, or the flat panel speaker I built, they have numerous braces and struts. If you want it super stiff, a span 3 inches is a good number to keep with bracing as a minimum.
The problem of hot melt with long stretches is absolutely correct! This can be solved for linear joints (edges where there is only a single line of glue at any given time) by working in sections of about 8 to 10 in at a time. Glue the first section, let harden, flex the panel to expose where glue is applied next, then let panel bend back and apply hand pressure until hard. To achieve airtight seals, use the hot melt glue like a caulk gun and apply a bead to the corner of the joint after the initial end-joint hardens. Use the backside of your finger (not skin pad) but finger nail to smooth the still soft and hot glue into a nice fillet joint. Be careful not to burn yourself, helps to dip finger in water first. If you do this, there should not be any issues with an airtight seal.
When gluing panels that cap off or seal a volume, i,e., a lid or last side wall you may have noticed that we use pva glue, gorilla glue, acrylic caulk, etc. Something with gap filling ability and a slower setting time. I have been able to glue cap panels with hot melt glue by segmenting the lid or final piece into multiple smaller pieces and gluing one at a time. You end up with a quilt like panel, which if on the exposed side may not be too attractive. However, if you plan on covering it with a decorative finish surface like wallpaper, hand made paper panels, or even a fresh single piece of foam core tacked on with spots of hot glue, it is not a problem. So yes, anything more than an 8 to 12 in linear stretch of hot melt, is best left to other glues.
You mentioned that you may have had some issues with warped foam that is not flat. Yes, that would pose a problem as you have to apply pressure to flatten the warped section while the glue hardens. The foam core panels from the dollar store have a nice property of being very flat. If anything else, you can count on them being flat so that has helped a lot.
Good idea about contact cement, but it has problems with being a solvent to the foam. Would work well for bonding the paper faced portions together though.
Anyhow, thanks again for sharing. We would love to see photos of your project. Please post pics if possible.
Welcome to the world of foam core!
Thanks for sharing and giving us the great feedback with the problems issues you are running into. You are very correct to notice that cabinet resonances can be a problem. I am not sure if you are using internal bracing, but I try not to have any span of foam that stretches more than 5 inches without an internal brace or strut. Having the bracing really cuts down on resonances and flexing of the walls which would reduce efficiency. There is definitely vibrations and hence, sound that passes thru the foam walls. That is to be expected as the 3/16 in walls are rather transparent to sound. Bcmbob is correct in noting that the Cornu is unique in having very small spans with built in bracing so that it is very stiff. Squarish or rectilinear type boxes need lots of bracing. If you look at the photos of my Fh3-inspired horn, or my box shaped back loaded horn, or the flat panel speaker I built, they have numerous braces and struts. If you want it super stiff, a span 3 inches is a good number to keep with bracing as a minimum.The problem of hot melt with long stretches is absolutely correct! This can be solved for linear joints (edges where there is only a single line of glue at any given time) by working in sections of about 8 to 10 in at a time. Glue the first section, let harden, flex the panel to expose where glue is applied next, then let panel bend back and apply hand pressure until hard. To achieve airtight seals, use the hot melt glue like a caulk gun and apply a bead to the corner of the joint after the initial end-joint hardens. Use the backside of your finger (not skin pad) but finger nail to smooth the still soft and hot glue into a nice fillet joint. Be careful not to burn yourself, helps to dip finger in water first. If you do this, there should not be any issues with an airtight seal.
When gluing panels that cap off or seal a volume, i,e., a lid or last side wall you may have noticed that we use pva glue, gorilla glue, acrylic caulk, etc. Something with gap filling ability and a slower setting time. I have been able to glue cap panels with hot melt glue by segmenting the lid or final piece into multiple smaller pieces and gluing one at a time. You end up with a quilt like panel, which if on the exposed side may not be too attractive. However, if you plan on covering it with a decorative finish surface like wallpaper, hand made paper panels, or even a fresh single piece of foam core tacked on with spots of hot glue, it is not a problem. So yes, anything more than an 8 to 12 in linear stretch of hot melt, is best left to other glues.
You mentioned that you may have had some issues with warped foam that is not flat. Yes, that would pose a problem as you have to apply pressure to flatten the warped section while the glue hardens. The foam core panels from the dollar store have a nice property of being very flat. If anything else, you can count on them being flat so that has helped a lot.
Good idea about contact cement, but it has problems with being a solvent to the foam. Would work well for bonding the paper faced portions together though.
Anyhow, thanks again for sharing. We would love to see photos of your project. Please post pics if possible.
Very interesting (and long thread). I have been incognito for a while and neglecting my mini-console project. I am ready to restart and should finish the electronics in the next few months and will need to start on the speakers.
I will be going with separate speakers (but matching the main console in style and material) and this thread gave me the idea to prototype in foam. If I like the results I may just make a wood shell out of thin plywood like Lauan and wedge the foam speaker enclosure in with wood blocks screwed to the outer skin. This should help damp any high frequency resonances in the foam enclosure.
The design I have in mind has small Mark Audio full ranges in a sealed sub enclosure facing forward (for 100Hz and above) with an 8" side firing helper woofer with TL exiting either on the bottom or out the back. Foam seems ideal as the the stepwise tapering TL will make for a rigid structure even from foam and the foam should help absorb some of the high frequency backwave.
Hmmm...
mike
 of any 'source' but the driver
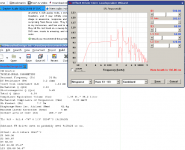
I did use bracing, but only pieces 10" or so long x 2" wide, glued flat, across the front baffle. May add some to the back panel later.Carlp,
Welcome to the world of foam core!
Good suggestion. I did try this at one spot but as I glued one place, the other came undone. I'll try again with better glue joints.The problem of hot melt with long stretches is absolutely correct! This can be solved for linear joints (edges where there is only a single line of glue at any given time) by working in sections of about 8 to 10 in at a time.
I simply used painter's caulk to caulk the joints. Dries in 30 mins or so. All joints caulked except the bottom.To achieve airtight seals, use the hot melt glue like a caulk gun and apply a bead to the corner of the joint after the initial end-joint hardens.
I'll have to try gorilla glue, as I've used it to "fill" bad wooden joints in the past too. Segmenting sounds interesting. Do you have a photo?When gluing panels that cap off or seal a volume, i,e., a lid or last side wall you may have noticed that we use pva glue, gorilla glue, acrylic caulk, etc. Something with gap filling ability and a slower setting time. I have been able to glue cap panels with hot melt glue by segmenting the lid or final piece into multiple smaller pieces and gluing one at a time. You end up with a quilt like panel, which if on the exposed side may not be too attractive.
Yep. Mine was from a posterboard display from a conference 5 years ago or so, and was stored in my barn. It eventually warped - that happens with foam core, and suggests warping might also happen with completed speakers, though with reinforcement might not be a problem.You mentioned that you may have had some issues with warped foam that is not flat.
Yes, as I wrote, it DID dissolve the foam a bit, but that might have strengthened the joint by adding to the adhesive property. Time will tell... Again, some clamping pressure allowed the glue to bond even where the foam had receded from the cut edge, but that meant the panel wasn't quite as big as I had cut it.Good idea about contact cement, but it has problems with being a solvent to the foam. Would work well for bonding the paper faced portions together though.
Anyhow, thanks again for sharing. We would love to see photos of your project. Please post pics if possible.
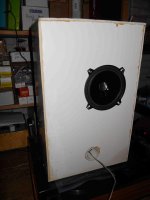
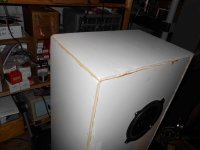
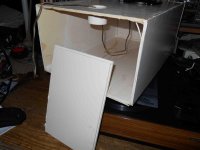
See below for photos. Note that for the bottom panel, I glued to pieces together, one cut to the opening size, and one to the finished outside dimensions, so that the bottom fits into the box yet closes it off. I haven't sealed this joint yet, but rather left it a press-fit. Let's me monkey around inside for a while. Port is just some PVC plumbing pipe, glued in with contact cement.
Attachments
Carlp,
Thanks for the photos - that box ought to get some deep bass. You really need some perpendicular bracing to reduce the "breathing" mode of vibration, plus it makes the walls more resistant to collapse or buckling if you ever apply pressure to them during handling. It needs to connect the front to back wall - hot melt it in place. And side walls together. Make sure you use some damping material like fiber glass or polyfill stuffing inside. I like how you did the lip joint on the bottom panel. Once you glue that in place and make a seal, the bass will really kick in.
See post #361 for example of segmenting the last piece (or lid) so that hot melt can be used for the whole project.
http://www.diyaudio.com/forums/full-range/223313-foam-core-board-speaker-enclosures-37.html#post3269174
Last edited:
Cardboard Box Bookshelf MLTL
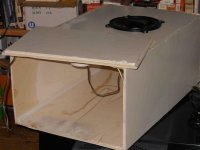
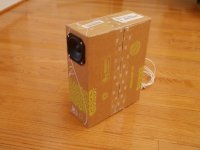
OK, I know this is the "Foam Core" thread... but I ran across some really high quality cardboard boxes that just felt so stiff and had great crisp lines and corners in about the right size for a bookshelf speaker so I had to try it. I figured that the box was basically built already and it would require minimal work to turn into a speaker - what did I have to lose?
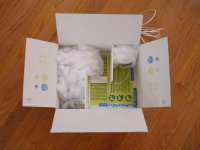
Anyhow, this is one of those internal box within a box that they ship books in. It had dimensions of 13 in tall x 4 in wide x 10 in deep. At first I thought I would do a simple BR so I plugged in the volume (about 8.5 liters) into WinISD and set the tuning freq to 70 Hz for a nice balanced response with the TC9FD's. I used a toilet tissue paper tube (1.75 in dia) as the vent so WinISD calculated 3 in long vent. I started to build the speaker which really required nothing more than sealing the box with hot melt glue and cutting holes for the driver and vent. Then I got to thinking... 10 in deep, if I add two foam core dividers, I can get an internal path length of 30 in. At this point, the vent had already been cut and glued in so I had to live with whatever it was. I figured that at worst it will behave like a BR box and if the internal channels do their job, it will pull it lower like a MLTL. The internal cross sectional area was 4.0 x 4.33 in - a little on small side for a 3.5 in driver but like I said, I have nothing to lose.
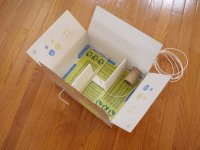
You can see the photo of how I laid out the divider and where the vent is. I added wiring and some pillow stuffing. in the first 40% of the line and some at the end around the vent tube. I sealed it up with hot melt, installed the drivers with just drywall screws into the cardboard no reinforcement wood because I did not want to waste time in case it did not sound good.
I hooked it up to the amp, put in my usual test CD tracks, and...
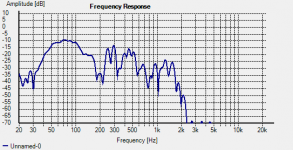
Wow, this thing sounds surprisingly good! I mean the bass reaches down pretty deep. I set the two speakers up on some stools to get them to ear height, sat about 8 feet away and closed my eyes and listened. I was listening to Dave Brubeck's "Ode to a Cowboy" and wow, was it good! I can hear the nice deep notes on the bass, make out where the drum kit is, just very enjoyable, To confirm my suspicion that there was deep bass, I put a mic to the vent tube with Holmimpulse and sure enough, this little box was pumping out sound down to 50 Hz. There is some higher freq peaks leaking through but I am not sure if that is just the sound from the front getting around. Anyhow, very cool.
OK, I know this is the "Foam Core" thread... but I ran across some really high quality cardboard boxes that just felt so stiff and had great crisp lines and corners in about the right size for a bookshelf speaker so I had to try it. I figured that the box was basically built already and it would require minimal work to turn into a speaker - what did I have to lose?
Anyhow, this is one of those internal box within a box that they ship books in. It had dimensions of 13 in tall x 4 in wide x 10 in deep. At first I thought I would do a simple BR so I plugged in the volume (about 8.5 liters) into WinISD and set the tuning freq to 70 Hz for a nice balanced response with the TC9FD's. I used a toilet tissue paper tube (1.75 in dia) as the vent so WinISD calculated 3 in long vent. I started to build the speaker which really required nothing more than sealing the box with hot melt glue and cutting holes for the driver and vent. Then I got to thinking... 10 in deep, if I add two foam core dividers, I can get an internal path length of 30 in. At this point, the vent had already been cut and glued in so I had to live with whatever it was. I figured that at worst it will behave like a BR box and if the internal channels do their job, it will pull it lower like a MLTL. The internal cross sectional area was 4.0 x 4.33 in - a little on small side for a 3.5 in driver but like I said, I have nothing to lose.
You can see the photo of how I laid out the divider and where the vent is. I added wiring and some pillow stuffing. in the first 40% of the line and some at the end around the vent tube. I sealed it up with hot melt, installed the drivers with just drywall screws into the cardboard no reinforcement wood because I did not want to waste time in case it did not sound good.
I hooked it up to the amp, put in my usual test CD tracks, and...
Wow, this thing sounds surprisingly good! I mean the bass reaches down pretty deep. I set the two speakers up on some stools to get them to ear height, sat about 8 feet away and closed my eyes and listened. I was listening to Dave Brubeck's "Ode to a Cowboy" and wow, was it good! I can hear the nice deep notes on the bass, make out where the drum kit is, just very enjoyable, To confirm my suspicion that there was deep bass, I put a mic to the vent tube with Holmimpulse and sure enough, this little box was pumping out sound down to 50 Hz. There is some higher freq peaks leaking through but I am not sure if that is just the sound from the front getting around. Anyhow, very cool.
Attachments
Man, XRK, I can't keep up with you. Nice work.
Thanks!
This was the fastest project I have ever done that produced a surprisingly good sound. (less than 2 hrs). And I didn't even have to crack open my dwindling supply of foam core boards.
I was looking a little closer at the dimensions of this cardboard bookshelf MLTL and it is almost matches the TABAQ which is probably why it works so well. Purely by accident though. The TABAQ has a 20 sq in cross section, I have 17.3 sq in. The TABAQ has a 30 in length not including the vent, same as mine. The TABAQ has a vent cross section of 2.4 sq in, I have 2.5 sq in with the 1.75 in dia tube. The TABAQ has a 3.8 in long vent, mine is 3 in long and inverted inside main body which probably has equivalent length that is slightly longer. The main difference is that I have my driver at the closed end whereas TABAQ is at 1/3 from closed end.
You can start a cardboard thread if you want. Not sure if it is that much different than foam core.
It has interesting options in that cardboard is free and can be huge when you get a large shipment container. I find using foam core bracing or ribbing in cardboard works really well as the cardboard is not very good in axial compression like foam. Maybe hybrid like how I made the bookshelf MLTL. In which case it contains some foam and qualifies to stay in this thread.
It has interesting options in that cardboard is free and can be huge when you get a large shipment container. I find using foam core bracing or ribbing in cardboard works really well as the cardboard is not very good in axial compression like foam. Maybe hybrid like how I made the bookshelf MLTL. In which case it contains some foam and qualifies to stay in this thread.
Specimen Petal Horn Speaker - Foam Core is Perfect for This!
I ran across these Specimen back loaded horn speakers that resemble the old style gramophones player horns. They make them out of recycled newspaper and glue mixed with dryer lint for a matrix. Instead of newspaper foam core is perfect for this, and instead of glue and lint, hot melt.

This looks very interesting and would be a unique conversation piece more than anything. The bent shape of the 8 petals is critical to making the horn bend forward like that.
This may be one of my next projects. Has anyone here listened to one of these in person? They are in Chicago area. Alright, who's in on this one with me? We need to develop those patterns. You can see the one photo where they are hung out like laundry. There are 4 unique shapes.
Specimen's Hand-Crafted Horn Speakers Are Made from Recycled Newsprint and Dryer Lint | Inhabitat - Sustainable Design Innovation, Eco Architecture, Green Building
I ran across these Specimen back loaded horn speakers that resemble the old style gramophones player horns. They make them out of recycled newspaper and glue mixed with dryer lint for a matrix. Instead of newspaper foam core is perfect for this, and instead of glue and lint, hot melt.
This looks very interesting and would be a unique conversation piece more than anything. The bent shape of the 8 petals is critical to making the horn bend forward like that.
This may be one of my next projects. Has anyone here listened to one of these in person? They are in Chicago area. Alright, who's in on this one with me? We need to develop those patterns. You can see the one photo where they are hung out like laundry. There are 4 unique shapes.
Specimen's Hand-Crafted Horn Speakers Are Made from Recycled Newsprint and Dryer Lint | Inhabitat - Sustainable Design Innovation, Eco Architecture, Green Building
Last edited:
Flatter is Better (FIB)
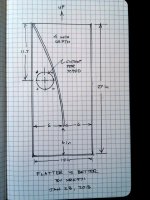
After some discussions on the BIB thread, I think I will try building the BIB but flattened so that it can be wall mounted. The wall and ceiling will provide even more boundary loading for the horn mouth. I will make the internal diagonal divider curved to accommodate the driver, and actually it should make the horn work even better. Below is the plan.
After some discussions on the BIB thread, I think I will try building the BIB but flattened so that it can be wall mounted. The wall and ceiling will provide even more boundary loading for the horn mouth. I will make the internal diagonal divider curved to accommodate the driver, and actually it should make the horn work even better. Below is the plan.
Attachments
After some discussions on the BIB thread, I think I will try building the BIB but flattened so that it can be wall mounted. The wall and ceiling will provide even more boundary loading for the horn mouth. I will make the internal diagonal divider curved to accommodate the driver, and actually it should make the horn work even better. Below is the plan.
Mmmm, you got me thinking about an in wall FIB with a 4" driver. Would that work? Approx. 48"x18"x3.5"
My kind of build!After some discussions on the BIB thread, I think I will try building the BIB but flattened so that it can be wall mounted. The wall and ceiling will provide even more boundary loading for the horn mouth. I will make the internal diagonal divider curved to accommodate the driver, and actually it should make the horn work even better. Below is the plan.
Foamcore's pretty decent over small areas with enough thickness. One thing it can't do properly without all kinds of awkward bracing is a Karlson aperture.
Even double-thick they move more than the driver's cone - I was not expecting much here to start with though. This is only a very rough test-box, so that's OK.
IG
An externally hosted image should be here but it was not working when we last tested it.
Even double-thick they move more than the driver's cone - I was not expecting much here to start with though. This is only a very rough test-box, so that's OK.
IG
- Home
- Loudspeakers
- Full Range
- Foam Core Board Speaker Enclosures?