You will be fine, from the photos I can see that it looks like you sealed it well. The transitions between the different lengths look very good too. I see that the sawblades left some jaggedness on the edges of the channels but that won't matter as the glue seals it up. The X-acto does a good job in this area, albeit much more time consuming. I can't wait to see what you do next. I guess you need to drill holes where the speaker bolts will come through and also on the 4 corners?
For the speaker wire routing, I cut small holes (sealed with hot melt glue) along the channels and routed the wire straight down to where it exits at the midpoint of an edge - I have flying leads (12 ft) coming from the speakers rather than terminal lugs - cleaner this way for wall mount. I am using some leftover 4-conductor security alarm wiring which is good because it has a white sheath and is super low profile (I doubled up the 22 AWG wires which should be good for 2 amps or 24 watts with my 12 volt TA2020A+ amp, I think I rarely would use more than 5 W). For your drivers, you will of course need thicker real wires if you want to push 100 W into them.
For hanging the speaker, I used two screw-eye hooks on the back with stranded steel picture frame wire to hang it like a picture frame. This allows the speaker to slightly tilt down (for good imaging from a slightly above ear-level placement) when being hung and keeps the flat back off the wall. If mounted flat, I fear it would rattle when bass notes hit. I use some stick-on felt pads (feet) along the bottom edge of the speaker where it touches the wall. This way, you reduce rattle/buzzing from vibration-induced contact between the wall and the back of the speaker.
One other thing, stuffing: I used some old polyester stuffing from a pillow inside the main speaker cavity (pretty densely packed) to absorb the high frequencies and to smooth out the frequency peaks. I also put light stuffing into the first 4 or 6 inches of the entrance of the channels to absorb any back reflections and further reduce the high frequency output. You can of course play with this and adjust to taste. I don't think the original Cornu used any stuffing at all.
Last edited:
Changed my mind on the drivers. I think I will use the Fostex FF125WK that have received the full treatment by planet10. That way I don't have to figure how to fit a tweeter. They also have decent sensitivity.
http://www.madisoundspeakerstore.com/approx-5-fullrange/fostex-ff125wk-5-full-range/
http://www.madisoundspeakerstore.com/approx-5-fullrange/fostex-ff125wk-5-full-range/
Changed my mind on the drivers. I think I will use the Fostex FF125WK that have received the full treatment by planet10. That way I don't have to figure how to fit a tweeter. They also have decent sensitivity.
The Madisound Speaker Store
Cal,
I agree with the waiting to listen before extra hardware, but it is imperative that these be hung on walls to do them justice for a first listen as the walls are integral to the design and serve as an extension of the horn mouth and make a big difference with the bass because of the floor+ceiling reinforcement. I was the same way and listened to them prior to wall mounting and it was good but not blow your mind good.
I was wondering what the frequency response was for your original drivers on the high end - you mean they are not "full range"? How did you select the Fostex FF125WK? It looks very nice and should work well - problem is now we have to wait to hear what it sounds like if you still have to order them
 . You should be OK with the piston area with regards to the channel entrance throat area at around 1.1 inch and 4.5 inch depth on channels.
 Good luck with the rest of the build!
Regards,
xrk971
Last edited:
Yes, I have been aware of this cabinet for a long time. You are the first person that has led me down the path to building them because of the suggested materials. I will place them on stands against the wall.Cal,
but it is imperative that these be hung on walls
Correct, they are a mid woofer with a good top end. The VWR stands for very wide range. Unfortunately at my age I would need a tweeter and I wasn't sure how to incorporate it.I was wondering what the frequency response was for your original drivers on the high end - you mean they are not "full range"?
No waiting, I have lots of drivers. Have a look at link in my sig line, I am a speakerholic. This one went to the front of the line because you made it easy enough to build.How did you select the Fostex FF125WK? It looks very nice and should work well - problem is now we have to wait to hear what it sounds like if you still have to order them
I looked at your stuff in sig line. Oh my, you do have a problem... I feel for the Speaker Widow  , or should I say, Speakerabler since you are the Speakerholic? I like the Pentagon, how does that sound? Must be great for parties.
Good thing is we don't have to wait to hear since you have drivers on hand.
, or should I say, Speakerabler since you are the Speakerholic? I like the Pentagon, how does that sound? Must be great for parties.Good thing is we don't have to wait to hear since you have drivers on hand.
Second spiral done.
I've been thinking of the rough edge on the foam. It was easy to deal with it with the hot glue but not so easy when add the fronts so I have an experiment I am trying. I am gluing the top edge with yellow glue then adding a thin strip of regular writing paper over that to act as a surface tensioner to hold the glue. Then I turn the whole thing over on a flat surface and weight it. I am hoping this will give me a flat surface to glue to. I am trying the same experiment with masking tape in place of paper. I realize this sets me back a day but what the heck, a week ago I wasn't going to be doing a build until the new year so...
I've been thinking of the rough edge on the foam. It was easy to deal with it with the hot glue but not so easy when add the fronts so I have an experiment I am trying. I am gluing the top edge with yellow glue then adding a thin strip of regular writing paper over that to act as a surface tensioner to hold the glue. Then I turn the whole thing over on a flat surface and weight it. I am hoping this will give me a flat surface to glue to. I am trying the same experiment with masking tape in place of paper. I realize this sets me back a day but what the heck, a week ago I wasn't going to be doing a build until the new year so...
Attachments

Its annoying me that i cant post pics but im very much enjoying watching u guys progress nicely. I havent sealed my lid yet coz i wan to put an amp inside but so far im not happy with the response down low. Its a pretty steep cutoff bass wise. I pretty much haelve to eq 100hz right out to get it sounding like it has anything below that.
Now in saying this what im aiming for seems to be breaking the rule of speakers. Its small and loud. If i want bass it wont be loud... And ive proven this today...
Now in saying this what im aiming for seems to be breaking the rule of speakers. Its small and loud. If i want bass it wont be loud... And ive proven this today...
Its annoying me that i cant post pics but im very much enjoying watching u guys progress nicely. I havent sealed my lid yet coz i wan to put an amp inside but so far im not happy with the response down low. Its a pretty steep cutoff bass wise. I pretty much haelve to eq 100hz right out to get it sounding like it has anything below that.
Now in saying this what im aiming for seems to be breaking the rule of speakers. Its small and loud. If i want bass it wont be loud... And ive proven this today...
Describe in words what your box is, dimensions, placement of drivers, location of terminus, etc. Stuffing 4 drivers in same box may be the biggest problem, you may be getting phase cancellation issues. Some browsers upload pics better than others. Chrome on Android doesn't work, but Firefox does. Make sure you use advanced post reply and not quick reply.
Second spiral done.
I've been thinking of the rough edge on the foam. It was easy to deal with it with the hot glue but not so easy when add the fronts so I have an experiment I am trying. I am gluing the top edge with yellow glue then adding a thin strip of regular writing paper over that to act as a surface tensioner to hold the glue. Then I turn the whole thing over on a flat surface and weight it. I am hoping this will give me a flat surface to glue to. I am trying the same experiment with masking tape in place of paper. I realize this sets me back a day but what the heck, a week ago I wasn't going to be doing a build until the new year so...
Cal,
I forgot to say what a fantastic job you did with regards to accuracy - the design looks spot on. Your idea of reprographics worked out really well. I noticed that you mirrored the geometry for left and right. I actually did the same thing to make sure the sound was balanced coming from periphery. I am not sure if it matters but I am aligning the longer path channels up/down to get the bass enhancement from the ceiling/floor for the deepest bass notes. Great job! Can't wait to see these babies capped off!

Regards,
Xrk971
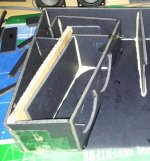
Its not that i cant or dont know how to upload im on very limited cap on my phone. Here is the best pic i have for the moment.
Klampykixx,
Interesting design, glad you were able to get us a picture. Am I correct in assuming that this picture shows 1/2 of the box only with the two drivers loading a pre-chamber that has a channel that leads to the mouth which then goes past the faces of the drivers? You mentioned that you tested it prior to capping it with the lid using glue since you wanted to put the amp inside. Until you glue or seal the channels air-tight, the performance will be very poor - not even close to what it could be. The reason is that the smallest leaks will collapse the establishment of the fundamental standing quarter-wave which is where you get your bass boost from. If your path length is 73 cm, this gives an approximate fundamental tuning frequency of 117 Hz (assuming speed of sound is 342 m/s). If you cap the lid off properly with glue, you should get a good amount of bass at 117 Hz or close to 100 Hz.
A couple of design considerations to think about: (1) what is the effective piston area (Sd) of your two drivers combined and does that area equal the throat area leading from the pre-chamber? You can trim the foam-core board to make this so if it is too small, this will let the horn "breathe" better and increase the bass; (2) make a cutout panel on the side to install the amp and have access to it after the lid is on (inevitably, you will need to access your amp for connections or to debug); (3) Use lots of stuffing in the pre-chamber and some loose stuffing on the snaking channels to absorb the reflections and higher harmonics otherwise you may end up with lots of distortion junk coming from the horn besides the bass; (4) add some bracing in your pre-chamber to keep it from flexing under the pressure of the two-drivers. If you haven't already, download and read MJK's papers on horn theory and back loaded horn design (htpp://www.quarter-wave.com) - very helpful info.
Good luck and keep us posted.
Regards,
Xrk971
I use it at home. So handy to be able to move it around. If I need an all in one for a party, I use the red 'Toolbox'. It has much more gusto.I like the Pentagon, how does that sound? Must be great for parties.
Changed my mind again. While I was counting sheep, I got distracted. I am thinking if lay a bead of glue on the foam, place the baffle over that and then remove, I will have an outline of the glue on the baffle. I can turn that face up, lay a heavy bead right on the baffle and place the spiral face down into it. That way I may end up gap free.So you are building a glue fillet on paper
Thank you, it's been fun.Wow! Nice job Cal.
Thanks for the complement. I've found it really helps to learn from the experience of others and then take the time to see how it all works before getting started. Sometimes this means using up time and materials while you are testing or getting comfortable but it sure cuts down on the oh-uh's. One thing that comes to mind is the kerfing on the inside of the curve. I have done that with wood where you are removing enough material to create a bend but with a knife, I would think you would want the cuts on the outside. Not the case at all. Also using the rounded edge of the kitchen counter to form the curves was really handy. Just like rolling flat stock, a little at a time and after a few passes, you have a nice smooth curve.Cal,
I forgot to say what a fantastic job you did with regards to accuracy - the design looks spot on. Your idea of reprographics worked out really well.
Changed my mind again. While I was counting sheep, I got distracted. I am thinking if lay a bead of glue on the foam, place the baffle over that and then remove, I will have an outline of the glue on the baffle. I can turn that face up, lay a heavy bead right on the baffle and place the spiral face down into it. That way I may end up gap free.
That is a good idea, saves you time too. This got me to thinking why not use some really thick glue to really seal those gaps - would industrial floor board cement from big caulk guns, etc. work (ideal since you are using floorboards for the faces)? What about RTV?
I read somewhere that there is a pre-scored masonite or MDF sheeting that allows bends called 'Bendyboard'. It may work well too but doesn't look so nice with all those slots. Yes, it is counter-intuitive which side to put the cuts on. It would work of course on the other side but you would expose the foam cracks rather than compress the foam where you need it and keep everything tight.
This thread is awesome! Inspiring and interesting.
Please, more photos !
I just noticed the thread got moved to Full Range Speakers - I guess that is more appropriate.
I'm glad you like it, it has been a lot of fun and the encouragement from others has been great. I urge you to try the foam core builds for yourself. They are very easy, quick, clean (no sawdust), and can work satisfyingly well. A great benefit is you can do it on the kitchen table and don't need a workshop full of tools. If you have an X-acto, a ruler, a pencil, hot melt, some cheap foamcore boards, spare drivers lying around, and some imagination, the possibilities are endless. Jump in like Cal did - he is loving it I think. Then post pictures please.
Regards,
xrk971
- Home
- Loudspeakers
- Full Range
- Foam Core Board Speaker Enclosures?