I was absolutely blown away
Congratulations!

That's great to hear but I have to tell you, I'm not the least bit surprised. The only thing holding so many persons back is the build. I have contemplated this for years but this is the first time there is light at the end of the tunnel. You've really encouraged me.
Now, seeing that you have been won over by the cabinet, have you changed your mind about me using the VWR126's from CSS?
Congratulations!
That's great to hear but I have to tell you, I'm not the least bit surprised. The only thing holding so many persons back is the build. I have contemplated this for years but this is the first time there is light at the end of the tunnel. You've really encouraged me.
Now, seeing that you have been won over by the cabinet, have you changed your mind about me using the VWR126's from CSS?
Cal,
Thank you! The VWR126's sound like a nice driver (is there a SPL vs freq chart?) - you have them already so I look forward to hearing your results with your build. They frankly would be too much music for my house given that they have a 6 mm stroke and handle 100W. That would absolutely shake the walls with how efficient the bass is with these cabinets. I am thinking of the Mark Audio CHR70 ( http://www.madisound.com/store/manuals/CHP-70 Gen.2 black Eng.pdf ) - which is more along in keeping in line with the budget philosophy of the foam core cabinets.
The point is to have fun, and I can certainly attest to the fun factor with this build. Given the huge reward in sound quality, it makes the fun all the more worth pursuing.
Regards,
xrk971
The new Jordan wide range driver looks like it would just KILL if mounted in the spiral horn. This thing has a 42 Hz Fs, and 5 mm of linear stroke. This may be bass overkill if using the spiral horns as they have a smooth 24:1 expansion. What other horn is there that is this compact and has this kind of expansion ratio?
Jordan loudspeaker drive units
Jordan loudspeaker drive units
hehe, em's just baby drivers.Cal,
Thank you! The VWR126's sound like a nice driver <snip>That would absolutely shake the walls
I'm glad you recognize that. It seems to have been lost on some.The point is to have fun
What adhesive are you using?
I have a bunch of poly faced foamcore and mean to use it for a project, but am not wholly confident in the adhesives I've tried.
I use standard multi-temp all purpose hot melt glue sticks (the skinny ones). I have noticed that some brands are better than others in terms of how gooey the stringy cobwebs that stretch from the tip to the workpiece when pulling back. All the brands I have used work well for paper-faced foam-core board. You will have to test on the poly-faced stuff - there may be one specific hot melt glue sticks to polymers. For the sealing crevices and final glue of top panel I use ordinary (school grade) Elmer's white glue. I stack books and dumbells (about 70 lbs total) on top of the front panel to clamp in place while the white glue sets. The hot melt is useful for instant tacking and holding the divider channels in place on the back while one hand bends it to the correct curve.
I was absolutely blown away, I mean my jaw dropped, and I have an ear to ear grin
Glad they turned out so great sounding.

I am a display carpenter and I have worked with paper-faced one inch thick Gator Board, and it cuts like butter on a table saw. The paper backing is much thicker than with "regular" foam core.
I am now the proud owner of 25 sheets of paper faced 3/16" 20"X30" foam board. Thanks for the tip on where to get it. Found it at the 3rd Dollar Giant store [soon to be renamed Dollar Tree] I went to. Only $1.25 per board - way cheaper than ordering it online. Restocked my glue sticks [I have the 12mm sized gun] and am ready to start. Now WTF do I do? I'm really gonna need help here. I need to understand the whole process. Your info about the hows and why so far are great but I need to do a layout for the CSS VWR126 and really don't know where to begin. I am thinking 3/8" facer boards and I can do the bolts and sheaths but I guess I need help most with the layout.
I'm really gonna need help here. I need to understand the whole process. Your info about the hows and why so far are great but I need to do a layout for the CSS VWR126 and really don't know where to begin. I am thinking 3/8" facer boards and I can do the bolts and sheaths but I guess I need help most with the layout.I am already thinking what to do next with the spiral horns. I think that the design and shape is what attracts me to them in the first place, and the wonderful sound is just icing on the cake. It is a shame to cover up the beautiful curved channels with a panel that you can't see thru. I think a clear acrylic top cover would be really cool and turn these things into art. I would have to be much more careful with internal construction though as it would all be exposed. Do you guys think that seeing the internals would be an attraction or cover it up? Lowes has 2 ft x 4 ft sheets of 0.080 in thick acrylic for $20. That is enough for the pair. Hmmmmm...
What adhesive are you using?
I always used "Gorilla Glue", and the white variety is faster setting. I moistened the surface with water a little first, applied glue and then clamped together with masking tape. Glue sets in about 15 minutes or so. The stuff expands as it sets up filling in any gaps, so don't over do it with application. Excess easily trims off though with a sharp knife.
I agree, they can be seen as a work of art and a shame to cover up, but...It is a shame to cover up the beautiful curved channels with a panel that you can't see thru. I think a clear acrylic top cover would be really cool and turn these things into art.
It may be better to trace the pattern on the outside of the panel and do some nice artwork to highlight the construction. I am wondering how 'clean' you could actually do it for a 'see through'. If you think you can, all the power to you, that would be ideal, I am just wondering too...hmmm...I would have to be much more careful with internal construction though as it would all be exposed.

I am now the proud owner of 25 sheets of paper faced 3/16" 20"X30" foam board. Thanks for the tip on where to get it. Found it at the 3rd Dollar Giant store [soon to be renamed Dollar Tree] I went to. Only $1.25 per board - way cheaper than ordering it online. Restocked my glue sticks [I have the 12mm sized gun] and am ready to start. Now WTF do I do?
Cal,
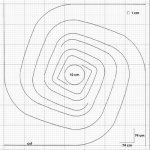
25 sheets! You dah man! To get started, print out the layout that Sebastian did - it is a jpg file with 1 centimeter grid. This design is for a 70 cm square, you need to transcribe his little picture to a 70 cm x 70 cm grid on your own sheet of paper. I literally taped together 9 sheets of letter sized paper and took a yardstick and hand drew a grid on my template. The going square by square transfer the design to your full size sheet of paper. You can copy it exactly as is as you are not shrinking your design to scale down for a teeny 3.5 in driver like me. The critical part is near the center where the driver chamber leads to the channels, Adjust the spacing so that the gap is 1.5 inches. This gap x the depth of the channel (3 inches) x 2 channels should equal the driver piston area Sd - at least that is my reasoning based on reading MJK's theory of back loaded horns. This is essentially a back loaded horn with a prechamber. If you are handy with drawing this part goes fast, if not just take it square by square. Alternatively, if you have a means to print the Sebastian layout to full scale go for it and save yourself a lot of time.
Next, layout your template on your back panel and use a sharp pen to poke holes thru the template every few inches. Do one channel at a time. Then take a pencil and hand sketch the curve by connecting the dots (literally). The Sebastian design uses curves throughout all the way to the inside. I modified the design and use smooth curves on the outside 1/3 for good horn efficiency and plus it looks cool. I could have done curves all the way inside but chose to put sharp angles internallly on purpose so it low passes the frequencies and keeps the high frequencies from leaking out and messing up the spatial imaging of the main front of the driver. Do one chhannel at a time or you won't know which dots to connect when you lift the template. You can of course re-use the template for the second speaker. Once you have the design layed out on the panel, the next step is to glue the channels.
The channels are made by carefully cutting 3.0 inch wide strips lengthwise from your foam core stock. It is important that the channels be pretty close in width to one another (+ or minus 1.5 mm) so that the top board has a good seal when you cap it. The gluing starts from the outside towards the inside. Start by gluing only the straight section first with hot melt, hold it in place by hand until it sets. Then slowly glue 6 to 10 inch sections of the curved portion at a time so that you can hold it in place as it sets. I forgot to mention that you need to score the inside (concave) side of the chanbnels with an xacto every inch or so to allow it to bend easily. The tighter radii you need to score it every 0.5 inch. Just pierce the paper surface, no need to go deep with the scoring. Try it and you will the channels bend nicely. The next tip is to work in such a way that you have room for the glue gun to access the work piece as you go in. I did this by doing sections of each channel at a time and work my way in.
That should be enough info for you to get started.
Good luck!
Last edited:
Plan for Cornu spiral from Sebastian Pitkanen's site
Here is the jpeg image of the plan made by Sebastian Pitkanen that I used as the basis for my horn which is smaller (20 x 20 inch).
seb:diy:audio: Cornu Spiral Copy Horn
Thank you Sebastian Pitkanen - this was very helpful.
Here is the jpeg image of the plan made by Sebastian Pitkanen that I used as the basis for my horn which is smaller (20 x 20 inch).
seb:diy:audio: Cornu Spiral Copy Horn
Thank you Sebastian Pitkanen - this was very helpful.
Attachments
OK, I have had more time to listen to the mini Cornu spirals now. I replaced the ipod with my old Philips CD player and noticed an immediate improvement in the sound quality - the source matters, duh.... Again hooked up to my cheapy Lepai TA2020A+ amp with setting at 50% (circa 6 W into 8 ohm?)
I put in Harry Connick Jr's "Blue Light Red Light Someone's There" and it again, knocked me off my socks! It was like I was there live listening to the big band and he was singing there in front of me. The spatial imaging, depth, and attack of the brass was simply amazing. So it does well with jazzy vocals and big band... What else is this speaker good with?
Next up, was Sting's "Dessert Rose", and again, I could not believe the expansive sound stage, an almost haunting feeling. The track played superbly in a way I have never heard before or even realized that it could sound.
Ok, now for some rock. I put in Blues Traveler "Runaround" and it was good but did not blow me away like the previous ones. Could it be that the 3.5 inch Vifa doesn't have enough oomph for rock? I am giving it one more chance, "Hook" is up - and this track sounds much better. The speaker has it again: the nice sound stage, the great spatial imaging and presence. I still have to say that it is good but not like listening to jazzy big band stuff.
For a test of what a live recording in a unique setting with deep bass and haunting vocals I put in Cowboy Junkies "Sweet Jane", then "Blue Moon Revisited". I feel like I am sitting in the church with the band when they recorded it. The sound really is special and just has to be experienced. Another winner.
Now for some girl with guitar stuff... I put on Luciana Souza's "Doce de Coconut" from Brazilian Duos (Bossa Nova stuff). Wow! Amazing, again, blown away with the presence, the imaging, the detail and clarity, and overall feeling that this is one of the best things my ears has ever heard through a speaker.
Finally, on to some classical. I put in Mozart's "Le Nozze de Figaro - Canzonetto Sullaria". Again, this sounds good but I was not blown away. So maybe not the best choice for classical. I will have to try other classical pieces before saying that it is not the best for this genre.
In summary: I think this speaker excels at jazz, big band, girl with guitar stuff, popular music, it is less spectacular for rock or classical. Not bad though as I like the first 4 very much. I like rock and classical, but for those I can use my in ear balanced armature drivers, or my two-way speakers in conventional cabinet with hot burning class-A amp.
If you are still debating whether or not to try these - go for it, it sounds amazing! Another note for many of us who do the DIY route because we like value, I have to say that this project is a big winner. Parts cost: $24 for drivers, $20 for amp, $6 for foam boards, $50 total... If you have an amp already, only $30 for a pair of Cornu spiral horns.
Attachments
Last edited:
That info is invaluable. Thanks again. I know once I start it will go a little smoother but for now it's baby steps. I will hit the local reprographics store on my way home to see if I can find some large graph paper. I will bundle, tape and use the saw to cut the 3" strips. Message understood about the 1.5" opening to the 'channels'. That seems to remove the compression effect if it's the same size as the piston. Should there be zero compression?
That info is invaluable. Thanks again. I know once I start it will go a little smoother but for now it's baby steps. I will hit the local reprographics store on my way home to see if I can find some large graph paper. I will bundle, tape and use the saw to cut the 3" strips. Message understood about the 1.5" opening to the 'channels'. That seems to remove the compression effect if it's the same size as the piston. Should there be zero compression?
See page 6 of MJK's paper on back loaded horn theory. I do not know if there is no compression, but he suggests setting Sd=Sthroat for a consistent horn design. Good idea about bundling and taping. You are going to saw the boards?
http://www.quarter-wave.com/Horns/Back_Horn.pdf
Last edited:
- Home
- Loudspeakers
- Full Range
- Foam Core Board Speaker Enclosures?